About Destiny Child |
||
|---|---|---|
|
|
||
| Release Date Oct 27, 2016 |
||
|
|
Developer ShiftUp |
|
|
|
Publisher ShiftUp |
|
|
|
Country of Origin South Korea |
|
Destiny Child is one of the most polished gacha games / idle RPGs on the market right now, offering addicting daily gameplay, and a wealth of content coming out all the time! There’s too much going on – deep progression systems, varied battle modes & constant challenges. This Destiny Child guide aims to clear out any confusions for new players, and help veterans get more out of their account.
Without further ado, let’s dive into Destiny Child’s world, and explore all the mechanics which make it such an enjoyable gacha any time of the day – unless you’re in public. ?

Child Overview, Destiny Child Guide
Destiny Child doesn’t suffer from the localization issues 99% of Asian RPGs do, but they still use the term “childs” instead of “children”. Well it sounds cool, so no judgement!
So, childs are all the “heroes” that you can collect in the game, and there’s a ton of ways to upgrade them and make them stronger, which is of course the ultimate goal of every gacha game.
Childs use 5 different stats:
Classes are simply named “Types” in Destiny Child, and they are the defining factor of the role each child has during the battle, whether that’s supportive, offensive, defensive etc.
There are 5 different Types:
Since you can have 5 childs in each team, fighting at the same time, the most balanced team you can have, is with one of each Type. That’s a great starting point, since you’ll be able to identify for yourself in which situations each one thrives, or fails. So I definitely suggest to make your first team a balanced one!
Of course, there are many more lineups you can use, depending on the situation. For example, it’s obvious that when you are farming a stage, you want to have the most DPS output, while still surviving the fight. We’ll discuss lineups in depth towards the end of this guide.
Now let’s see a few more details about each Child Type. At first it might feel that 4 out of 5 types are “defensive”, but don’t you worry, your Debuffers & Supporters can dish out a ton of damage! ?
Stat Priority for Attackers: ATK > AGL > CRT > DEF > HP
Attackers are obviously your main source of damage, so especially when starting out, you want to carefully choose your main Attacker, and invest on upgrading her as much as possible – as soon as possible.
Focusing on ATK equipment is paramount, and then you probably want to get even more damage, instead of focusing on bumping your low survivability. AGL will help you use your attacks without missing, and it’s a weak base stat for most Attackers.
CRT doesn’t provide the best benefits, and many veterans have reported that the overall gains of AGL are far better than CRT for Attackers.
If you do want to provide some defensive stats to your Attacker, it’s better to choose DEF than HP, since it will let you mitigate a bit more damage, and escape from some otherwise deadly attacks.
Stat Priority for Supporters: AGL > DEF > HP > ATK > CRT
The Supporter’s main role is to enhance the rest of your team with powerful buffs. These are not dependent on any Stats to work, but AGL can help you use Skills more often.
It’s essential to secure your Supporter’s survivability, since if she dies your team will be less powerful, and more vulnerable. Therefore it’s wise to invest in DEF / HP the most.
CRT is pretty much useless, and if you’d choose a source of extra damage then it’s best to go for ATK.
Stat Priority for Debuffers: AGL > DEF > HP > ATK > CRT
Debuffers work like Supporters, but on the other end of the spectrum. They debuff your enemies, and restrain their movements.
Since most Debuffers are reliant on CC skills, AGL can make a big positive difference. Theirs skills however don’t scale off any Stats, so it’s best to secure their defenses, instead of investing in their raw DPS.
You will find Debuffers extra useful in World Bosses, where their debuffs can make a huge difference in your team’s damage output.
Stat Priority for Defenders: DEF > HP > ATK > AGL > CRT
Your defender is the guard of your team, so you want them to be able to absorb as much damage as possible.
Taunt and Barrier are not affected by Stats (just their Skill levels), so you only need to focus in DEF / HP equipment for Defenders.
Defenders that use Taunt will be much more vulnerable (and helpful to the rest of your team), so make sure they can survive the battles.
Stat Priority for Healers: CRT > ATK > AGL > HP > DEF
Healers are the only Child Type I’d advise you to always use in your teams. They can provide immense healing non-stop, so there’s nothing better for your survivability in any mode.
CRT is at last the protagonist here, since it affects your chance for critical heals that are powerful. ATK comes second, since it actually affects your healing amount (instead of damage), therefore a combo with CRT is deadly.
AGL is not useless, but HP and DEF pretty much are, since Healers already have strong base HP & DEF.
Similar to most gacha games, Destiny Child uses the old Pokémon-favorite system of Elements, called “Attributes” here.
There are 5 different Attributes:
That simply means for example that a Fire Child will do more damage to a Wood Child, than it would normally do on other Attributes.
It’s wise when starting out to mix all 5 elements in your team, since each one uses its own upgrade materials for evolving it to higher rarities, therefore you will be able to have a well-upgraded team much faster.
You will occasionally need to bring more X attribute in your team to overcome some difficult stages, but all in all it won’t matter too much in PvE. PvP is a whole other discussion though, which we’ll break down later on in the guide.
No gacha game can be called a gacha game, without fancy starts popping everywhere, showing you your most powerful heroes at a glance!
Unlike most similar games, Destiny Child uses the star system for Child Rarities as well, so instead of “SR & SSR heroes”, what you get is 3-star childs (most common), 4-star childs (a bit rare, and quite strong) and 5-star childs (the real deal).
You will also encounter 1-star & 2-star childs, but these are simply fodder to upgade your main childs’ levels, no need to worry about them.
The max rarity a Child can get is 6 stars, but there are no “native” 6-stars in the game. That means even 1-star childs can reach 6 stars, and the strongest native rarity is 5 stars (usually 3% drop rate from gacha pulls).
The easiest way to make your Childs stronger, is by leveling them up – the option named “Combine”.
This way, you can choose any other childs to use as fodder, and level up your main child. You can safely use any 1-star and 2-star childs for this reason, as well as the special EXP monsters you get from daily Event Dungeons that provide Level-up materials.
The max level of your childs is restricted on their star level (rarity):
Each Child has 5 different skills:
There is also a Fever Skill, which can be used when you fill its bar by using Drive Skills during battle. Then you have 15 seconds of Fever time, where you can tap a Child’s portrait as fast as possible, and dish out a ton of damage. Make sure to tap the Child that has the highest raw DPS output in your team.
In order to level up Skills, you need Onyx Crystals – a lot of them. You will get a ton of Onyx Crystals if you do your dailies, so no need to worry too much, just make sure you focus your Skill Upgrade efforts to your most important childs first.
How much you can level a Skill, is restricted by the Child’s Uncap Level (discussed below). There are 7 Ranks in total for each skill (Auto Attack, Main Skill & Slide Skill, you can’t level Drive Skill or Leader Buff), with 10 levels of power each.
Each Uncap level of your Child, will unlock the next Skill Rank:
Don’t forget that Uncap levels are affected by your Child’s Rarity level.
Destiny Child offers a unique Awakening system, where each Awakening level offers you not just Power, but also new voice lines and story lines for each separate Child!
There are 13 different Awakening Class Upgrades, the default Awakening Class is E. The cost for each upgrade is dependent on the Child’s Native Rarity, so native 5-star Childs are the most expensive to upgrade.
You need to reach some Level milestones in order to unlock B Class, and then S Class. These Classes, along with D Class, will also trigger a special storyline for the Child you are Awakening.
S Class unlocks the Accessory Equipment slot of your Child, as well as a new Skin, and if you Awaken it 100% by purchasing all Classes, you will unlock the Soul Carta Equipment slot.
| Class | Onyx Crystals Cost | ||
|---|---|---|---|
| 3-Star Child | 4-Star Child | 5-Star Child | |
| D | 1,000 | 3,000 | 4,000 |
| D+ | 2,000 | 4,000 | 8,000 |
| D++ | 2,000 | 4,000 | 8,000 |
| C | 2,000 | 4,000 | 8,000 |
| C+ | 2,400 | 4,800 | 9,600 |
| C++ | 2, 400 | 4,800 | 9,600 |
| B Requires: | 3 Stars Lv20 | 4 Stars Lv30 | 5 Stars Lv35 |
| B | 3,000 | 6,000 | 12,000 |
| B+ | 2,600 | 5,200 | 10,400 |
| B++ | 2,600 | 5,200 | 10,400 |
| A | 4,000 | 8,000 | 16,000 |
| A+ | 3,000 | 6,000 | 12,000 |
| A++ | 3,000 | 6,000 | 12,000 |
| S Requires: | 3 Stars Lv30 | 4 Stars Lv40 | 5 Stars Lv50 |
| S | 6,000 | 16,000 | 32,000 |
| Total Onyx Required | 36,000 | 77,000 | 152,000 |
Don’t forget to Claim your Awakening Rewards after reaching 50% and 100% of Progress, each milestone will award you with:
Evolving your childs, will let you raise their star level / rarity, therefore making them more powerful!
In order to evolve a Child, you will need special evolution materials – which you can gather daily on the Event Dungeons – that match your child’s attribute, for example you need Fire Evolution Materials in order to evolve a Fire Child.
These are the materials you need for each evolution level:
If you are missing Evolution materials, you can buy some from Rumble Shop, farm them in story stages or use lower Evo. mats to turn them into higher Evo. mats.
This is the cost of upgrading evolution materials:
Uncapping is what you do with all the duplicate childs you get!
You are limited to how many times you can uncap, based on your evolution level:
Uncapping gives you a great boost in all stats, so especially when starting out you can have 3 & 4-Star Childs that can get way stronger than the 5-Star ones.
It’s definitely recommended to try and get a full +6 team as soon as possible.

Child Equipment & Soul Carta Overview, Destiny Child Guide
Your childs use equipment to get stronger, and there are 4 different slots they can use:
When starting out, it’s hard to unlock Accessories & Soul Cartas, but don’t worry as you’ll get there fast enough.
Weapons, Armor & Accessories always provide two different stats, the one higher than the other one. They can also be upgraded up to +15, boosting the stat gain with each level. All you have to do to enhance them, is simply consume other items of the same type (for example you can only enhance a weapon with other weapons etc.).
You can find ATK / HP combos, HP / DEF, ATK / CRT or anything else. Therefore, it’s crucial to pick the right stat boost for each Child through equipment:
Keep in mind that low tier items don’t have two stats, so only upgrade what is absolutely necessary for you to progress.
Soul Cartas also offer two stats (which are way higher than the other equipment items), and an extra special buff, which most of the times only applies to a certain Child Type / Attribute, or even a combo of them (so for example a Soul Carta might only apply its buff to a Wood Attacker).
Soul Carta enhancing is also more complex, as you can Enhance, and Soul Enhance it. Enhancing works similar to other equipment, you consume equipment items in order to level it up, up to +50 this time!
Soul Enhancing works like Child Uncapping, where you can use the same Soul Carta to get a +1 Soul Enhance (or several different Soul Carta, for much less Soul Enhance XP), up to +5.
Upgrading your Soul Carta will seem very expensive at first, so you’re advised to do it only after you’ve upgraded the rest of your team’s equipment.
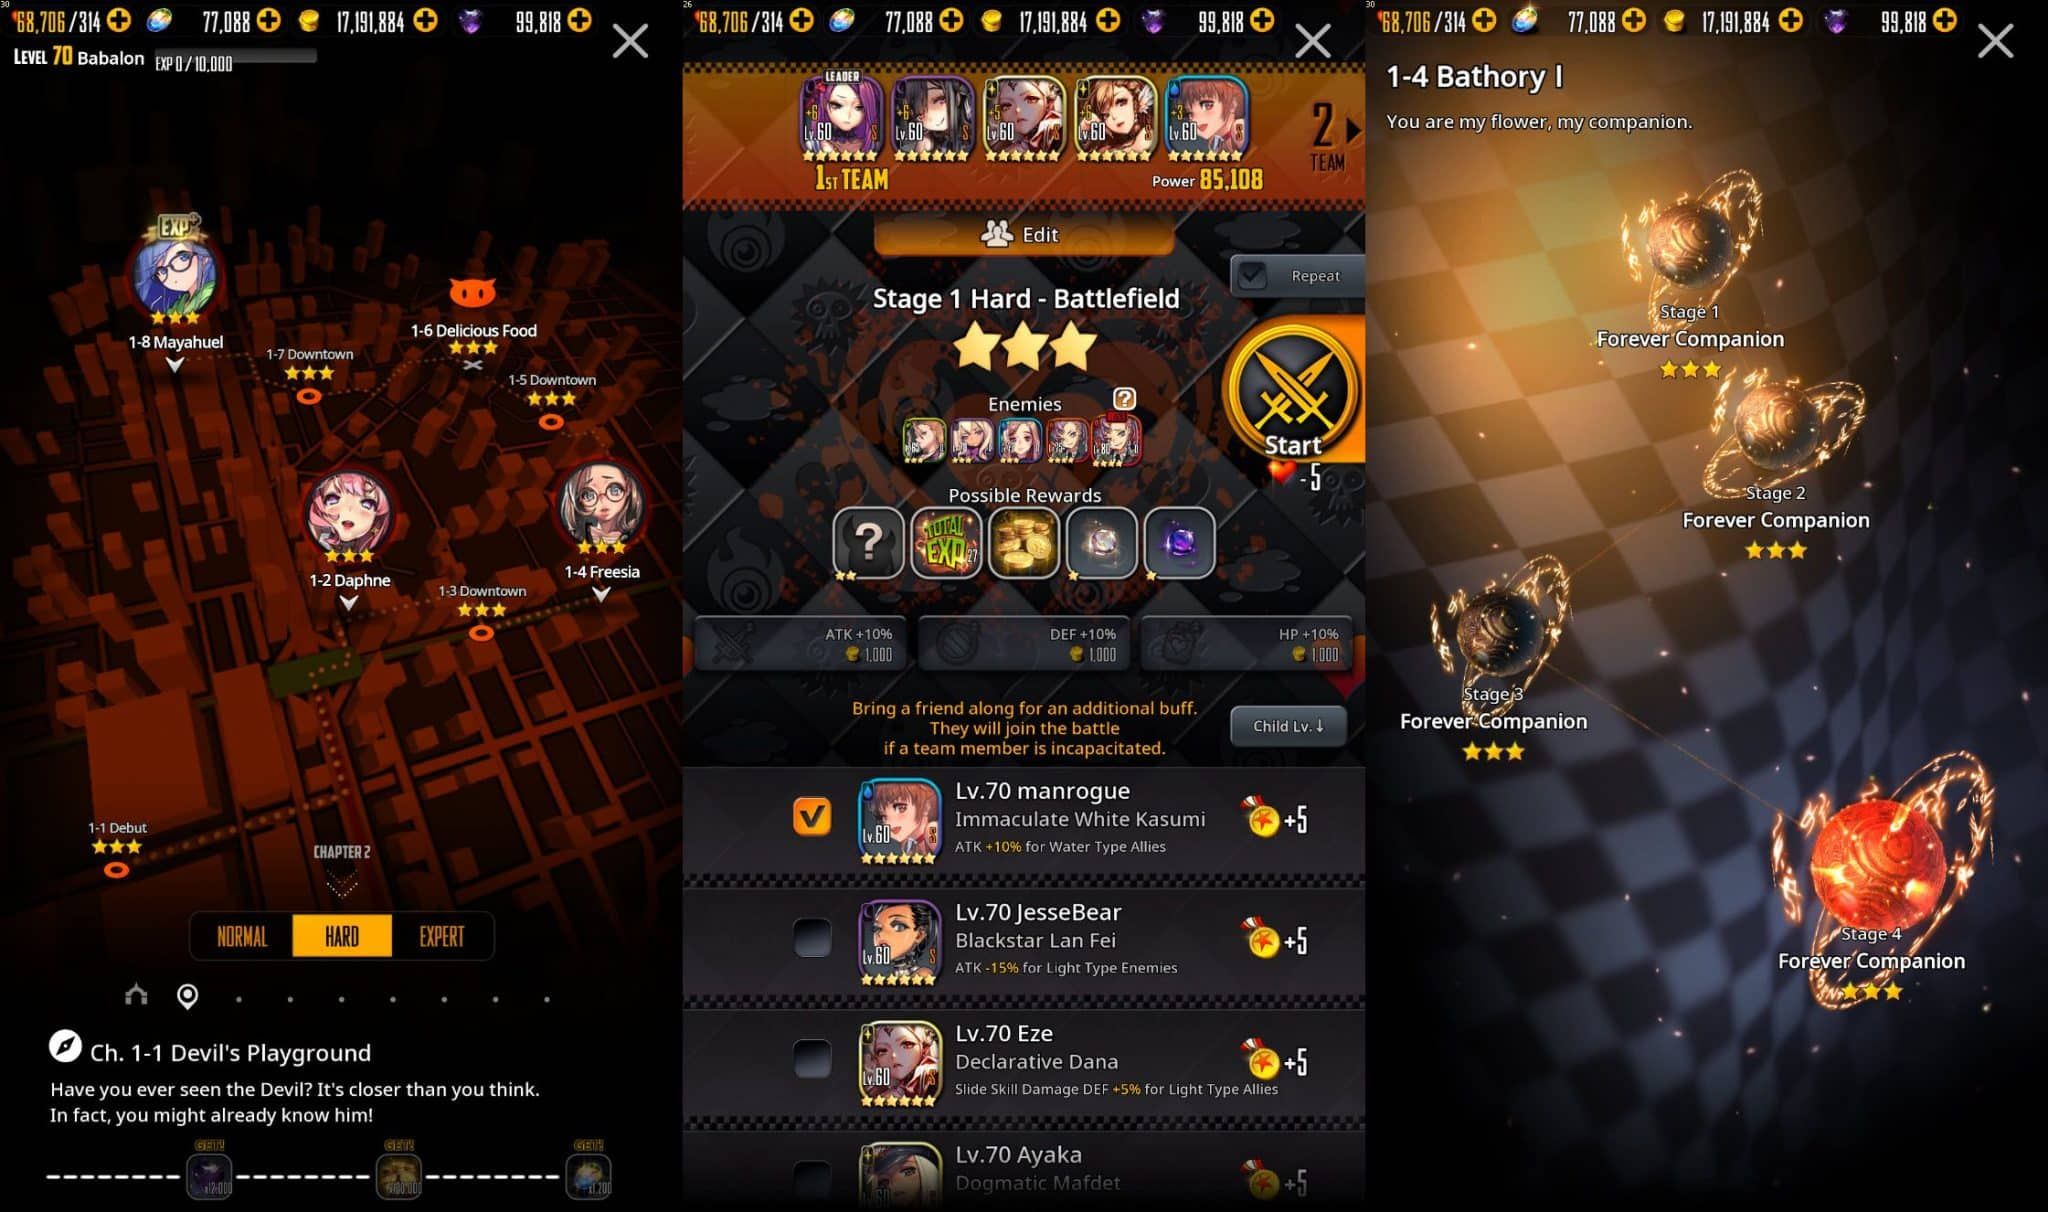
Story Mode, Destiny Child Guide
Hands-on the best story mode I’ve experienced in a gacha game, the story is actually meaningful, fun and engaging. SJWs beware – it won’t be your cup of tea – there’s too much “black” humor!
The Story map is divided in 3 difficulties, Normal, Hard and Expert (coming soon), and 2 Chapters (Chapter 2 is now being worked on). Each chapter has many sub-chapters, each sub-chapter many Stages, and each Stage many sub-stages.
Each sub-stage contains its own XP rewards and loot, so it’s worth checking out which ones are worth grinding for your Child upgrading needs. It’s also worth trying to get 3 stars in each sub-stage, as you will get some very strong rewards from getting all stars in a sub-Chapter!
You will rush through some parts of the story very fast, while others might take you even weeks to overcome. So definitely check out some guides for the hardest stages, as a simple change in strategy might help you overcome them that much faster.
Not many more tips to give you about Destiny Child’s story mode, simply enjoy it, the English localization is perfect, and all the stories are greatly written and animated!
Night World Battle Modes, Destiny Child Guide
The Night World is the place all battle modes in Destiny Child take place – and they always stay the same. That’s quite helpful, cause you don’t have to search for any events or new content in the Night World, these will show up in the home screen.
The Night World includes:
Let’s discover more info about the most important modes:

Event Dungeon Overview & Battle Screen, Destiny Child Guide
The available event dungeons change every day, and they provide you with essential level-up material monsters, evolution monsters, as well as a good amount of daily gold! You can clear each one up to 3 times per day.
The weekends are generous, with all the dungeons being available, so make sure you run all of them, for a big amount of resources!
You will be able to clear the highest level of difficulty pretty early, so try to get there as soon as possible.
| Dungeon | Monday | Tuesday | Wednesday | Thursday | Friday | Saturday | Sunday |
|---|---|---|---|---|---|---|---|
| Fire XP | |||||||
| Wood XP | |||||||
| Water XP | |||||||
| Dark XP | |||||||
| Light XP | |||||||
| Gold Dungeon | |||||||
| Fire Evolution | |||||||
| Wood Evolution | |||||||
| Water Evolution | |||||||
| Dark Evolution | |||||||
| Light Evolution |
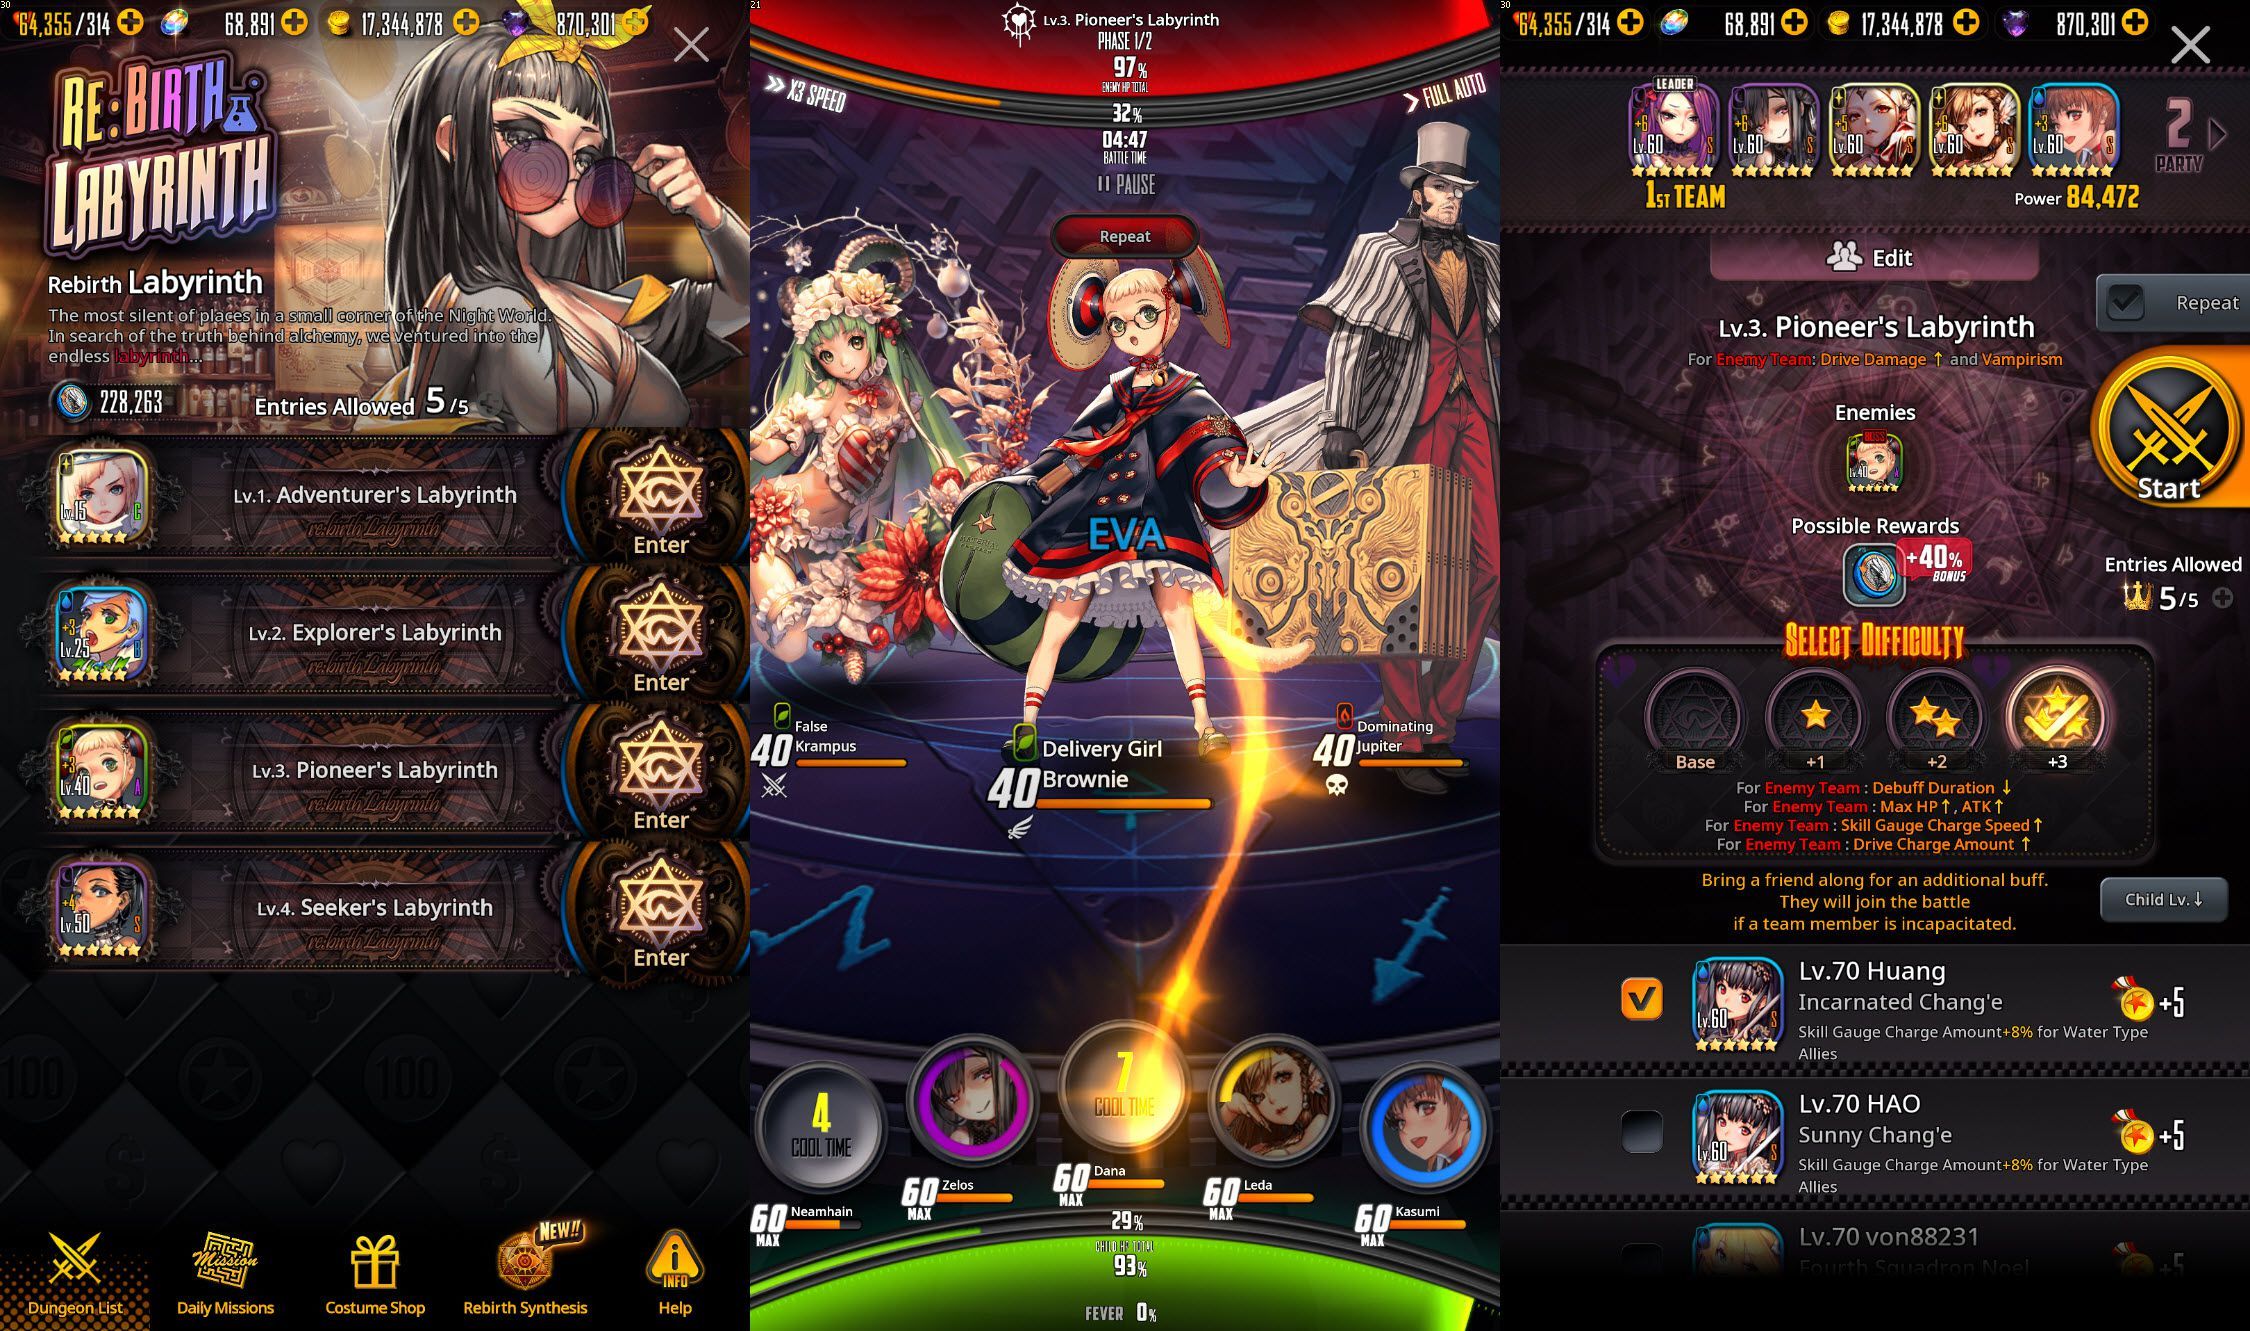
Rebirth Labyrinth Overview & Battle Screen, Destiny Child Guide
Rebirth Labyrinth is probably the hardest battle mode in Destiny Child – at least the one I still haven’t managed to clear the hardest stage of, with hundreds of hours in the game.
There are 4 different main difficulties, and each one contains 4 different sub difficulties. The sub difficulties give huge buffs to your enemies, making it harder and harder to get a win!
More specifically, the enemies get the following buffs based on the Labyrinth’s level:
And the following buffs based on the Level’s difficulty:
Based on the difficulty you clear, you will get awarded Rebirth Coins, which you can use inside “Rebirth Synthesis”, a roulette that awards you with many items, as well as exclusive skins for your Childs!
You are allowed 5 entries each day (win or lose) and the ability to recharge your entries for 500 crystals (really not worth it), and each stage awards you the following Rebirth Coins:
Last but not least, there are some daily quests you can complete in Rebirth Labyrinth for extra rewards. Check them out below:
Total Rewards: 1,000 Rebirth Coins & 150 Stamina
For some unknown reason, there is also a Costume Shop inside Rebirth Labyrinth, but you can only use Blood Gems for purchases.

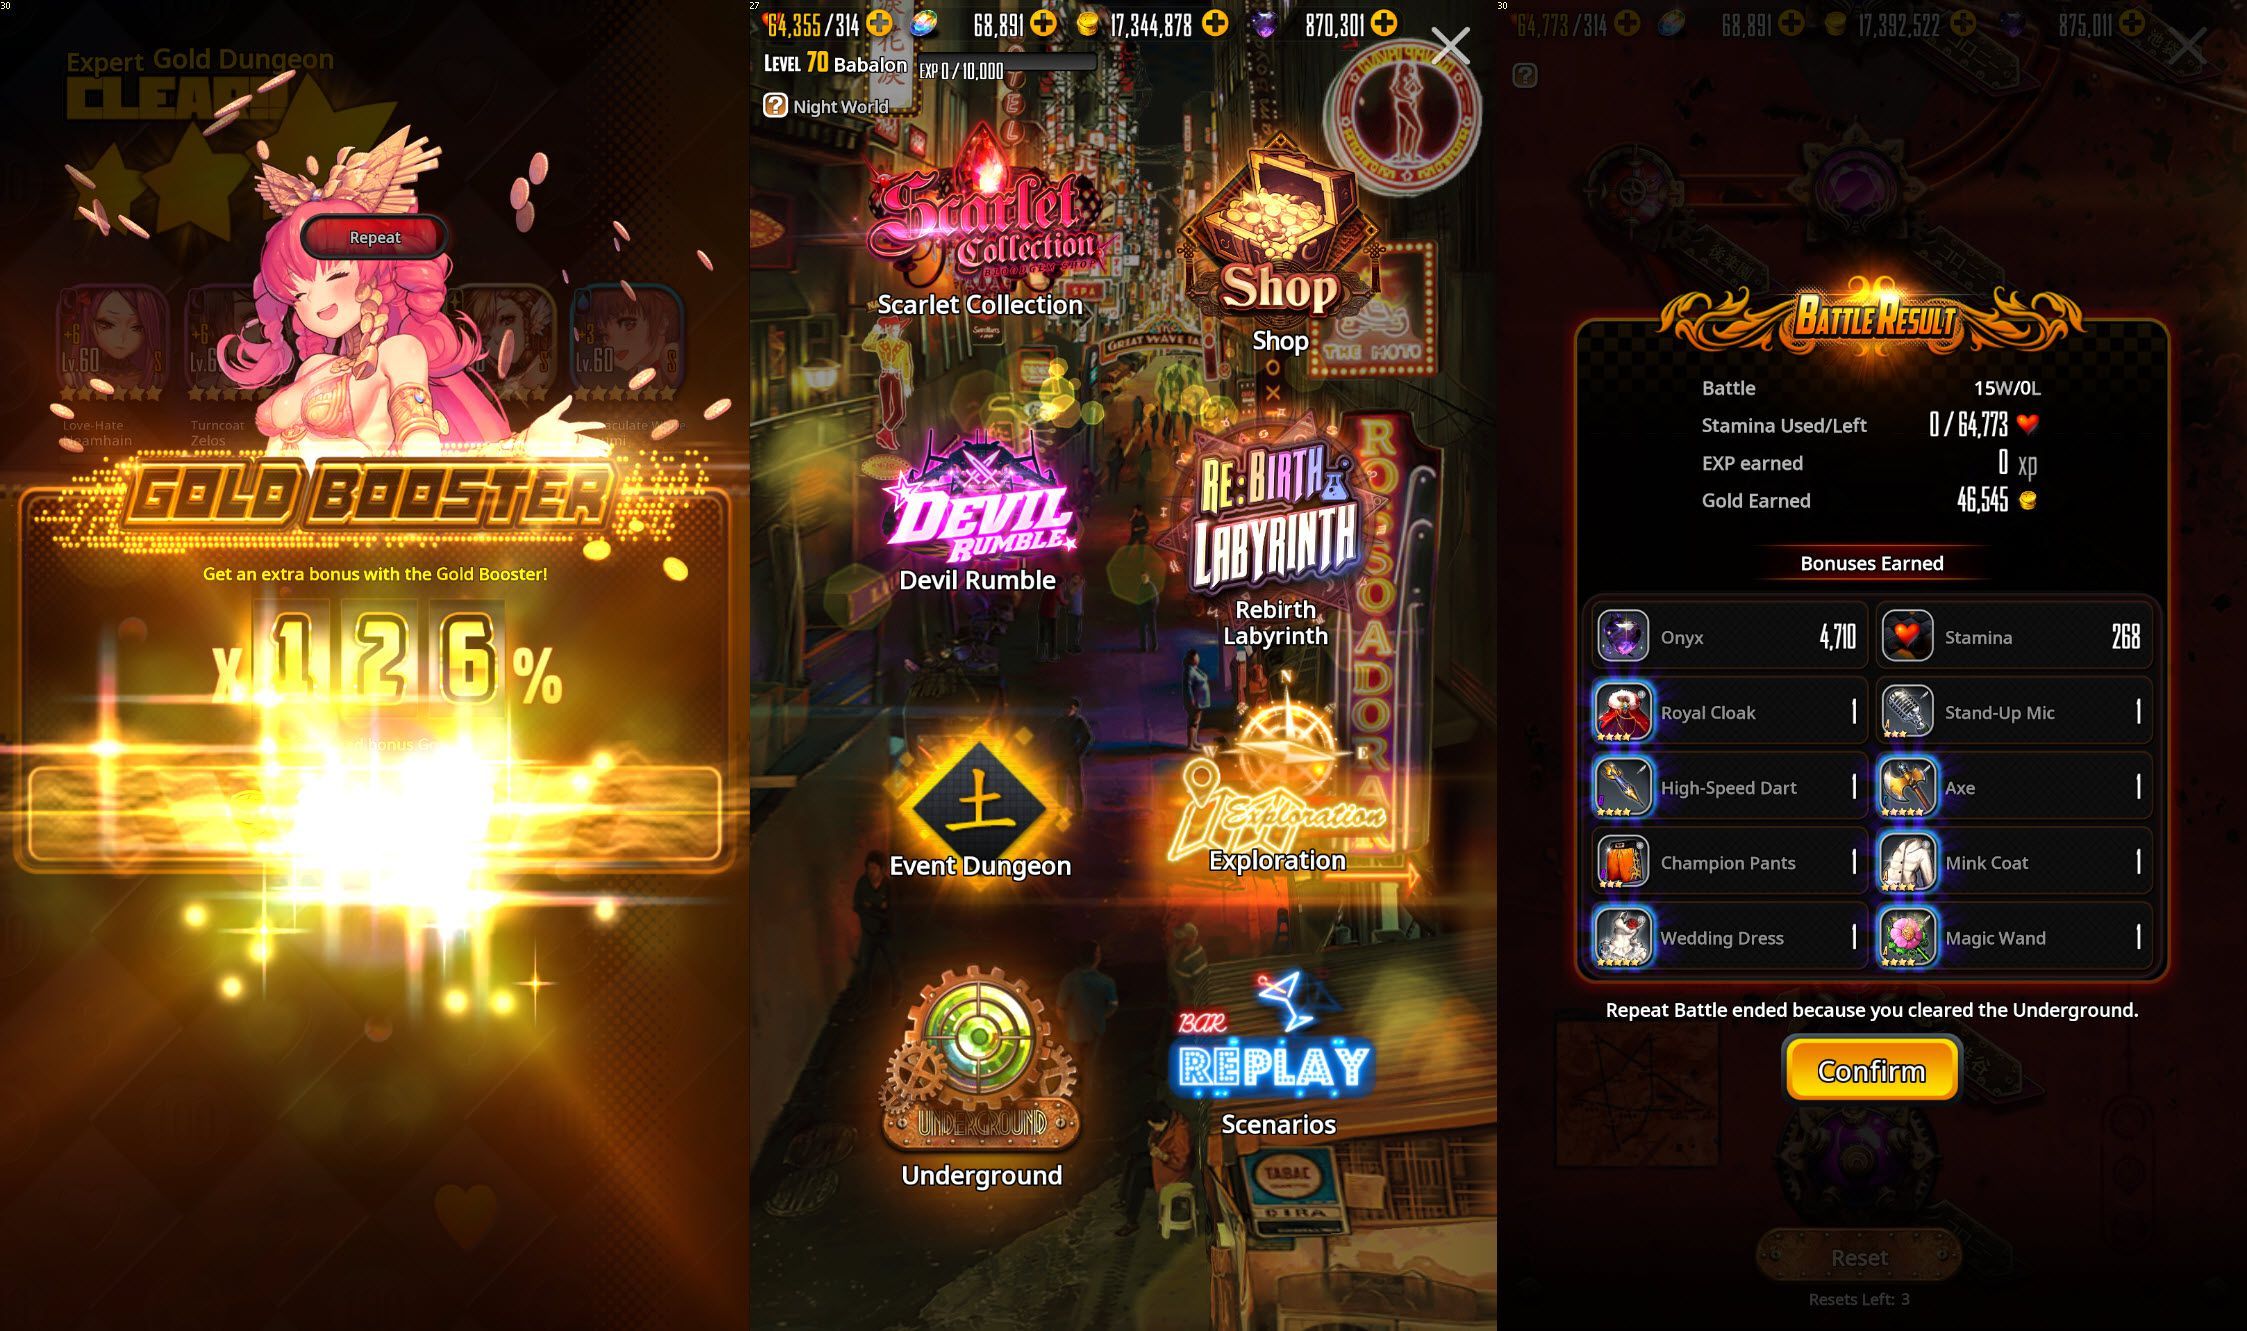
Underground Overview & Team Lineup, Destiny Child Guide
The underground is an “all-in” daily tower / survival mode, where you go through 20 stages of your chosen difficulty, and your Childs don’t regenerate through them, so you have to make sure you can survive the last stage, with all Childs at your disposal.
It’s quite hard to get too far as a new player, but you should aim to clear the Hard Underground every day as soon as possible. It will be a piece of cake soon enough, and the amount of Gold you can make daily is far from negligible.
A wise tactic you can follow at first, is to clear the early stages with your worst possible Childs. This way your strong ones will stay intact for the harder stages, giving you way more chances of clearing the Underground earlier.
Make sure to visit your “Items” after each Underground run, to auto-sell any Souvenirs for a nice Gold reward, as well as enhance any Equipment or Soul Cartas you need, in order to keep your inventory de-cluttered.

Devil Rumble PvP Overview, Destiny Child Guide
Devil Rumble is (sadly) the only PvP mode in Destiny Child, but at least it’s quite rewarding and fast-paced! Each season lasts for XX days, with your final rank / league determining your rewards
You can hold up to 5 Entry Tickets at one time, and once you’ve used one, you need 30 minutes to regenerate the next one. Therefore, it’s wise to get into PvP as soon as you open the game each day, so that you can replenish most of your entry tickets by the time you finish with the rest of your dailies.
There are also daily quests you can do in Devil Rumble, and the rewards are quite worth it:
Total Rewards: 6,000 Onyx Crystals, 58,000 Gold & 2,100 Rumble Coins
PvP wins and daily missions, will also award you with Rumble Coins, which you can use on Rumble Shop to buy a lot of extremely useful high-level evolution materials – for a hefty cost of course – but do not worry, if you PvP everyday, you’ll have a lot of them soon enough, for just when you need them!
Keep in mind that getting win streaks will award you with more and more extra Rumble Coins and Ranking Points, so make sure you choose your opponents wisely.
It’s not easy to clear through all the dailies, unless you login at various times of the day. It’s definitely not worth it paying 100 crystals to refresh your tickets, unless there is a special Devil Rumble event which gives you rewards for doing so, or you want to climb the ladder as soon as possible.
The Rumble Shop items refresh every few hours, or you can spend 50 crystals to refresh them yourself. It’s definitely worth buying all the extra slots as soon as you can afford it, since you’ll have more chances to find the items you need each time.
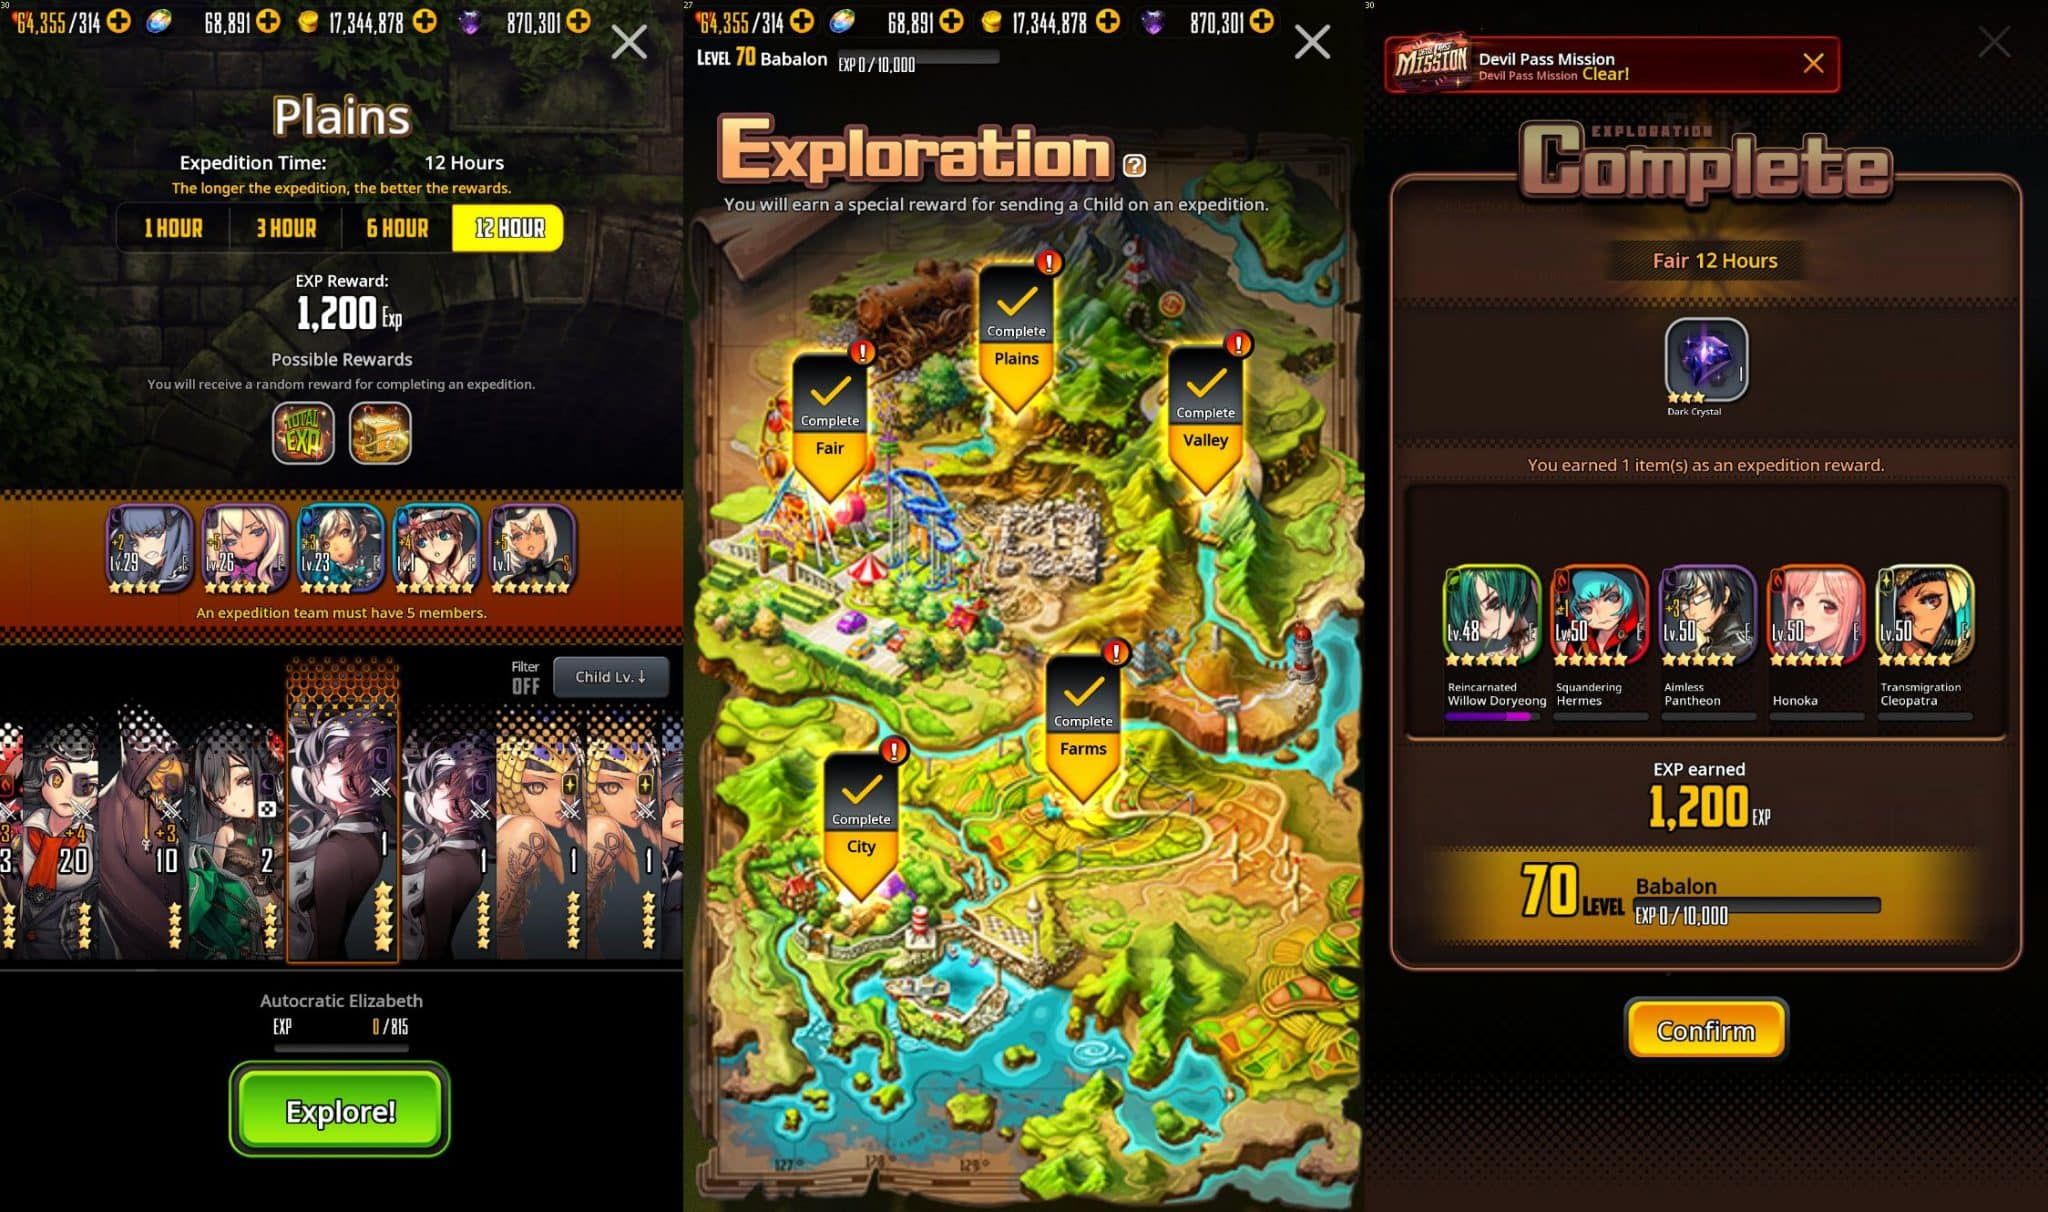
Exploration Missions, Destiny Child Guide
A classic mode found in most hero collector games, Exploration will let you form up to 5 teams of 5 childs each, which you can dispatch on AFK missions, and they come back earning a lot of XP and a few materials.
It’s a good way to level up a lot of childs quickly, as well as a small passive income of evolution materials.
There are 4 different choices for how long your Child will be away:
The 1-hour option gives far more XP / hour, but it’s not the easiest one to maintain obviously. You could get 1,800 XP in 12 hours, compared to 1,200 XP with the 12-hour option.
Ragna Break is the Raid mode of Destiny Child, and unfortunately it’s not active all the time. It lasts 2 weeks, and comes up once a month.
A different Raid Boss appears each time, and you have the chance to acquire this special Child in many different ways, by grinding the Ragna Break raids!
You can discover and Summon Raid Bosses by grinding through Story stages, and you are also given 5 free Raid Summon tickets each day – make sure to use them! Once the season starts, the first Boss that will appear will be Level 1, and with every win you get, it will level up to Level 40.
You can have up to 10 Raid tickets maximum, and when using them 1 regenerates every 30 minutes. You are also given 10 Ragna Boosters daily, which you can use before Raid Boss fights, in order to upgrade your loot and Ragna Coins by a big margin. I suggest you burn all 10 Ragna Boosters through your day, and try to use them in higher-level Bosses that give you more rewards.
Your friend list also becomes helpful during Ragna Break, since you can call for your friend’s support, and your boss will show up on their list, so that they can come over to help you defeat it. Each boss has a 2 hour timer since it shows up, till you can’t any longer fight it.
Once you reach a Level 40 Ragna Boss, you will also unlock the Slayer Rank, where you can participate in killing more Level 40 bosses for greater rewards & rank rewards. Keep in mind that similarly, you can call for Slayers’ support in your own Level 40 bosses.
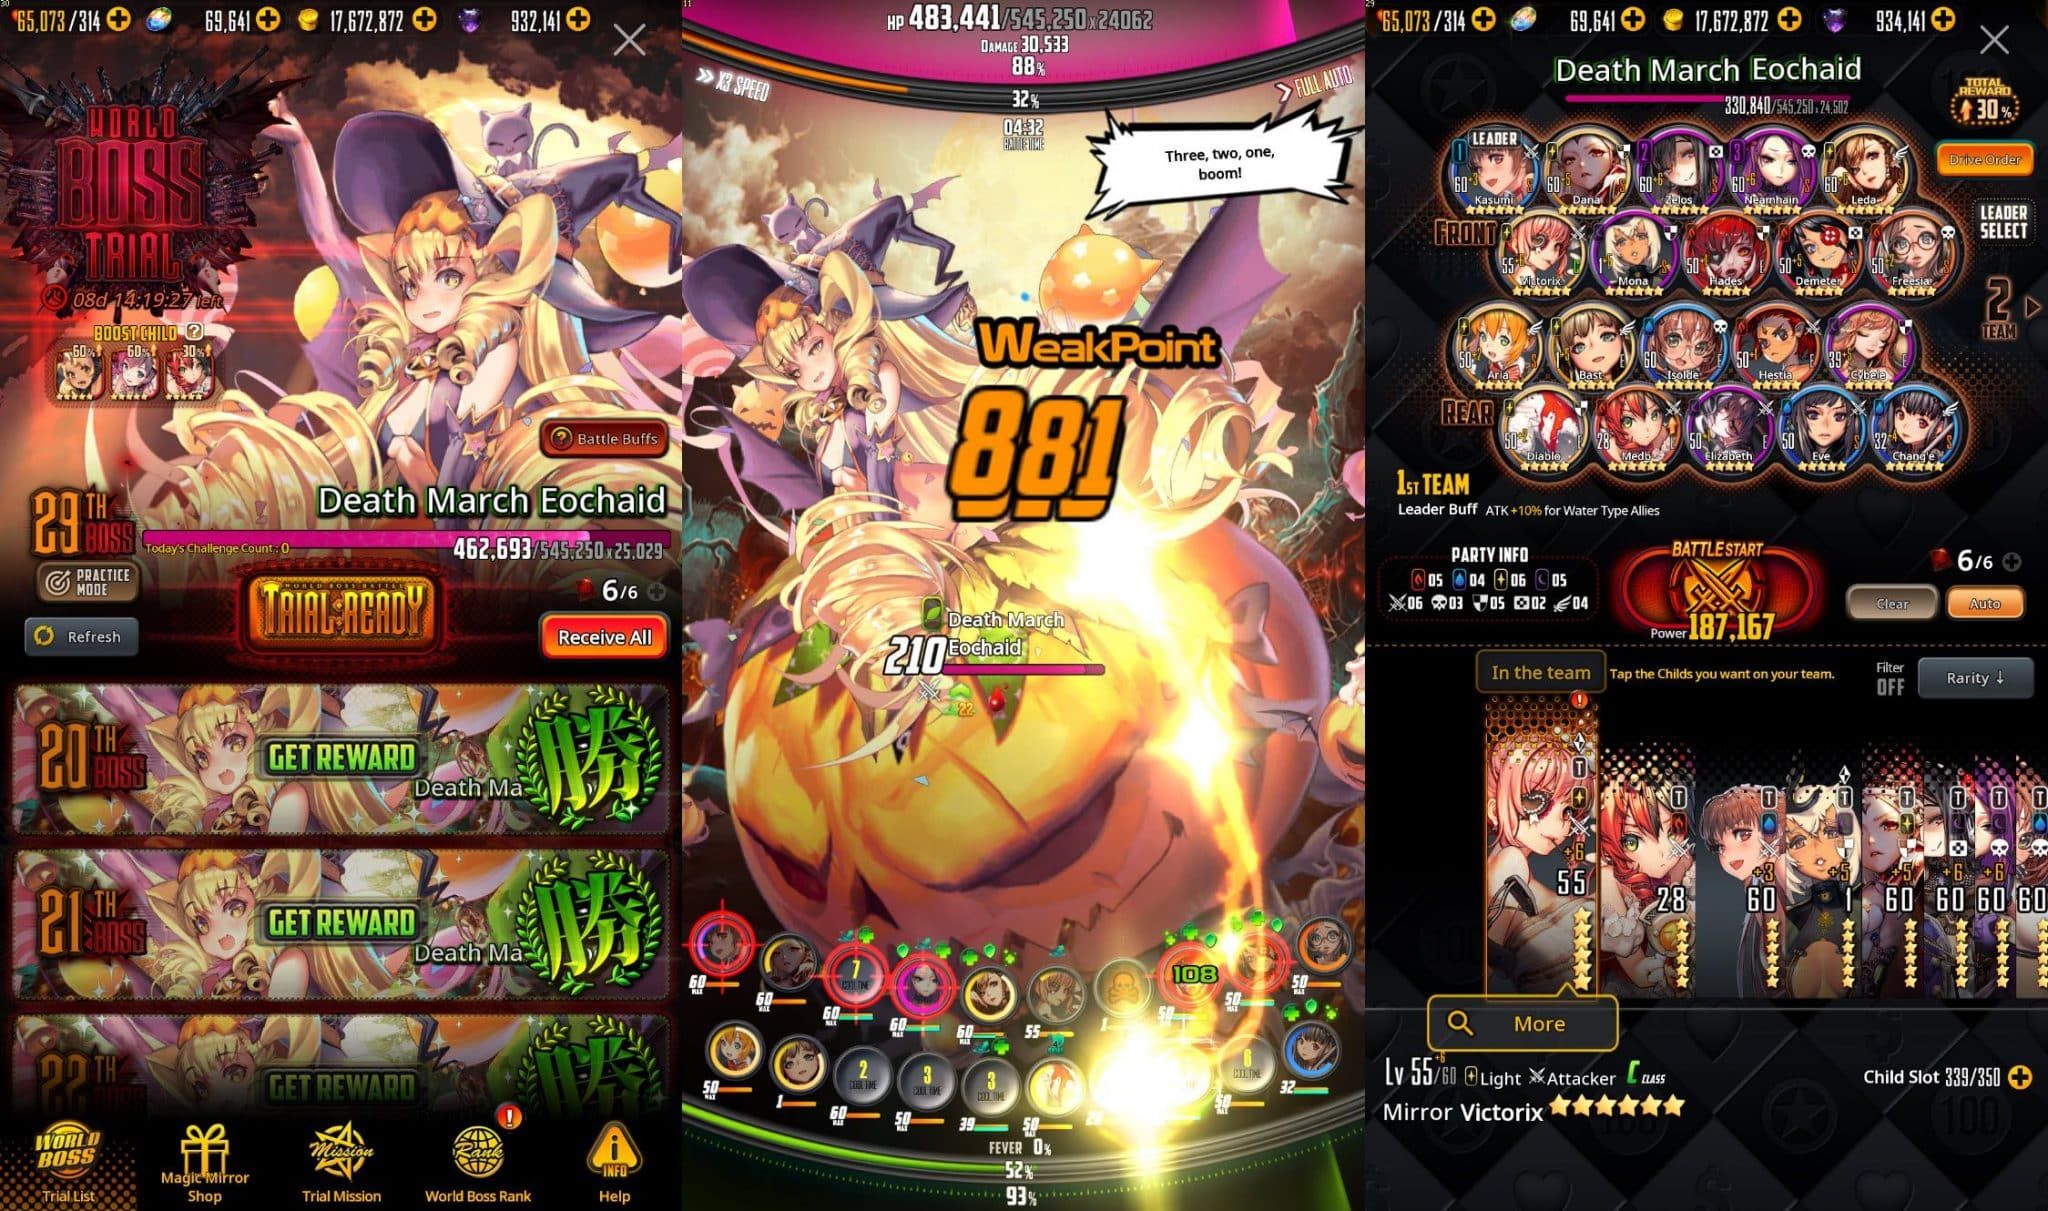
World Boss Trial Overview & Battle Screen, Destiny Child Guide
Similar to Ragna Break, World Bosses are not active all the time, but they rotate between game patches, and last for 2 weeks. One special child will be the World Boss, and you will have many chances to make it your own too!
What’s even cooler, is that World Bosses will let you use an immense amount of Childs per battle, making all these extra waifus handy, and giving purpose to leveling multiple characters. You can use 4 teams of 5 at the same time, 2 of them in the front lines, and 2 of them in the back lines.
You can have up to 6 entry tickets at a time, and you will replenish 1 every 2 hours. You can use 200 crystals to purchase 6 extra tickets, up to a maximum of 20 times.
World Bosses also award you with Magic Mirror Coins, which you can use to obtain a handful of amazing rewards, like 5-star summon tickets for Childs and Soul Carta, as well as limited 5-star childs.
Rumble Shop, Re:Birth Synthesis & Costume Shop, Destiny Child Guide
There are many different shops in the game, as with all gacha games, so knowing what each one can get you is crucial in your gameplay, so that you learn better which resources are important, and which you can spend freely.
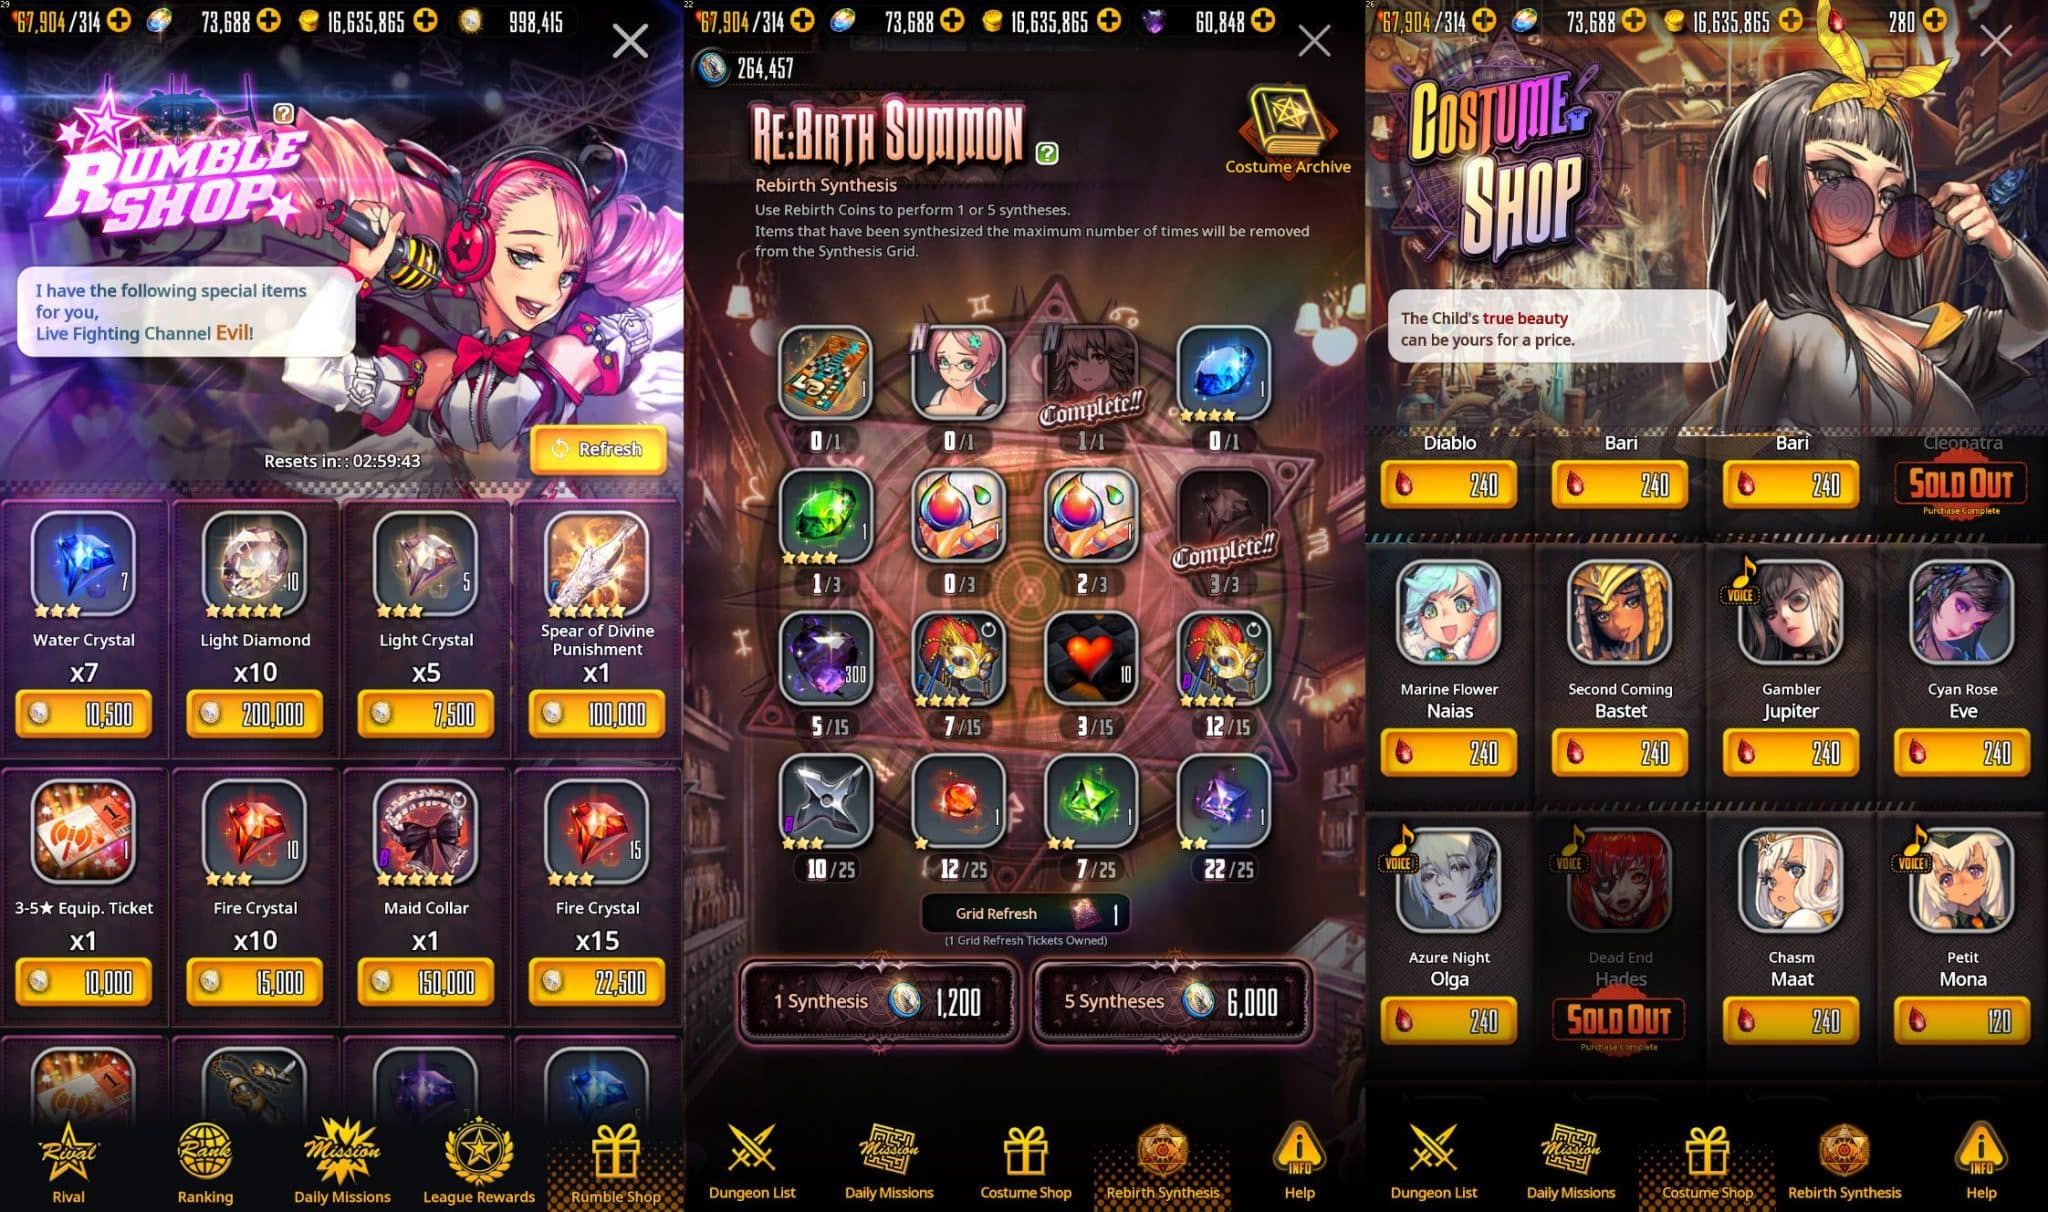
This is the PvP shop, where you will find mainly evolution materials on rotation, along with some equipment items. Grinding Rumble Coins is quite easy, refer to the Devil Rumble section of this guide for more.
It’s worth noting that Evolution materials are hard to come by, so if you have trouble upgrading a Child, the Rumble Shop is the first place you should look.
It’s also even wiser to know your needs ahead, and casually check the shop daily so that you can snatch the most important materials you need asap.
Some price references to help you:
While not a shop per se, this is where you will use your Rebirth Coins. There are many items in rotation for each Synthesis, and you get them with a roulette-type mechanic.
The top row will always have amazing items, from 5-star summon tickets, to exclusive Child skins!
You can refresh the grid for 1,900 Crystals if you’ve gotten your important rewards and don’t need to spend your Rebirth Coins on the rest. It really depends on your situation if you want to do this, if your team has still low uncaps, it’s better to invest your crystals in Gacha Pulls.
Destiny Child’s super premium currency is called Blood Gems, and even though they are expensive AF to buy with real money, the game will also award you a steady amount of them (1 daily for completing dailies, a few from Devil Pass, and quite a few from special events).
You can spend these in the Costume Shop, in order to buy exclusive and awesome Child Skins, though the price is very steep.
If you are not the aesthetic type (then I don’t know why you’re playing Destiny Child after all), you can instead get more useful things with your Blood Gems, like 5-Star Childs / Soul Cartas from the “Summon” tab.
Scarlet Collection is another place where you can spend your Blood Gems, and get some quite expensive, and not so useful items.
You will usually find Equipment Refining Orbs, Enhancement & Evolution Material Childs, Summon Tickets etc.
I’ve never found a use for it, but I guess heavy P2W players will have a different opinion.
This is the normal P2W shop of the game. You can spend your hard earned money, for some ridiculously expensive packages, that will give you very little compared to playing the game normally.
Destiny Child is very generous to F2P players, but I really don’t understand why all paid items are SO expensive. I mean I’d spend a few dollars for something nice, but instead they are asking for a month’s rent, just to get basic stuff.
The only “fair” priced packages are Monthly Package I & II, which can award you with some daily Crystals & Stamina for 5 / 10 euros per month. You can get the same amount of crystals in a week by doing your dailies, so you be the judge of that!
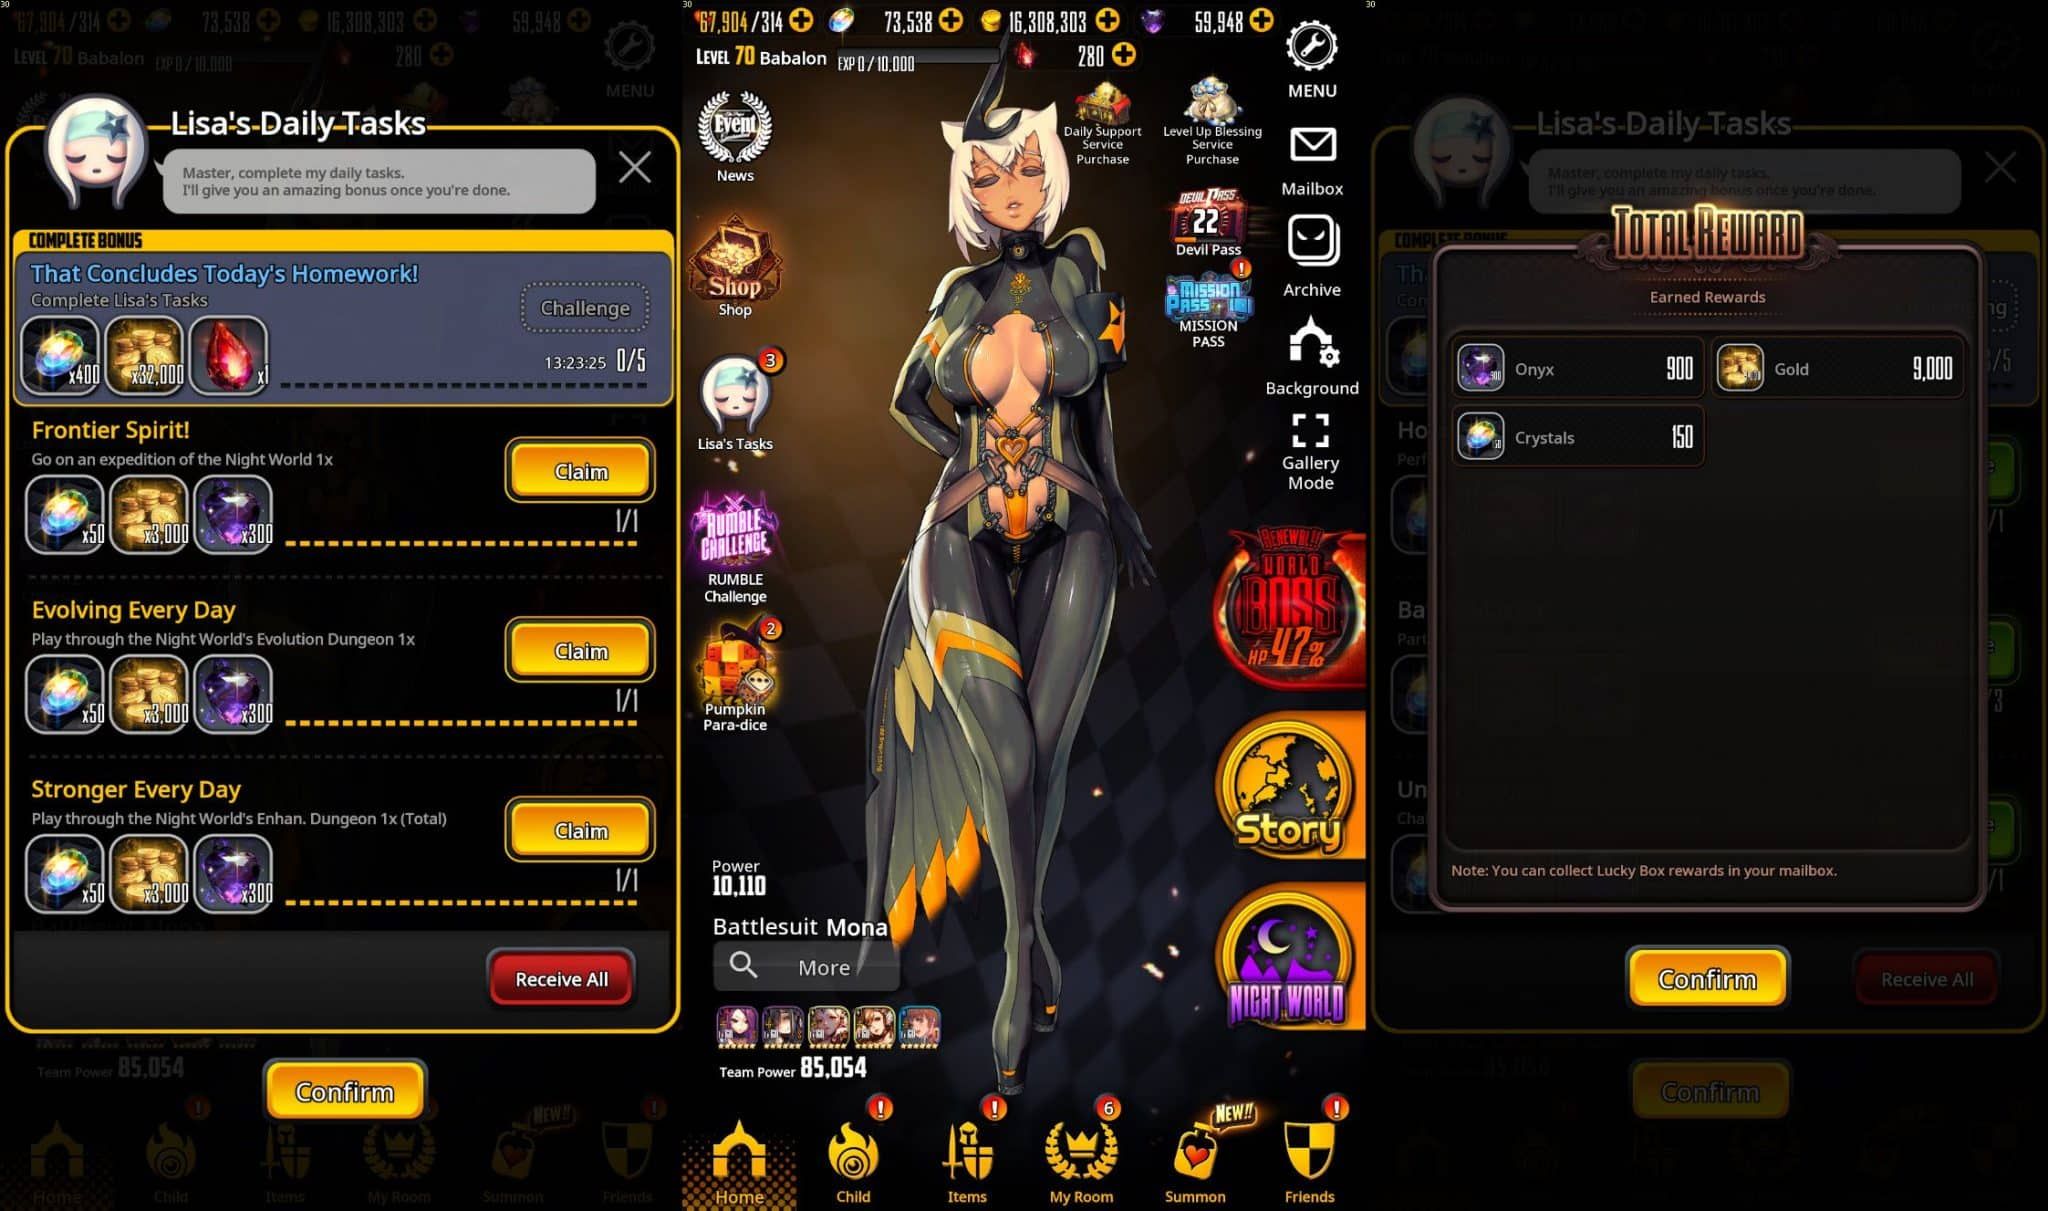
Lisa’s Daily Tasks Overview, Destiny Child Guide
Daily quests are the main source of Crystals, therefore your main source of gacha pulls! There are 10 different dailies, and you only need to complete 5 of them in order to claim your daily reward, which is the most important.
However, it is advised that you clear all of the dailies as they go by real fast, with the exception of clearing 10 story stages, which is more time consuming – unless you clear a very low level stage, that really beats the purpose though.
These are the 10 Lisa’s Tasks you can do each day, and their rewards:
Total Rewards: 950 Crystals, 65,000 Gold, 3,300 Onyx Crystals & 1 Blood Gem
This is the optimal route I suggest you follow daily, for getting maximum resources in the least time:
Starting out your day with a single World Boss / Ragna Break fight will let you start regenerating tickets asap, while continuing with Devil Rumble servers the same purpose, you’ll have more tickets by the time you finish with the rest of your tasks.
It doesn’t really matter what order you follow from there, but I’ve found the suggested one to be the most convenient.
If Ragna Break is active, and you have a lot of time to burn, I suggest you grind story stages non-stop, so that you can summon more Ragna bosses, and only use your Raid Summon tickets when you’re done for the day. This way you can get to the higher levels faster, and enjoy greater rewards.
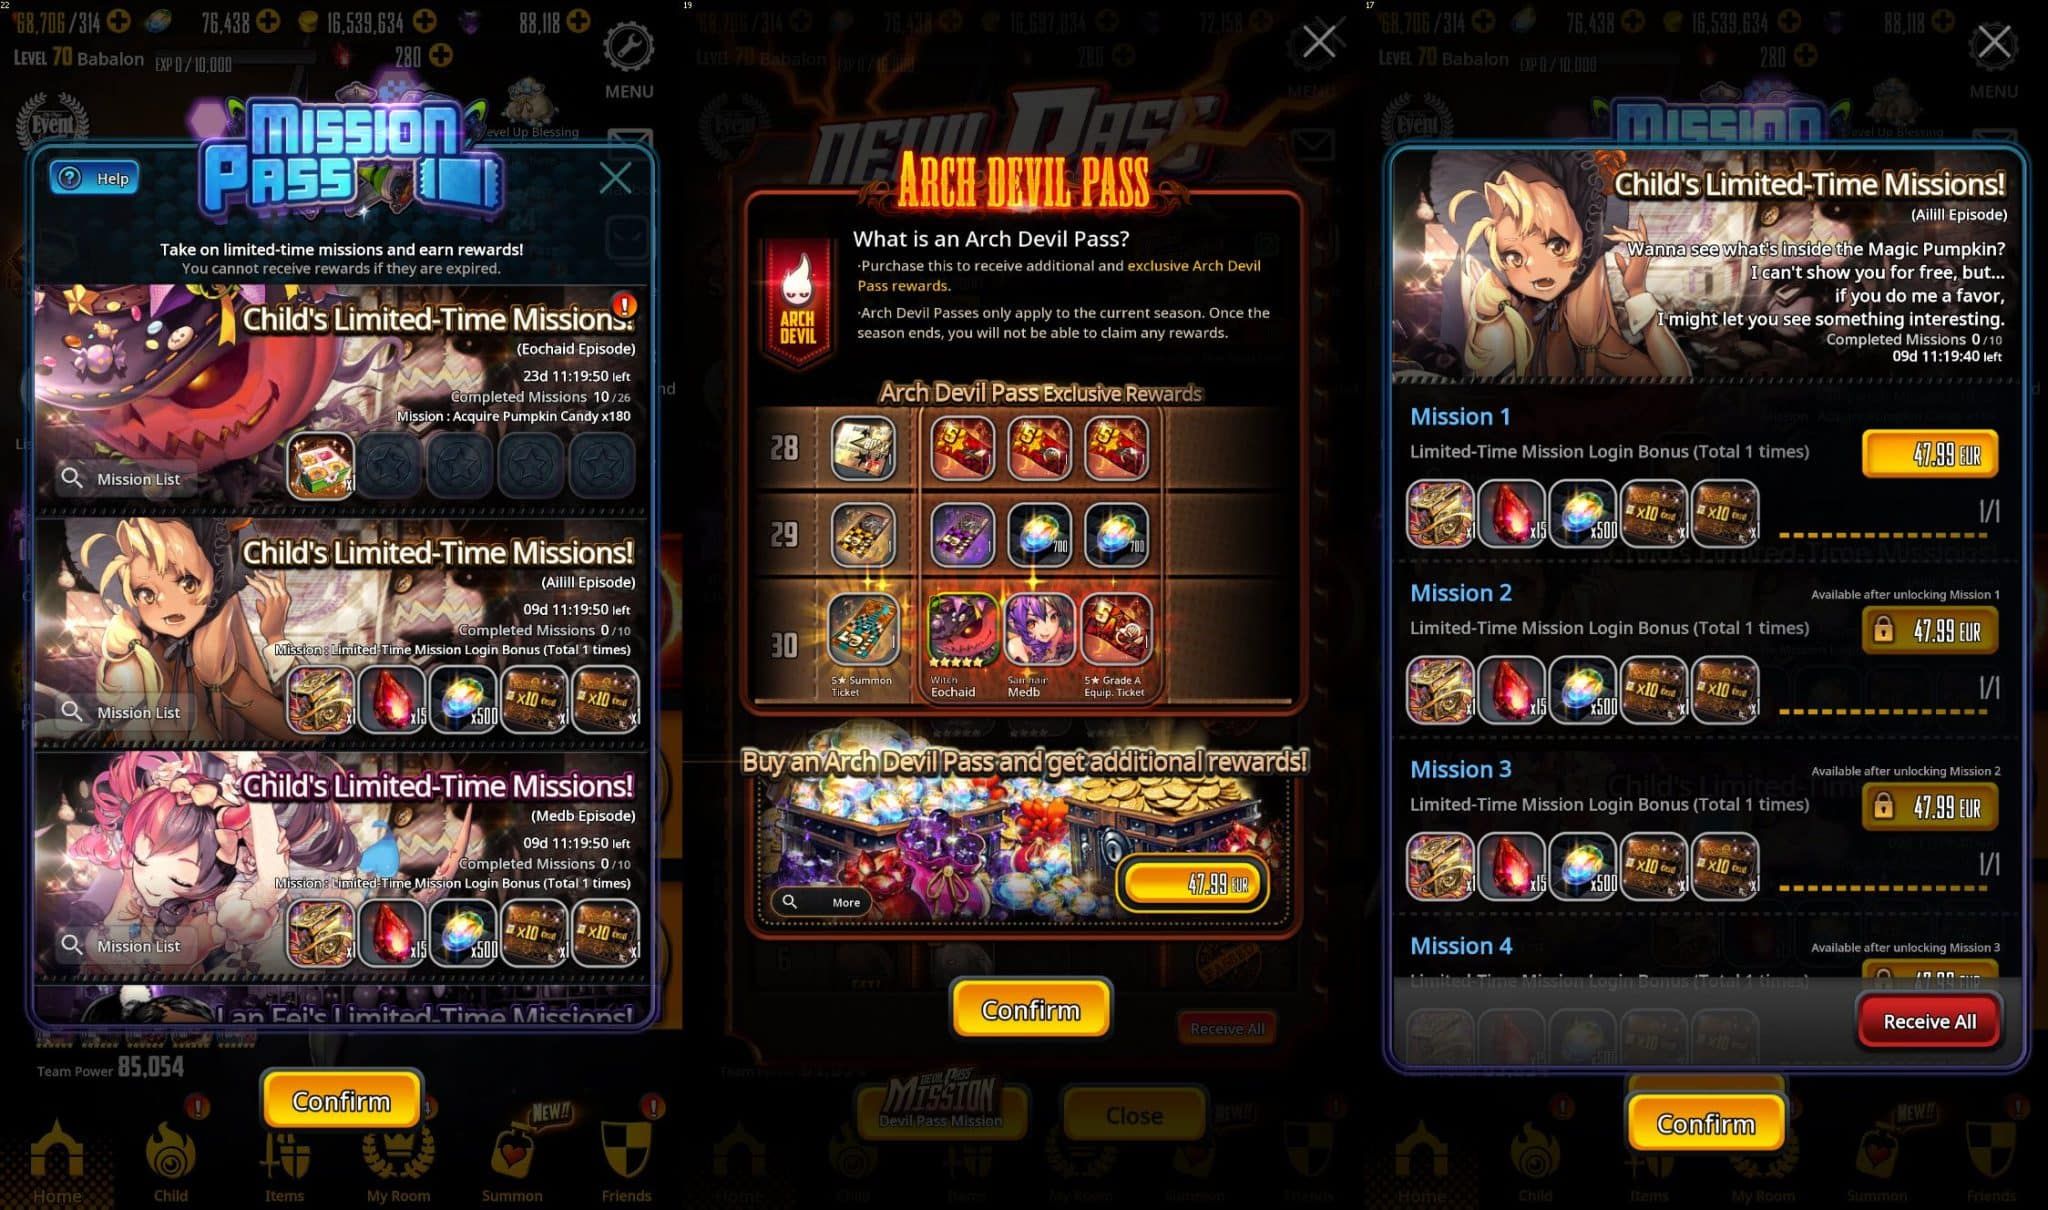
Devil Pass & Mission Pass, Destiny Child Guide
There are two types of “battle passes” in Destiny Child, and they are both Pay to Win AF. ?
The good news is that you can also get a handful of great free rewards out of them, so not all hope is lost.
Each Devil Pass lasts 2 weeks, costs XX, and has 30 tiers of rewards. In order to unlock each tier, you need Devil Pass Points, which you can gather daily, from the same daily quests you do for “Lisa’s Tasks”.
If you have paid for the Pass, you can unlock the double amount of points each day, letting you unlock the final tier faster. After the final Tier, you will unlock a special chest every 100 points, which may even contain 5-star Childs or Soul Cartas!
Mission Pass, otherwise known as “The Epitomy of Pay to Win”, is an absurdly expensive set of missions (you would need a few thousand dollars per month to clear all of them), and it only serves to please those who would otherwise light their money on fire.
Hopefully there’s a few free ones in there as well, so do keep an eye always, the rewards tend to be very good.
What are the best childs for my team?
I honestly don’t want to have this discussion. You can check many guides out there, and all of them will list the same names since day 1, even though there’s like 4 new childs coming out every month. Maat, Chang’e, Eve, everyone will have the same suggestions.
My only suggestion is to actually spend some time to read your childs’ skills, and decide on a strong team combination, based on the type / stats information in this guide, depending on if you need it for PvP, clear through the story, raiding etc.
What’s the best Soul Carta for X Child?
Soul Carta is a frustrating system, since there are too many – too limited combos you can make, and it’s not like it’s raining 5-star Soul Cartas every day.
If you have a Soul Carta that matches both the Type & Attribute of your Child, then you know it should be a good match! Usually it’s best to study the child’s skills, and identify any keywords that get enhanced by your Cartas (eg. Vampirism, Poison Damage etc.)
What’s the best Equipment for my Type (class)?
I suggest you read the whole parts on Child Types and Equipment, but here you go:
Should I re-roll in Destiny Child?
Nah. Unless you are an OCD-re-roller, there’s no real reason to do so. You will lose much more time doing it, than if you just progress normally through the game.
There are too many “Pickup” summons all the time, and literally all of the 5-star childs rotate there, with a big chance to get them. So be patient, set a lot of crystals aside, and spend away when you get your most wanted Childs in a pickup Summon banner.
|
|
Babalon, Mother of Abominations
16-hours / day in front of the screen entrepreneur, of which 6+ are spent on gaming. MMOs, CCGs, RPGs and many more, Steam-addict & achievement-w***e. Currently wasting life on BDO & Gacha Games.
|
This was very cool. I picked up the game again because i had nothing to do and now I’m currently hooked.
Hehe, thanks Shana! I always go back to Destiny Child every few months, and get stuck there for a few more ?
Very awesome guide here.
Thanks Jiff! ?
muito bem explicado, parabéns, vai ser muito útil as informações.
Obrigado Fernando ?
It was really useful, thanks a lot for this awesome guide!
Thanks Zee, I’m glad it helped! ?