In this guide, we will be talking about how to play Nintendo 3DS games on your PC with ease. Unfortunately, this guide will not feature other alternatives like we did in previous articles. However, the showcased program is a great choice for emulating anything that comes to your mind.
The Nintendo 3DS is the successor to the massively successful Nintendo DS, and it introduces new features. Such as backward compatibility with older Nintendo DS games. Another feature is the ability to display stereoscopic 3D effects without the use of 3D glasses or additional accessories. In addition, the system comes loaded with various applications including an online distribution store called Nintendo eShop where you can buy various titles.
This fine handheld has a great collection of classic titles that you mustn’t miss. From the Legend of Zelda to Mario games and other titles, there are just too many games that you cannot simply ignore.
That is why an emulator exists for such things. Hunting down every title on the system can take a while, but with an emulator? it should make things easier. Once again, we’re doing a guide on how to play Nintendo 3DS games on your PC. The emulator which I will be mentioning is called Citra. Read all about it below.
Notice: I try to constantly update each emulator guide to be as accurate, helpful and fun to read as possible. Thank you.

Citra is a free open-source 3DS emulator which started in early 2013. This fine piece of program is capable of emulating a wide variety of titles, as well as, homebrew applications. According to the official website, the Citra emulator requires OpenGL 3.3 or above to run at full speed. Anything below that, or using old hardware will result in some unusual slowdowns that’ll affect your experience with the emulator. Lastly, if you’re wondering where the Citra name came from, it’s simple, it came CTR, which is part of the model number of the original 3DS.
Citra emulator is completely safe, just like any emulator we’ve showcased before. It’s still active, and it’s still receiving major updates which enhances the performance, security and adds new features over time.
You can get the emulator from the official website right here. What’s fascinating about the site is that it’ll automatically detect your OS version. So, you don’t have to dig into a download link that matches your OS version. It saves you some time, eh?
When you’re done downloading, and installing, you’ll get two builds. One is called Canary build, and the other is Nightly. Basically, the Nightly build is the official stable release of the Citra emulator. Meanwhile, the Canary build of Citra is the same as nightly builds, but with additional features that are still waiting on review before making it into the official Citra builds. To put it simply, the Nightly build is like PCSX2 1.6.0, while the Canary build is like PCSX2 1.7.0. I hope I explained this briefly.

Citra emulator has an installation wizard, unlike other emulators we showcased before. The emulator is easy to install, so you shouldn’t have any trouble with it. Once you press ” Next “, you’ll be prompted with the destination you want to install the emulator into.

As mentioned above, the Citra emulator has two builds. One is Canary and the other is Nightly. The moment you press next, you’ll have to choose from the two options. Personally, it doesn’t hurt to have both in your pocket. Just in case if you want to experiment every now and then.

After you do that, you’ll be prompted with accepting a T&C and creating a start menu shortcut. After that, you’re ready to install the emulator on your rig.

You will need active internet to download and install all of the components. It doesn’t take an eternity for it to install, so just sit back and relax until it finishes. Once it’s done, you’re ready to ride like a bride.

The first time you open up the Citra emulator, you’ll see an empty space like this one with games not showing up. However, by only double-clicking and choosing the folder you put your games into, it’ll become something like this:

Just create a folder and name it ” Roms ” or ” Games ” and then put it inside the Citra emulator directory. That way, you’ll have an easy time putting your games in an organized way. Like this:

To launch your game, just double-click on your game’s icon, and it should boot up on the spot. In order not to waste your time wondering if a game will work or not, you better check the official game compatibility list on Citra’s forum.

Configuring your controller using the Citra emulator is a piece of cake. It doesn’t require a lot of effort to get the hang of it.

For this emulator, I’m using the Logitech F310 controller. It works out of the box and it’s easy to map as the emulator autodetects it instantly. Just plug in your controller, create a new profile, and name it whatever you want, and you’re good to go. Once you’re done mapping, press OK.
In case if you don’t have any idea what buttons you should map with your controller, I recommend checking up this picture right here. It’ll help you as it did with me.
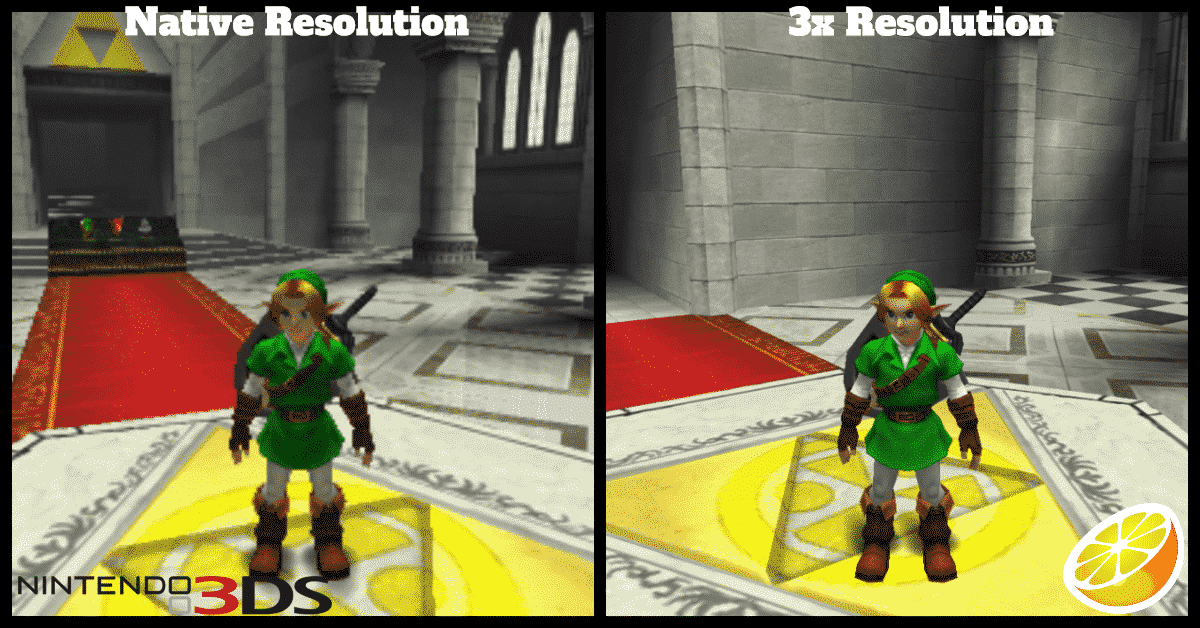
Thanks to Citra Emulator, you can play your favorite 3DS games on a much higher resolution. All you need is a decent GPU capable of rendering a higher resolution, and you’re good to go. The process of increasing the resolution is facile, and it doesn’t require a brainer to get the hang of it.

To change the resolution, simply press the down arrow, and it should look like this:

The Citra emulator supports up to 10x internal resolution. Just make sure your graphics card is capable of making it possible. On my end, a GTX 1650 Super was capable of running the Citra emulator at 4x easily. However, personally, I stick mostly with 3x. Don’t ask me why!

Just like any emulator, you can change the texture filter used in the Citra emulator. Personally, I stick with xBRZ Freescale as it makes the textures look smooth and sharp. You can mess around with the other options, and see what works best for you.
Citra emulator isn’t as demanding as PCSX2, Cemu, or RPCS3. All you need is a graphics card that supports at least OpenGL 3.3 and a 64-bit OS, but you definitely want a processor with the highest possible performance per core.
If you are using a budget gaming PC, then a rig with specifications like i5 7400, GTX 1050, 8GB RAM DDR3 is enough to cover your needs. The greater your computer specifications, the better your experience will be.
To initiate the operation, you certainly must have a 3DS handheld. Bear in mind that dumping a cartridge does not dump DLCs and Updates. In order to do that, read the next section. Anyway, to dump your cartridge, you need to have these tools:
Here are the instructions:
[C:] GAMECART.[TitleID].trim.3ds, then select NCSD image options..., then select Decrypt file (0:/gm9out)./gm9/out/ and is immediately usable with the Citra emulator.The required tools for this operation are similar to the ones said above. With that being said, let’s dive deep into the instructions.

[A:] SYSNAND SD. It’s the 4th option.title directory and press (A) to enter it.
Build CIA (standard) option../gm9/out folder on your SD card.<Title Name> (<Product Code>) (<Region>).cia<Title ID> (<Product Code>).ciaAt last, you can now install the update or DLC to Citra’s emulated SD SYSNAND (File > Install CIA...).

So if one day you’ve downloaded a 3DS ROM and it showed this error message, the fix is simple:
Similar to the Nintendo DS emulator, Citra has the option to change how your screen layout shows up. It’s pretty simple, and it doesn’t require an extensive explanation to get the hang of it. Below, I’ll show you how to access the option, and how each option looks like.

By default, I have used the side-by-side option as I really like the way it looks, and it’s facile to use with the mouse. Let me show you how it looks on default.

This option is pretty similar to that of the 3DS handheld, but personally, it’s my 2nd favorite.

Another option that I have never used, but I think a lot of people will want their screen layout to look like this with a small touchscreen.

The single-screen option completely eliminates the touchscreen. If a game relies on the latter, then that’ll be a completely unplayable experience.

You can go fullscreen using the Citra emulator either by going into View>Fullscreen. Or, just press F11 on your keyboard. To get out of Fullscreen just press F11 once again, and you’re good.
The process to save and load your game using the Citra emulator is easy. First of all, open up your game, go to Emulation> Save State or Load State. That’s it.
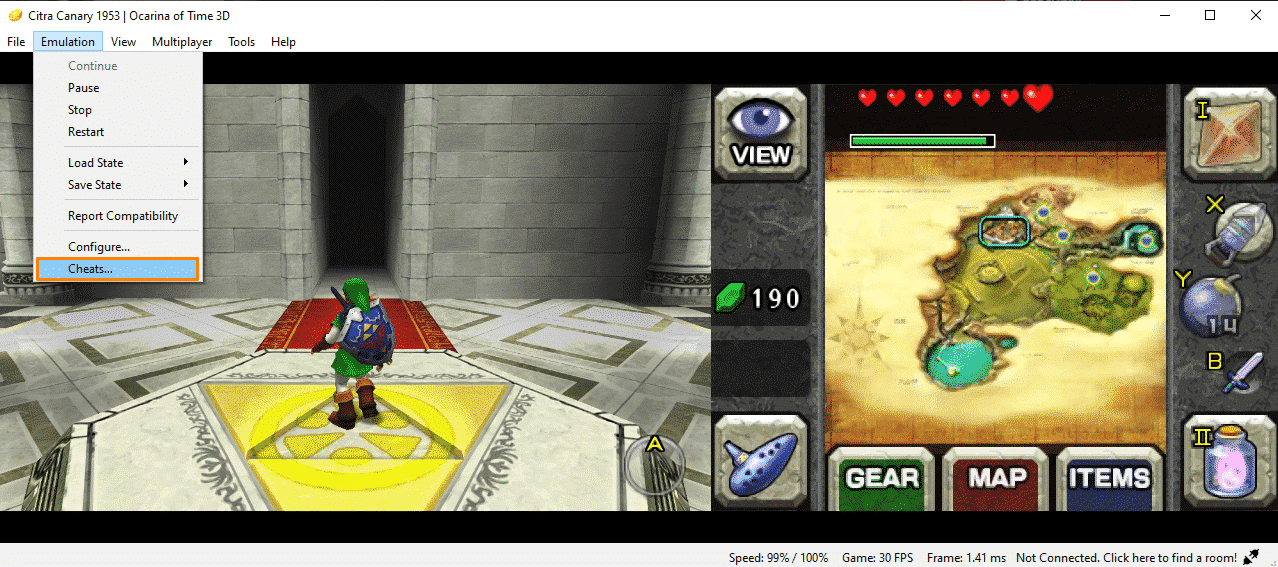
Using cheats on the Citra emulator can be a bit confusing at times, but the process is similar to that of the Dolphin emulator. I wouldn’t recommend using these cheats as they sometimes tend to break ” some ” games. Not all of them, but ” some “. Anyway, the process for doing this is easy: Launch up your game and go to Emulation > Cheats. A window should pop up after this.

Click on Add Cheat to include a new cheat. After this, things get easy from there.

The process should look like this. The first thing you will want to do is add a cheat. Next, name that cheat of yours. For Notes, you can leave it blank if you want, but not for the code section. Basically, the code should be something like this :
[Gold 999999 (Code Offset 1)]
0808E0E4 000F423F

[Gold 999999 (Code Offset 2)]
080900A4 000F423F

[Gold 999999 (Code Offset 3)]
08092064 000F423F

[Max SP (Code Offset 1)]]
08ED0CF8 00000003

[Max SP (Code Offset 2)]]
08ED2CB8 00000003

[Max SP (Code Offset 3)]]
08ED4C78 00000003
PS: These codes are from Bravely Default, and they work, but I put them as an example. Just paste the numbers that start with zero into the code field, and you’re good to go. If the cheats are correct, and they match your game version, then you’ll notice few changes in the game.

Thanks to the Citra emulator, you can emulate the 3DS’ local wifi. This particular feature allows you to play games with people all over the world. But before you use the multiplayer feature, you should have an idea about the difference between public and unlisted rooms. Below I’ll give you a brief explanation.
So with that aside, let’s read about how to join and make a Public Game Room, as well as, Unlisted Room.

The process of joining a Public Room is facile. On the emulator, click on Multiplayer > Browse Game Lobby. Next, set your nickname on the top left. What you should do after is navigate the game room you want to join by double-clicking, and then double-click the game you’re using.

To join an unlisted room, simply follow these steps: Go to multiplayer as shown in the picture > Direct Connect to Room. A small window should appear. Like this one below you:

What you should do right now is type in the IP and the port you are trying to connect to. If applicable, you should type the nickname and password of the room as well. When you’re done, click on Connect.

To make a public room, first set up port forwarding in your router settings. After that, go to Multiplayer > and press Creat Room.

Here are the steps to create your own room:

The process of creating an unlisted room is similar to that one above you. Except, you’ll have to switch from Public to Unlisted as shown in the picture. That’s all. Oh, and you can give your room a description if you want.
You’ll rarely face any issues with this emulator, but if you do, there are always ways on how to solve them.
The solution to this issue is to update your drivers to the latest version. It could be also because your GPU is old ( Intel HD3000) which is causing the emulator to crash.
The fix to this one is easy. Make sure you have C++ Redistributable for Visual Studio 2017 installed on your computer.
Take a look at your graphics settings and try to lower them. Just for your understanding, the first time you boot a demanding game on the Citra emulator, you’ll feel a bit of stuttering but that’s just Citra downloading cache files in the background to ensure it will be smooth the next time you boot up your game.
The fix to this is to update your Citra emulator to the latest version. Moreover, Citra updates every time there’s a new build, so make sure to keep an eye out on that.
This marks the end of the Citra emulator guide. I hope this helped you, and stay tuned for the upcoming Original Xbox emulator.
|
|
FreeckyCake
I'm just your average gamer who enjoys hunting hidden gems and underrated games. My love for Onimusha: Dawn of Dreams is like a truck and I recommend that you play it.
|
Leave a Reply