In this guide, we will talk about ” How To Play PS1 Games on Your Windows PC”. Bear in mind that there are other emulators out there such as ePSXe, but it’s outdated now and it requires plugins to work properly unlike DuckStation that works very well.
After the brutal competition with Nintendo and Sega back in the nineties, who would have thought for one second that Sony was slowly marching in with a console such as the PlayStation? Since Sega was already struggling with the competition, the PS1 brought nothing but more worries and more hardships.
Sony wasn’t playing around that time. They made a lot of games that convinced the customer to instantly purchase the console. Such games are Crash Bandicoot, Metal Gear Solid, Silent Hill, Spyro, Medievil, and others that are still haunting players to this day. (No wonder why fans are clamoring for remakes every single day).
If by chance you had a sudden surge of nostalgia that went through your veins, fear not, because there’s an emulator that is capable of emulating any PS1 game you can think of. This emulator is Duckstation. A fine and easy emulator that will help a lot of people to play any game they want from the platform. Come and read all about this emulator down below.
Notice: I try to constantly update each emulator guide to be as accurate, helpful and fun to read as possible. Thank you.
DuckStation is a recent PlayStation 1 emulator that focuses on bringing accuracy, speed, and playability to low-end computers, as well as, high-end ones. While the emulator promises to be as accurate as possible, the developers are trying to put performance as a high priority. The emulator is facile to navigate compared to the once-best PS1 emulator, ePSXe.
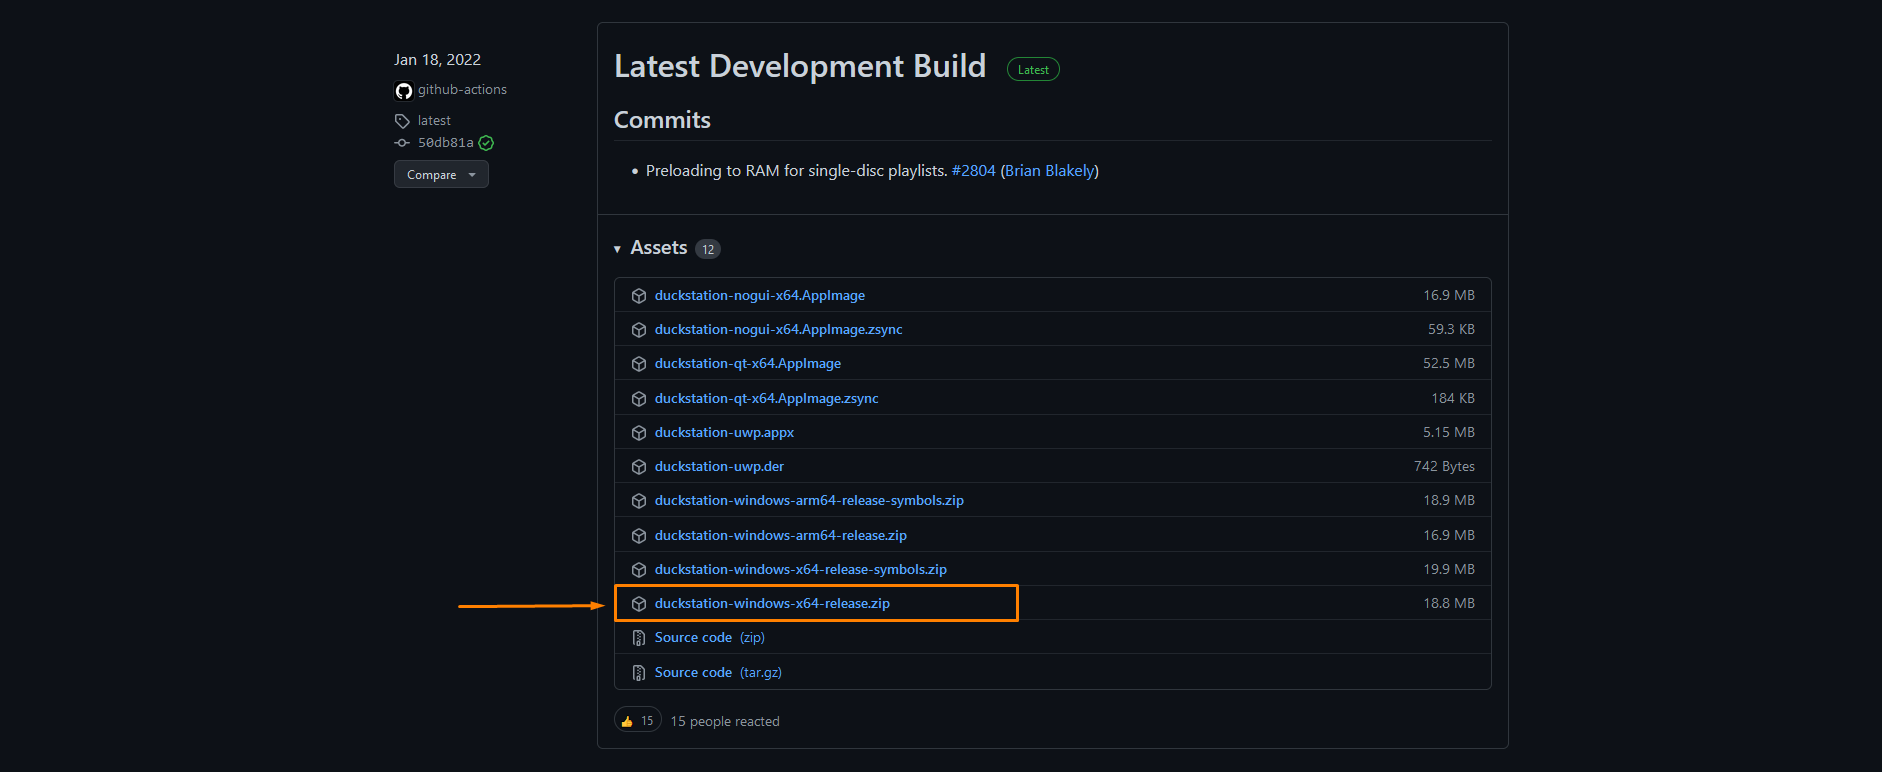
You can download this fine emulator from the official Github page. To stay up to date with recent updates, it’s highly recommended to bookmark the link. Once you’ve clicked the link, Duckstation should start downloading as a RAR file. Once finished, you’ll need to get the BIOS in order to launch the program and, of course, play games.
Note that mismatching game regions and BIOS regions may sometimes cause compatibility issues, so it’s highly recommended to match the BIOS with its respectable region.
Update: As of 2022, the link to download DuckStation has been updated.
Similar to DeSmuME, Redream, and PPSSPP, DuckStation is a standalone emulator that doesn’t have an installation wizard. Installation is simple, extract the Zip/Winrar which contains the emulator and you are good to go. As always, you need to place the emulator on anything other than the C/drive. Create a folder, and name it PS1 or Duckstation, then extract the RAR file into it.

Just like PCSX2, DuckStation requires plug-ins and a BIOS in order to function, without these, good luck running the emulator. They are essential pieces of software to let the program up and running. Once you get them and set up the emulator, you won’t be required to re-do the processor configure the emulator once again as they’ll be saved into the BIOS directory.
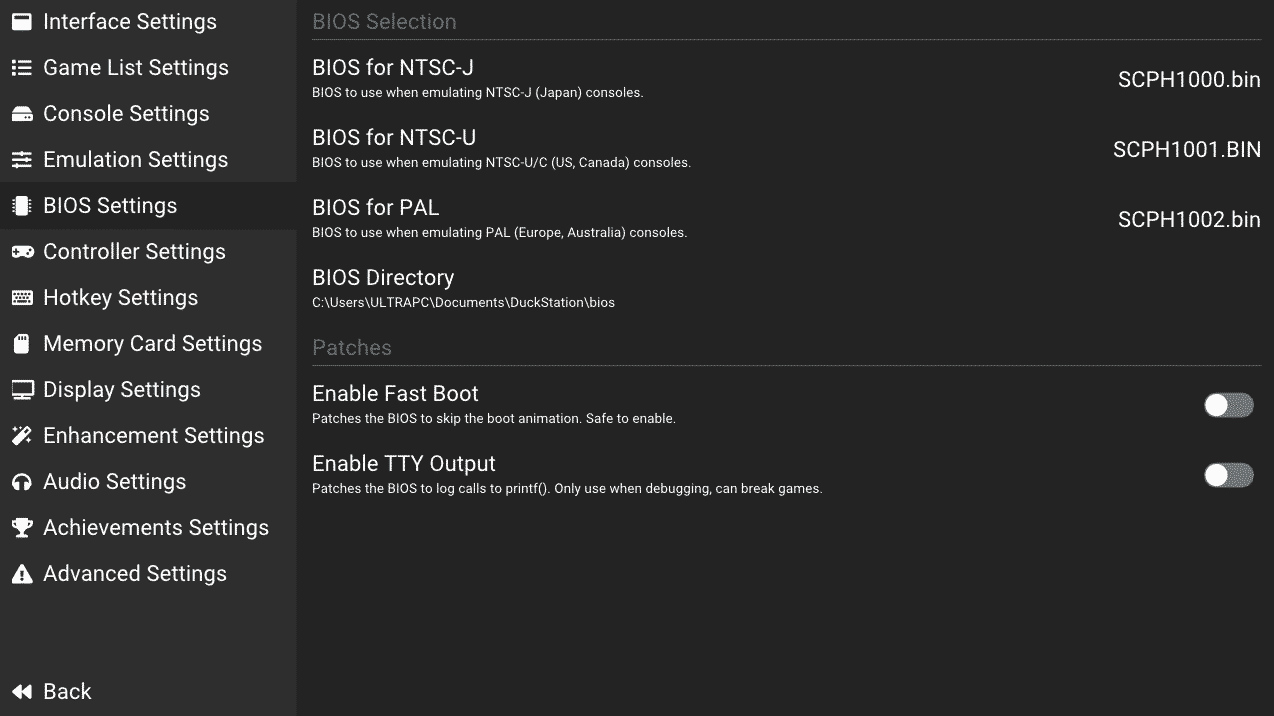
Here’s what the BIOS files should look like inside your folder :

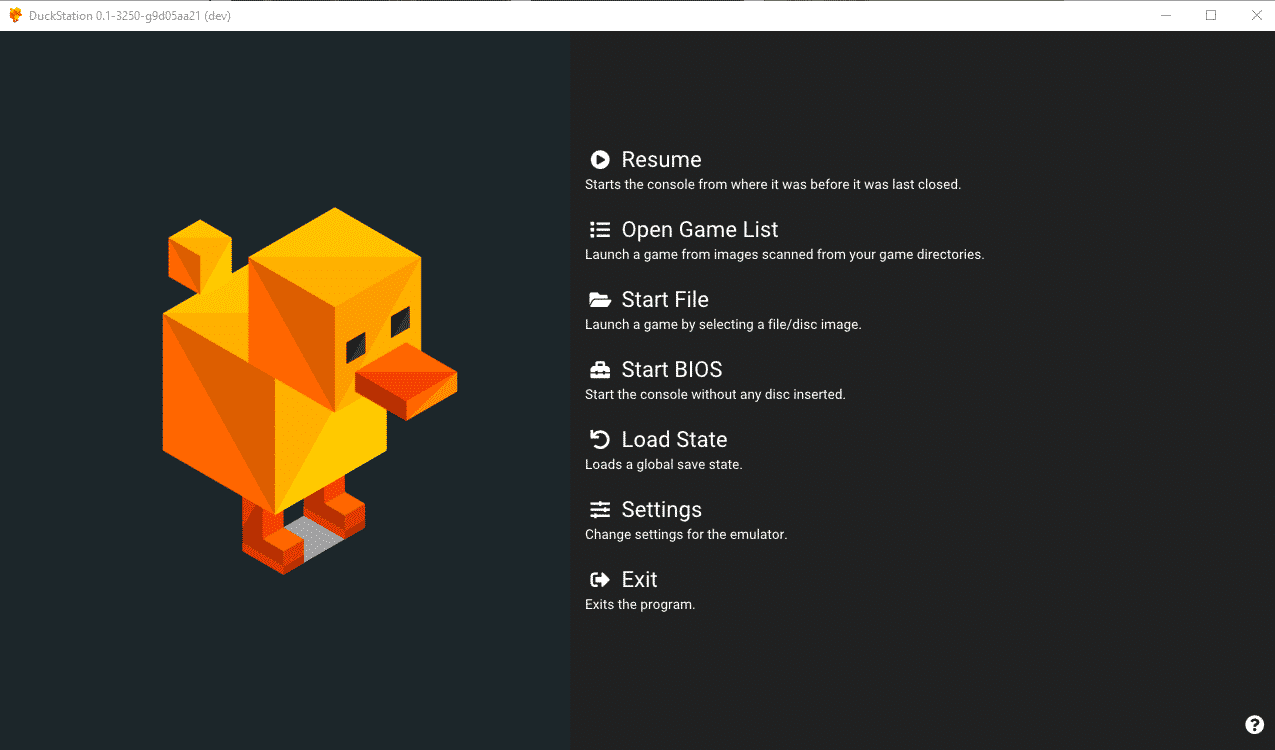
With DuckStation, it’s easy to detect which BIOS you’re using. The emulator has two frontends: The first one is a nogui-x64-ReleaseLTCG, and the other is qt-x64-ReleaseLTCG. Personally, I have seen no major difference between the nogui and qt release, except the different designs. It really depends on what you want to use. See below to check what they look like.
This is nogui-x64-ReleaseLTCG
As you can see, the emulator is built to detect the BIOS that matches your game’s region. For example, let’s assume you wanted to run an import game, and you possess the Japanese BIOS, then DuckStation will do that for you.
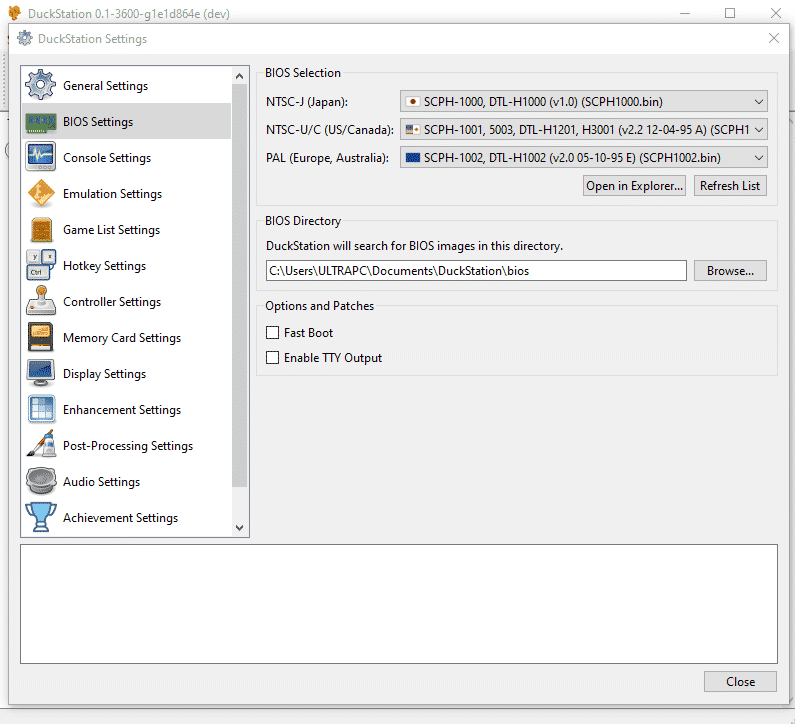
This is qt-x64-ReleaseLTCG
This is a nice feature, and it saves you the time of switching back and forth between the bios files each time you want to boot a game from a different region.
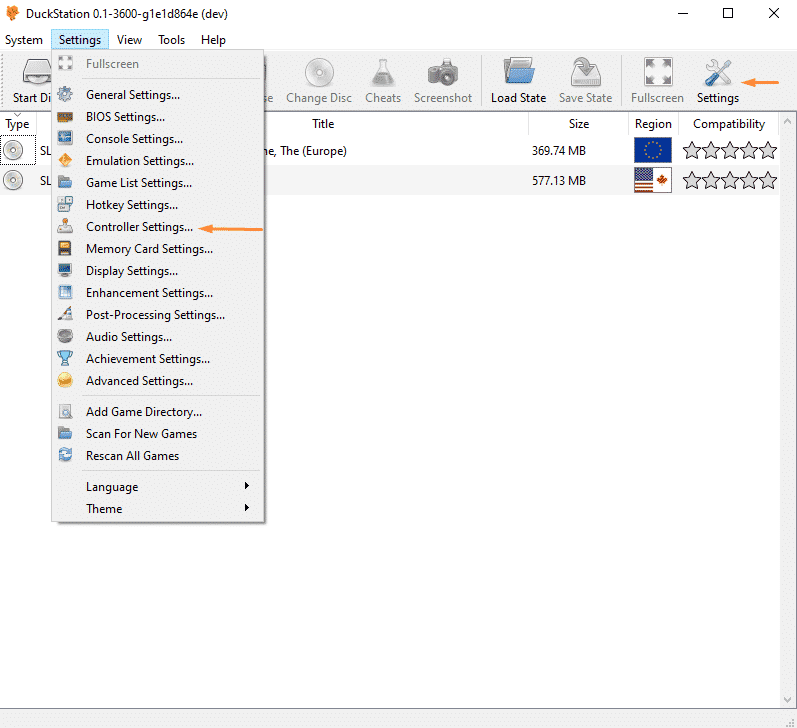
Just like any emulator out there, DuckStation allows you to use your controller, mouse/keyboard, or even a lightgun. To access the controller settings, simply head to Settings on the top as indicated above. Or, go to Settings>Controller Settings as shown at the top of your left.
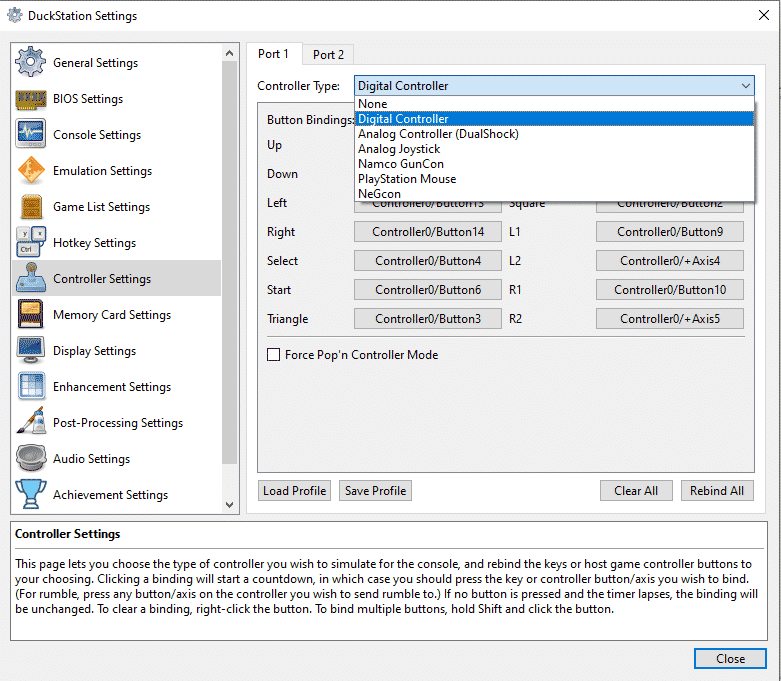
After you do that, you’ll arrive at the window above you. The emulator is set to play games using your keyboard by default. To change them, simply press the field you desire, and press the button from your controller. I’m using a Logitech F310 for this guide, and it works out of the box. You just press the fields and map your controller. In case you’re also planning to use the Logitech controller, just flip the switch on the back of your gamepad in case it doesn’t get recognized. However, personally, it should be recognized whether you’re using DirectInput or Xinput mode.
If you’re using a Dualshock 3/4 or Xbox controller, and you want to play your games using your analogue sticks instead of the d-pad, the solution is simple. When picking a controller type, choose ” Analog Controller (Dualshock). That’s it, your sticks should be recognized in games.
After you have your game at hand, create a folder, name it whatever you want, and put your game inside. Head on to Settings > Game List Settings. A screen should pop up like this:
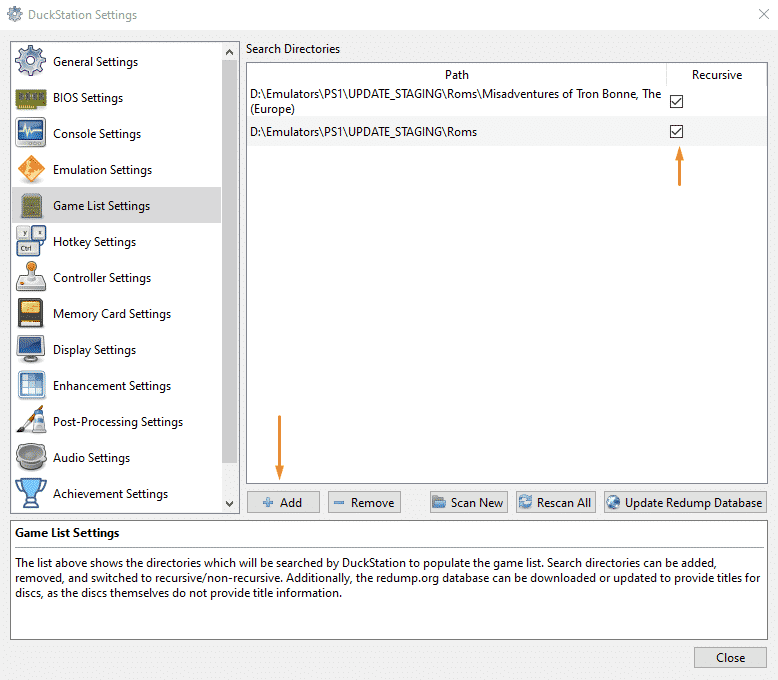
Basically, what you’re doing right now is adding your game’s directory folder to the emulator. So, next time when you boot up your game, it will show up like this:
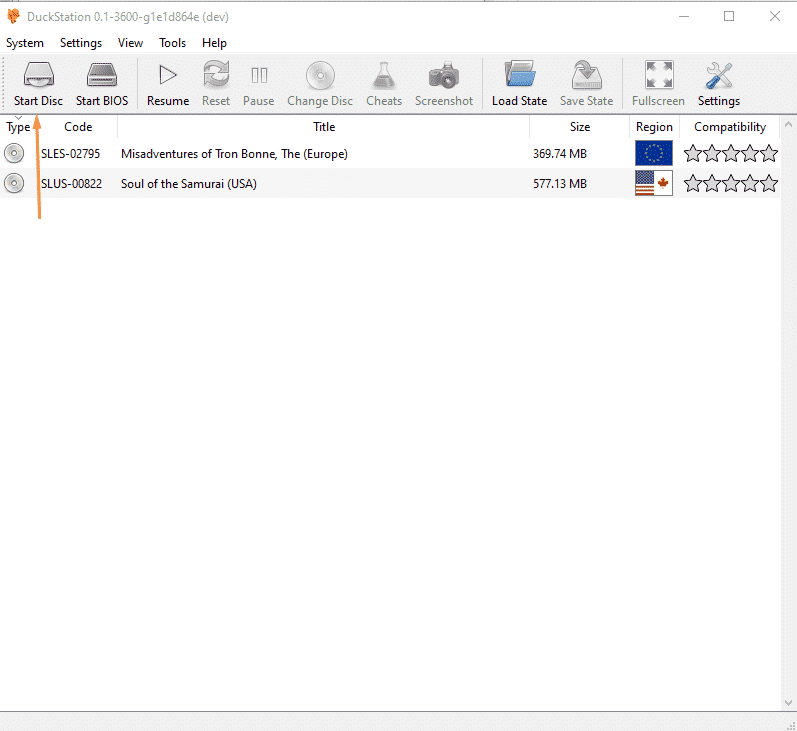
If you want to run your game manually, just go to Start Disc, and run your game from there. But personally, I prefer the method I showed above.
In this section, we’ll see how you can improve the graphics using the emulator to look better than the real thing. Unlike ePSXe, DuckStation brings many features that make it better than the aforementioned. Check all the information below!
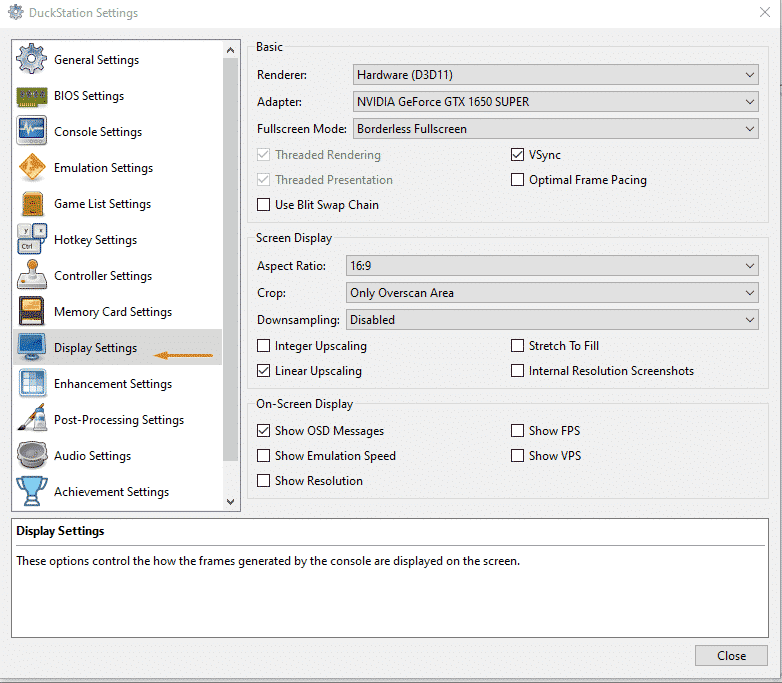
In this section, we will be diving into the Display Settings and what each option does. The section is divided into 3 fields: Basic, Screen Display, and On-Screen Display. Let’s see what every single option does.
The first option shows the Renderer you can use on Duckstation. There are 4 renderers in the emulator: Hardware D311, OpenGL, Vulkan, and Software. If you have a very low-end computer, it’s recommended to stick to D311 or OpenGL. If you’re using an AMD GPU, you definitely opt to tick Vulkan.
Secondly, there’s the adapter. This one should have the name of your GPU and not the Basic Microsoft Renderer.
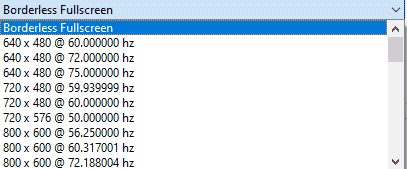
Thirdly, there’s the fullscreen mode in which you can choose whatever resolution you want as shown down below:
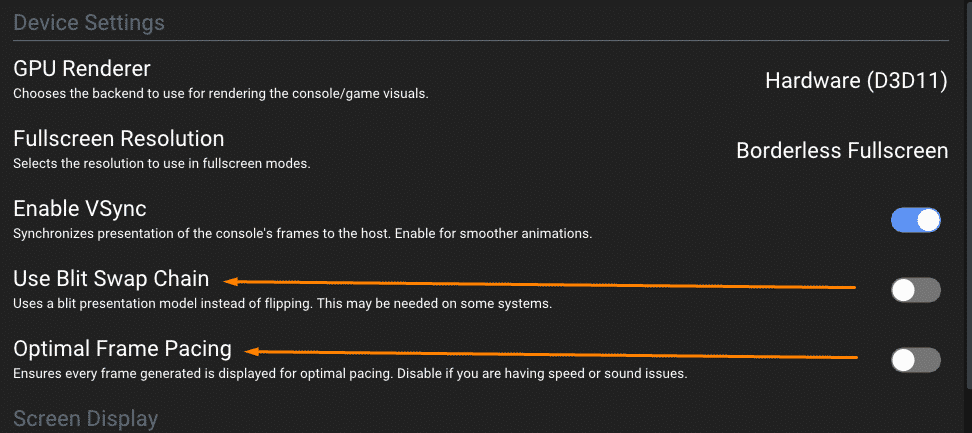
The other options, Optimal Frame Pacing, and use Blit Swap Chain are not very necessary, but if you’re curious what they do, check below:
This section doesn’t require much explanation as everything is pretty clear. You got the Aspect Ratio which can reach up to 32:9. There’s downsampling that plays a huge role in improving the overall image quality in mixed 2D/3D games. However, this option is often not advised by the DuckStation emulator when using 3D games, and it only applies to hardware renderers. So, if you’re using Software, you may not see any difference at all.
Next, we got Integer Upscaling which sharpens the image quality, Stretch to Fill, Linear Upscaling, and Internal Resolution Screenshots.
To sum up this section, it’s all about monitoring the performance of your emulator. For example, you can tick Show FPS to check the framerates. There’s also VPS that shows the numbers of frames ( or Vsyncs) per second displayed by the system on the top right of the program.
Additionally, you can tick Show Emulation Speed to check the speed of the system on the top right of your program. Lastly, there’s Show Resolution which is obvious.
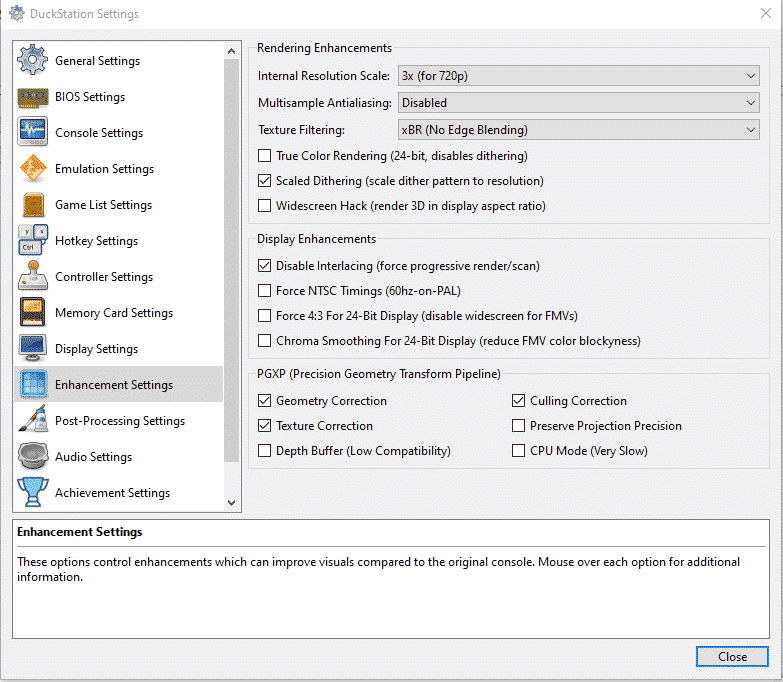
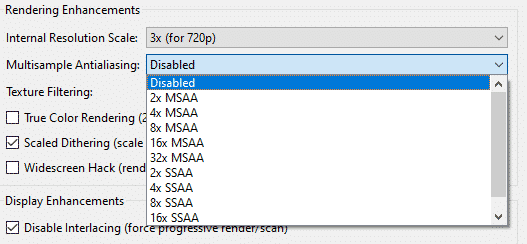
One of the features that make DuckStation a recommended emulator over ePSXe is its interesting enhancement settings. These settings not only make PS1 look great, but also better than the original hardware.
At first glance, we can see the internal resolution scale. DuckStation is capable of scaling up to 9x, which in this case means 4K resolution. Below, there’s Multisample Antialiasing. The emulator has a plethora of options to choose from as users are capable to choose up to 16x SSAA.
One of the best features of DuckStation is that it forces PAL games that would usually run below 60hz to the intended frequency.
In addition, thanks to Chroma Smoothing, you can smooth out blockiness between colour transitions in 24-bit content, usually FMV (Full Motion Video).
Looking back, the PS1 had some wobbly polygons and warping textures that were the norm back then. Unfortunately, people, these days have grown accustomed to sharp textures and fixed polygons. So, many find it difficult to play games that have that kind of stuff.
Luckily, DuckStation got you covered with its interesting features. Below, we will see the comparison between Geometry Correction and Texture Correction enabled and disabled.
Note that this feature may not work with every game on the system, and you should expect some glitches and bugs with obscure titles, but as far as my test went, these glitches or bugs did not break the game. With further updates, I think the emulator will be much better.
I forgot to note that I had ” Culling Correction ” and ” Preserve Projection Precision ” in the showcased game above you. Oh, and in case if you’re wondering, the showcased game over here is called Soul of the Samurai.
Geometry Correction+ Texture Correction: Enabled
Geometry Correction+ Texture Correction: Disabled
I hope these two examples have shown you the difference when both enabling and disabling the PGXP mode. In case if you’re wondering, the mentioned game is called Threads of Fate.

Basically, what post-processing does is allow you to change how your games look and appears by using various filters.
Once you press, +add, a small window should appear like this:
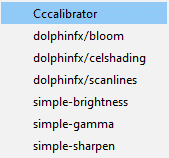
Each option represents something, you can sharpen the image, improve scanlines, the gamma, the bloom, and everything you want. Enjoy experimenting until you get the results you desire.
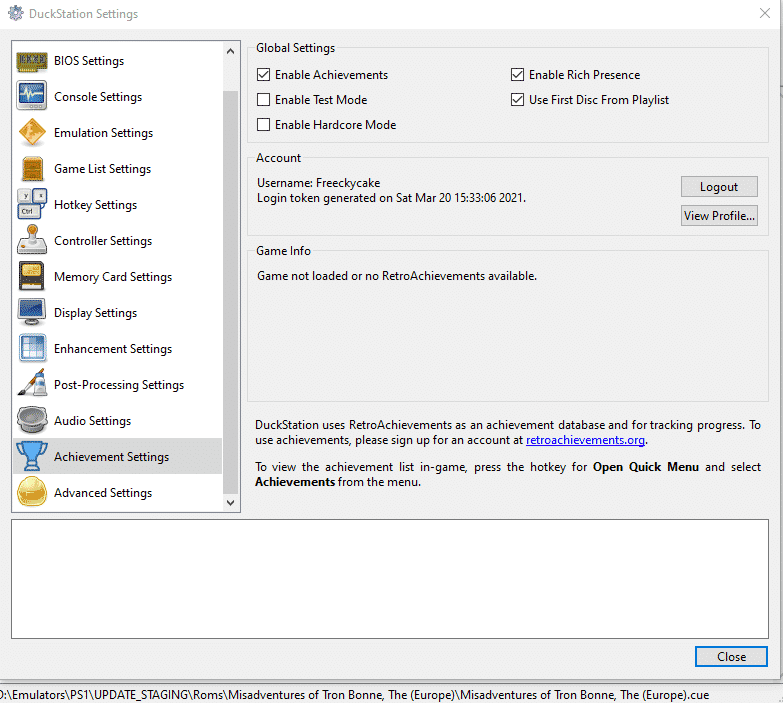
Another feature that makes DuckStation better than ePSXe is its Achievements feature. Just make sure to enable them on settings as I did. If you want to check if the game you are emulating has achievements, head over to the Retroachievements website, and check if your game is there.
Note that for achievements to work, you have to create an account on the official website.
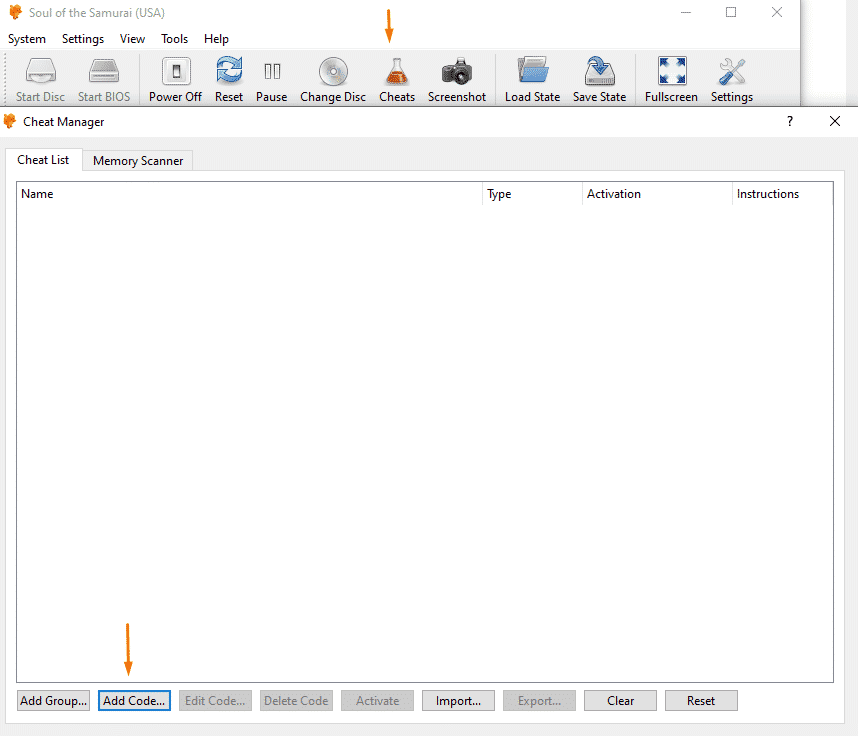
Just like every emulator, DuckStation has a cheat manager option. DuckStation has the same ePSXe tool when it comes to using cheats as it has an automatic tool that instantly detects the cheats simply by downloading them off the internet, and that’s it.
Anyway, to manually activate cheats, first, boot up your game, go to cheats, and a small window will pop up. Then, press Add Code. Alternatively, if your game has automatic cheats detection, you’ll see something like this when you access the cheat list:


Give a description of your cheat, and type the cheat code in the blank space below. Make sure that you’re using a Gameshark cheat, otherwise, it won’t work. If you want a cheat website, head on to GameGenie’s.
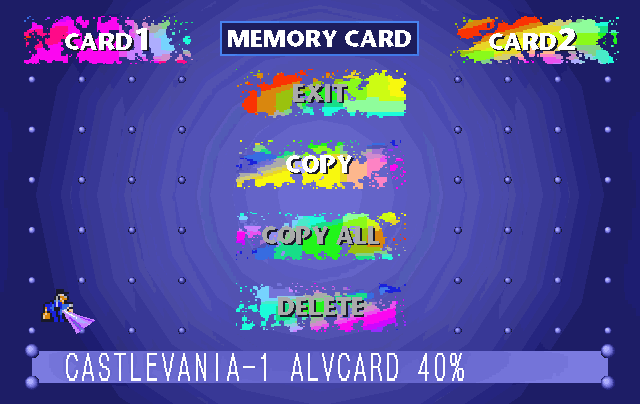
You can free some space from the actual PS1 memory by accessing the bios. To access it, go to System> Run Bios. Once you do that, you should see a screen like the one above you. Next, press Memory Card and start deleting what you want.
DuckStation is updated regularly. Whether small or major ones, it all boils down to one thing; Updates that enhance the emulator further. To check if yourDuckStation has any pending update. Go to Help > Check for Updates.

Conclusion:
If you are yearning for some nostalgia, DuckStation will be there to fill your needs. DuckStation runs on a potato PC at a decent speed and it doesn’t require a brainer to get the hang of it. Before I close this guide, here are some games that I recommend: Parasite Eve 1, Silent Hill, Panzer Bandit, and Klonoa. I hope you will enjoy them.
That’s it for the guide, thank you for reading!
|
|
FreeckyCake
I'm just your average gamer who enjoys hunting hidden gems and underrated games. My love for Onimusha: Dawn of Dreams is like a truck and I recommend that you play it.
|
By the way I just tried this several times, for several days and I cannot connect with “fantasyanime.com” for the plugins on any of my devices or my roommates. This includes phones (Android and Apple), tablet (Microsoft), or pc. My net and wifi are great and I can do anything anywhere else, just not that site. Not sure if that is just for the past few days or what.
Is there an alternate site for the plugin pack mentioned? Any other suggestions?
Yeah, it has been going down lately from time to time.
You can check this link for the plugins: http://www.emulator-zone.com/doc.php/psx/psxplugins-tools.html
Or this: https://psxdatacenter.com/downloads.html
I’m not sure about Android as I don’t emulate anything on my phone. I hope I helped you!
Another competitor that you didn’t mention is Duckstation. It’s a young PSX emulator, so hot in development it has no stable build [it has an update to install every time I open it pretty much]. It favour both compatibility and low system requirements. It can easily render PSX games 3 or 4 times native resolution with perspective accurate texturing on integrated graphics solutions. It also supports two shared memory cards like ePSXe, so swapping discs is no problem. It also supports per-game settings as an option. It’s also even easier to configure than ePSXe.
I have not personally heard of it until you mentioned it. I’ll make sure to update the guide in the near future!
May I ask, have you tried PCSX-R? I heard good things about it.