About BDO |
||
|---|---|---|
|
|
||
| Release Date Oct 17, 2013 |
||
|
|
Developer Pearl Abyss |
|
|
|
Publisher Pearl Abyss |
|
|
|
Country of Origin South Korea |
|
Star’s End is one of the best grinding locations which is popular for its rare drop – Black Distortion Earring. Although it can’t compete with the recently released Hadum locations, it is a big step up compared to other grinding zones that require overall less AP and DP.
In April 2021 Star’s End received an update that added 3 pillar shaped structures – Vessels of Inquisition, that offer stationary style of grinding. We will go in details in later section of the guide.
On July 14, 2021 various spots including Star’s End got a nice permanent boost in Drop Rate of Caphras Stone and Ancient Spirit Dust, making the zone slightly more attractive for players seeking Caphras Stone gear progression.
July 28th Vessels of Inquisition has received slight change, ranged type of mobs was added to prevent players from standing in place.
| Pros | |
|---|---|
| Enormous Profit Potential | |
| Location Accessibility | |
| Unique Mechanic | |
| Cons | ||
|---|---|---|
| Rare Drop Reliant | ||
| Repair NPC is Far | ||
| Somewhat Contested | ||
The node is located to the West of Calpheon and it’s worth investing your Energy, as it benefits you with +50% Item Drop Rate for every 10th monster you kill.
The most common route is through Calpheon:
An alternative viable route, which requires less CP and goes through Ash Forest, is connecting from Grána city:
By investing 1 more CP into the Excavation node of Star’s End, you can send workers to collect  Mass of Pure Magic, Trace of Violence and Trace of Death. If these materials are important to you, connecting through Calpheon will save you some time.
| Item | Comment from Author | |
|---|---|---|
 Black Distortion Earring Black Distortion Earring |
Rare Drop. Worth ~300 million. Enhanced version can drop, with DUO worth ~2,7 billion! | |
 Black Stone (Armor) Black Stone (Armor) |
||
 Black Stone Black Stone |
||
Is a component used to craft  Corrupted Magic Crystal. Worth ~120 million. Corrupted Magic Crystal. Worth ~120 million.  Forest Fury is a bottleneck. Forest Fury is a bottleneck.HAS CHEER ANIMATION!!! |
||
 Black Magic Crystal - Precision Black Magic Crystal - Precision |
||
| Mass of Pure Magic |
Is used to enhance Blackstar Gear. | |
 Ancient Spirit Dust Ancient Spirit Dust |
5x of Ancient Dust ~ 1x  Caphras Stone Caphras Stone |
|
| Caphras Stone |
||
 Trace of Origin Trace of Origin |
||
 Sanguine Crystal of Despair Sanguine Crystal of Despair |
Primary trash loot. Vendor price = 15500 Silver. | |
 Destroyed Star Fragment Destroyed Star Fragment |
Secondary trash loot. Vendor price = worthless. In case of weight problems you can throw it away. |
|
 Intricately Patterned Mystical Shard Intricately Patterned Mystical Shard |
Used to craft Karlstein outfit boxes. | |
 Laila's Petal Laila's Petal |
Used to upgrade your fairy, exchangeable to  Sweet Honey Wine or Sweet Honey Wine or  Valks’ Cry equivalent Valks’ Cry equivalent  Fairy's Blessing. Fairy's Blessing. |
|
 Black Energy Residue Black Energy Residue |
is used to craft Dragon Slayer Weapons. | |
 Pure Forest Breath Pure Forest Breath |
Place on marketplace or use for Dream horse attempts (Doom). |
| Distribution | Silver | |
|---|---|---|
| 56% | 69,021,500 | Primary and Secondary Trash |
| 16% | 20,187,500* | 5x Black Magic Crystal - Precision |
| 15% | 18,550,400* | Caphras Stones + Ancient Spirit Dust |
| 3% | 4,165,000* | Trace of Origin |
| 10% | 12,240,000* | Black Stone (Armor) & Black Stone |
| 124,164,400 | Total (whereas “*” means taxed with Value Pack) |
Your average hour of grinding with blue Item Collection Increase Scroll (60 min) probably will look slightly underwhelming. You have to keep in mind, that it is possible to grind 15+ hours and getting no Distortions drops. But if you happen to drop a Black Distortion Earring you would earn an additional 272* Million Silver making it ~400 million profit in one hour.
As you can see the spot has low lows and enormous highs, making it one of the most inconsistent grinding spots in Black Desert Online.
A good starting point for most classes is 261 AP Kutum and 308 DP. With anything less, you would gain more profit on Aakman or Hystria.
There are some examples of going there under that requirement (Berserker – 245 AP Kutum / 301 DP / Striker – 245 AP Kutum / 308 DP), but I would not recommend it, since it requires lots of constant cautiousness, which will be tiring after a couple of hours.
269 AP Kutum coupled with 324 DP is the point where you will reach high efficiency. By acquiring at least 7 more DP you will be also meeting gear requirements for Sycraia Underwater Ruins (Abyssal Zone), which offers not necessarily better, but more consistent profit than Star’s End.
Here is an example of a 265 AP and 313 DP build suitable for Star’s End with an emphasis on CC resistance and Damage Reduction:
| Gear | Crystals | ||
|---|---|---|---|
TRI:  Blackstar Crossbow Blackstar Crossbow |
 Ancient Magic Crystal of Crimson Flame - Power Ancient Magic Crystal of Crimson Flame - Power HAN Combined Magic Crystal - Hoom HAN Combined Magic Crystal - Hoom |
||
TET:  Kutum Ra'ghon Kutum Ra'ghon |
2x Corrupted Magic Crystal |
||
TET:  Dandelion Greatbow C2 Dandelion Greatbow C2 |
|||
TET:  Griffon's Helmet Griffon's Helmet |
2x HAN Combined Magic Crystal - Hoom |
||
TET:  Dim Tree Spirit's Armor Dim Tree Spirit's Armor |
2x  Dark Red Fang Crystal - Armor Dark Red Fang Crystal - Armor |
||
TET:  Bheg's Gloves Bheg's Gloves |
 JIN Magic Crystal - ViperHAN Combined Magic Crystal - Hoom JIN Magic Crystal - ViperHAN Combined Magic Crystal - Hoom |
||
TET:  Urugon's Shoes Urugon's Shoes |
2x  Red Battlefield Crystal: Adamantine Red Battlefield Crystal: Adamantine |
||
2x TET:  Ring of Crescent Guardian Ring of Crescent Guardian |
|||
2x  Capotia Earring Capotia Earring |
|||
TET:  Ogre Ring Ogre Ring |
|||
TET:  Basilisk's Belt Basilisk's Belt |
|||
 Sturdy Alchemy Stone of Destruction Sturdy Alchemy Stone of Destruction |
|||
 Hunter's Clothes (Costume Exchange) Hunter's Clothes (Costume Exchange) |
|||
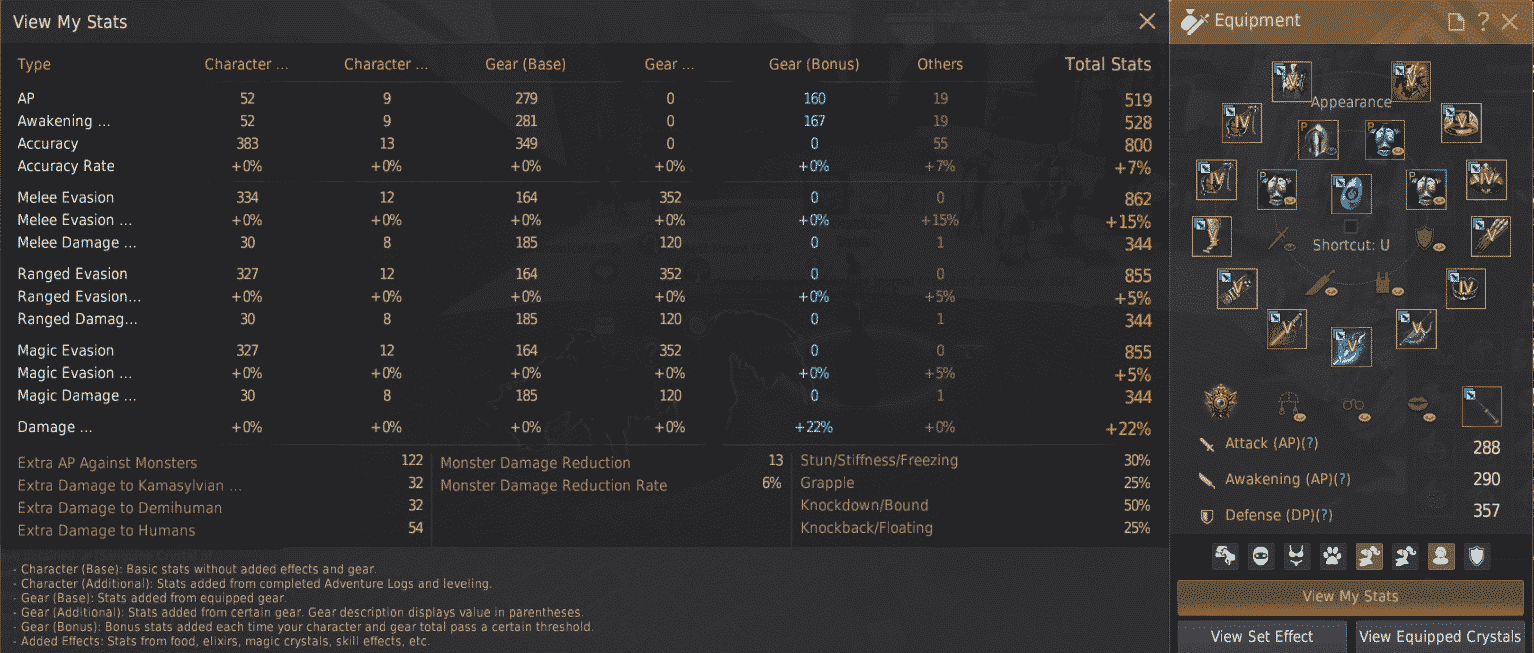
Next important stat is your Accuracy and Accuracy Rate. You can see it by pressing I and clicking the “View My Stats” button.
To hit the mobs with 99% chance you need 450 of All Accuracy with at least +4% Accuracy rate. Some of the classes have additional Accuracy Rate or Evasion Debuff on their skills. If you have either of them in your kit, you might make it with less Accuracy. We will see how to increase your Accuracy with the buffs in the section below.
If you decide to get rid of your Agris Fever in Star’s End, you won’t be on the losing side. Besides Elvia spots and others such as Olun Valley, it is quite an efficient spot for your Agris Points. In one hour you will be burning around 70 000 Agris Points, depending on your gear.
In terms of Experience, it is slightly better than the main Mirumok Party spot, but worse than solo. You will be looking at ~0.8% an Hour at level 61 with 260% Experience Buff.
| Monster | Consumed Agris Fever |
|---|---|
| Apostle of Corruption | 40 |
| Harbinger of Corruption | 40 |
| Apostle of Defilement | 40 |
| Harbinger of Defilement | 40 |
| Apostle of Immorality | 40 |
| Harbinger of Immorality | 40 |
| <Possessed> Apostle of Malevolence | 50 |
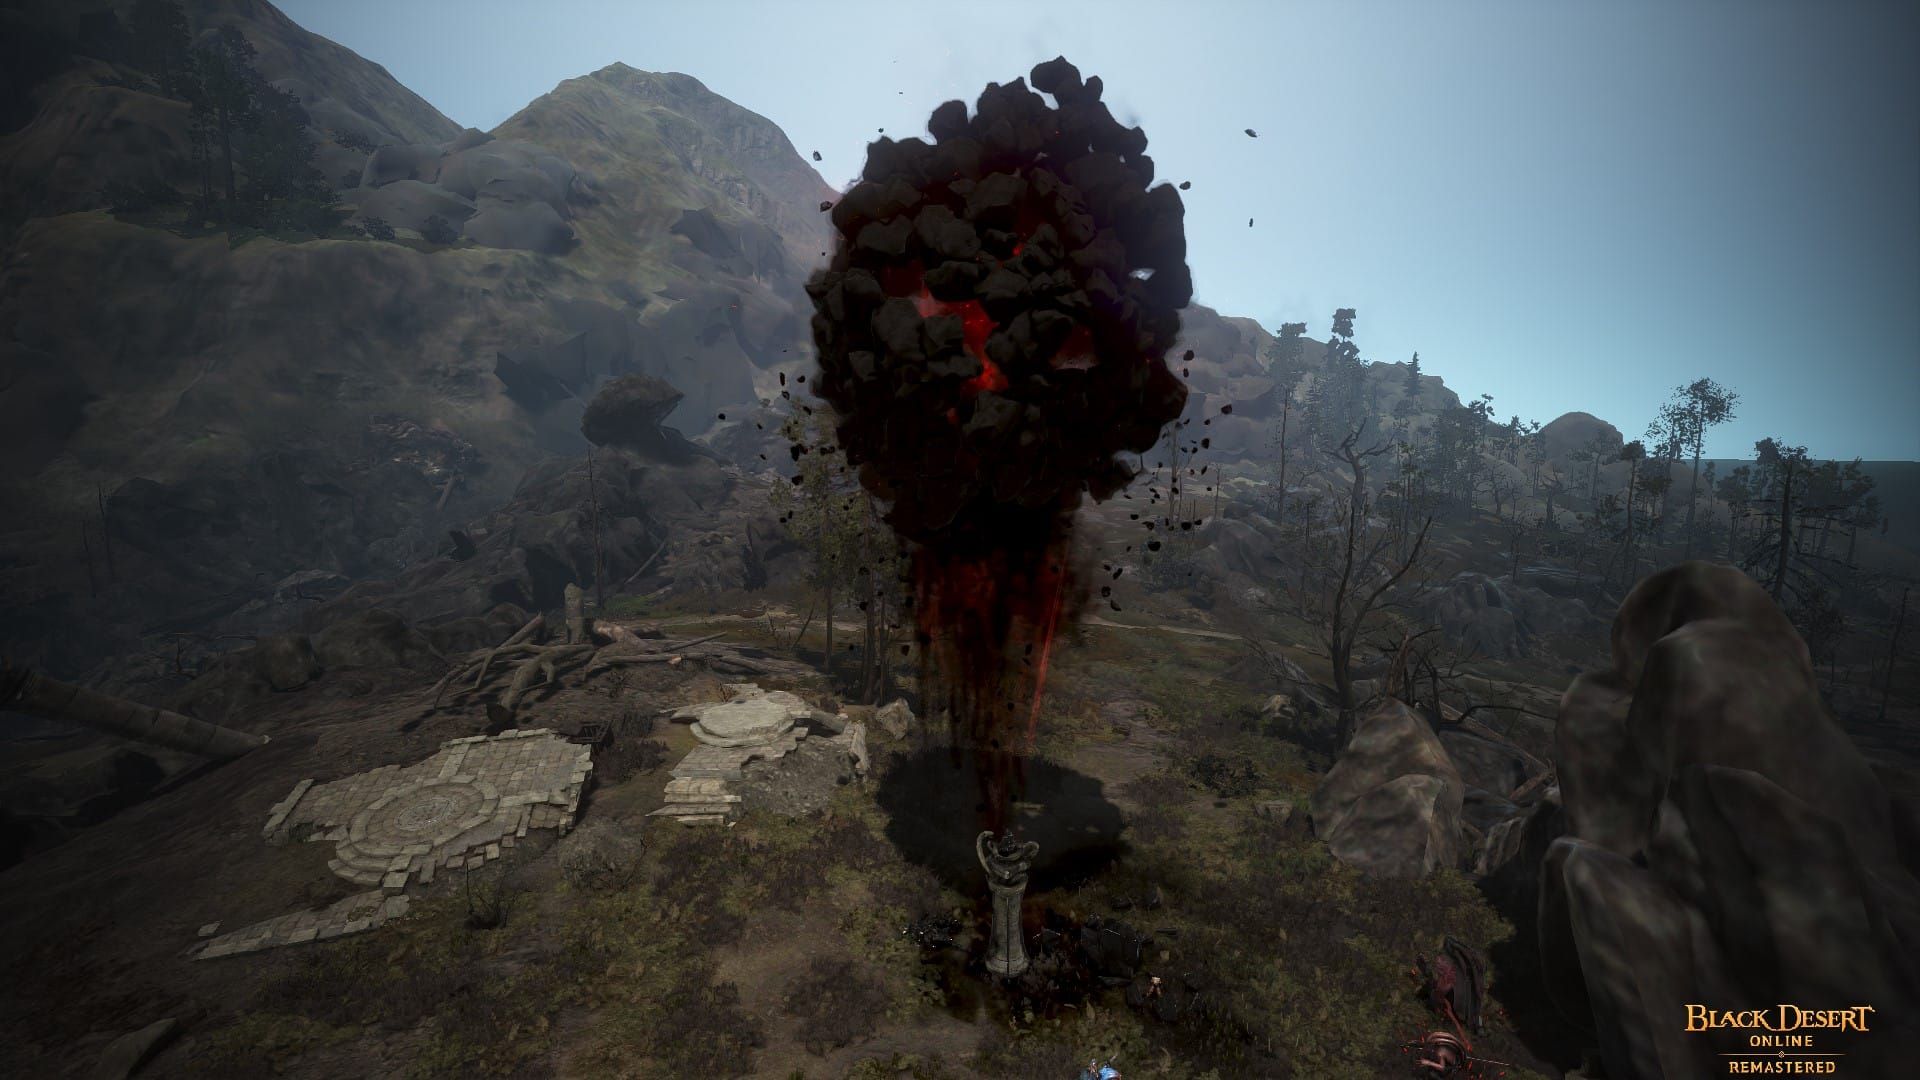
Throughout your grinding you will make use of the structure called Unstable Star Debris.
As monsters are immune to Crowd Control, this is the only way to CC them. Once destroyed it will knock down nearby monsters, even the ones that are ignoring you, due to aggro limitation of 10. It also has the chance to kill them instantly!
It is important to use skills with a Down Attack Damage modifier on them in order to deal most damage. As your AP is growing at a certain point it won’t make a difference in terms of clearing speed if you group around the crystal or not. Some classes as Awakening Sorceress don’t have many Down Attack Damage modifiers and it is faster for them to skip the crystal.

Occasionally you will have a chance of spawning an Elite Monster called <Possessed> Apostle of Malevolence. He has more HP comparable to other monsters.
If not defeated within 5 minutes he will disappear. It is reasonable to kill him in your next cycle of rotation, since you can agro respawned mobs simultaneously, as opposed to only focusing him. Also, he is guaranteed to drop at least 1x Caphras Stone and 1x Ancient Dust.
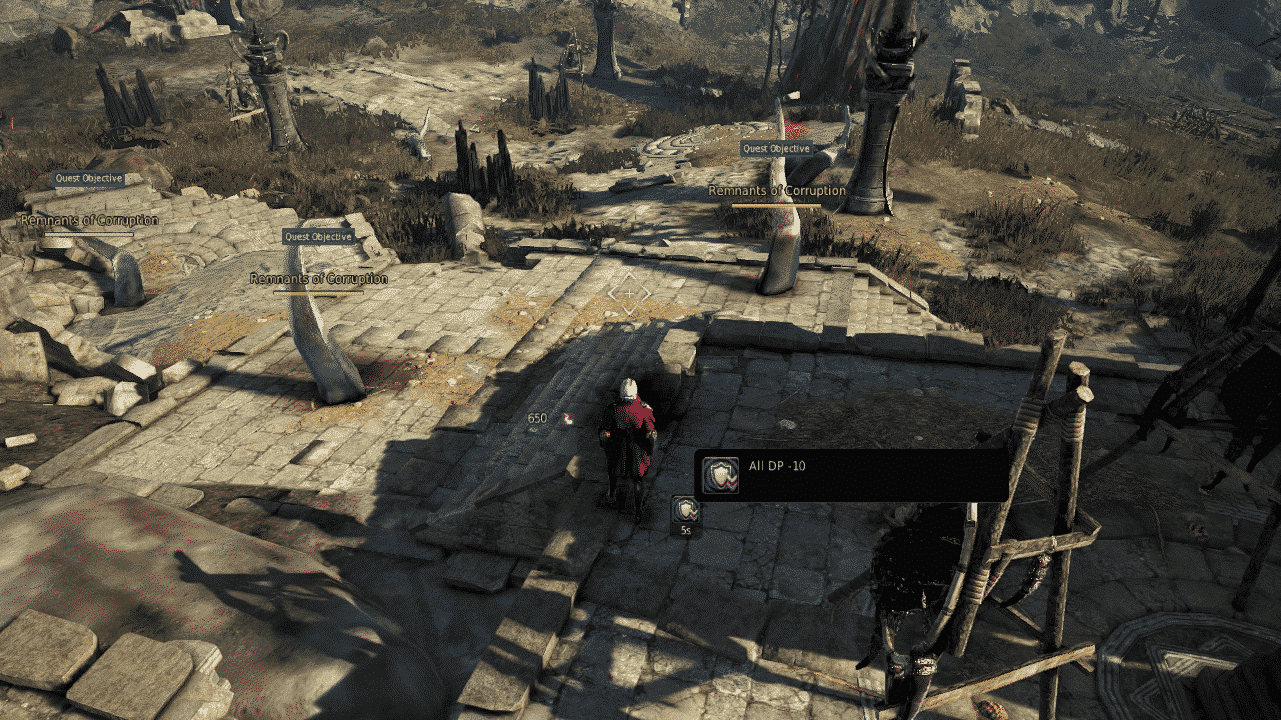
One thing to keep in mind for players with low DP, is the debuff applied by Remnants of Corruption, especially at nighttime.
This is something you will have to get used to.
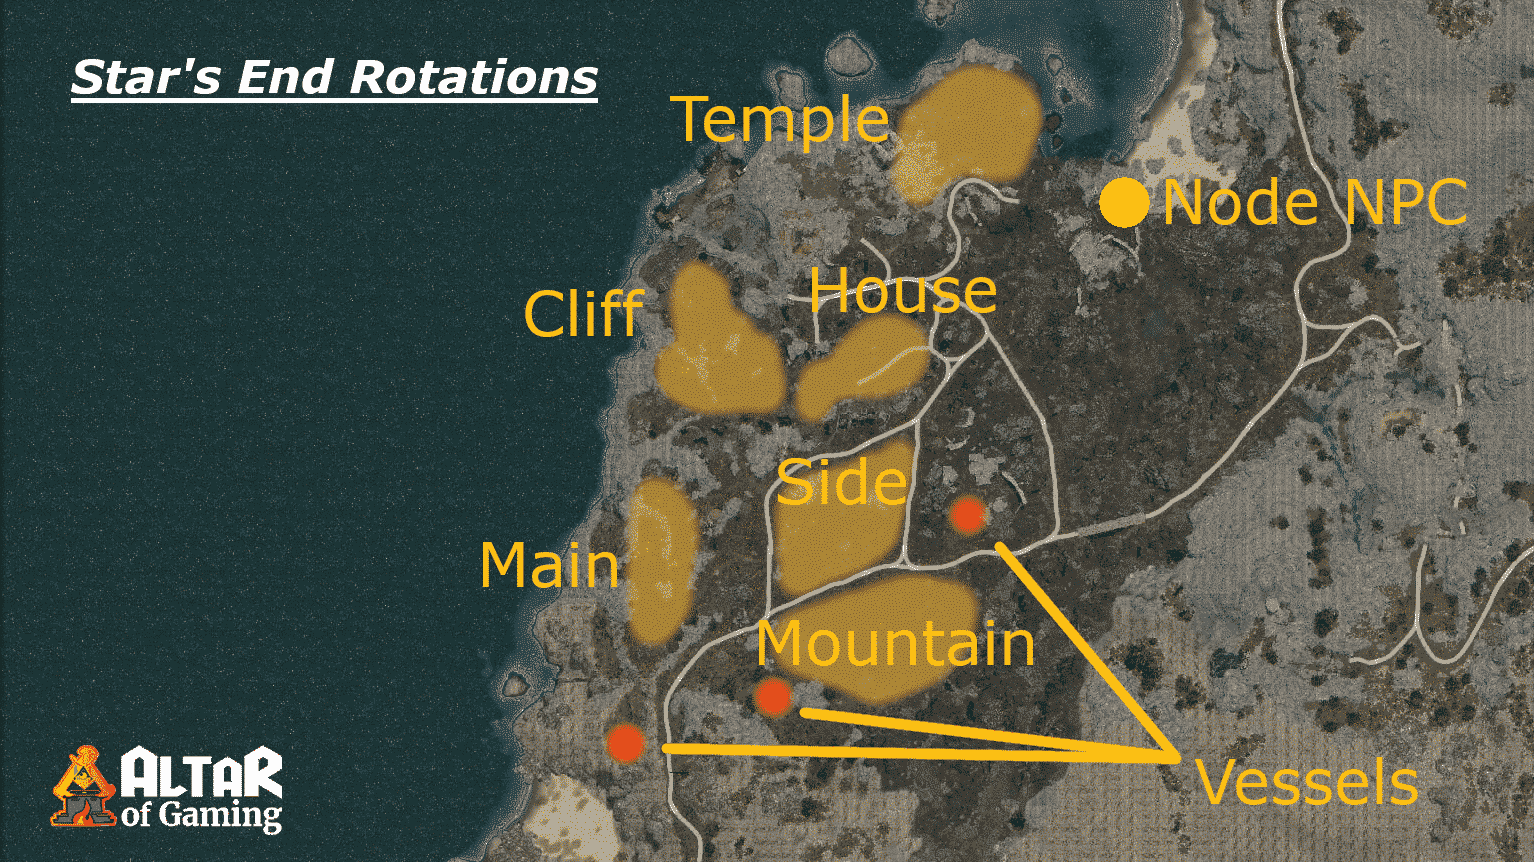
Let’s do a quick review of all Rotations on Star’s End.
Players with at least 341 DP might try grinding a recently added spot called – Vessels of Inquisition. Once you attack the pillar, monsters will start spawning around it and try to destroy the pillar. It will flash red indicating low health. After it gets destroyed you will need to wait 2 minutes for it to respawn. You can expect around 5,000 Trash Loot per Hour at this spot with just Blue Loot Scroll. It is lower than at Main, but at least you won’t be bothered with proper grouping.

Randomly you will see Unstable Star Debris appearing from nowhere, you can use it here to your advantage as described above.
The mobs might look the same, but do not let Apostles of Immorality (big guys) surround you. They can easily oneshot you if their attacks are synchronized. Beware of back attacks!

Ranged type of mobs – [Sin-filled] Harbinger of Defilement will appear around Vessel and throw spear from the distance at you or the tower. They were added to prevent players from standing in one place. Now you will be forced to move around more often. Spear throwers have very low HP and are easily defeated in 1-2 skills.

There are 2 relevant Daily Quests relating to Star’s End at Calpheon Northwestern Outpost. Speak to Elionian Priestess to receive [Repeat] Evidence of Corruption Quest that rewards you with a Caphras Stone.

At the South West exit of Calpheon Northwestern Outpost you will meet a Soldier and can take [Repeat] Stenchful Frontline Quest, which will reward you with an item exchangeable for Mass of Pure Magic.
Bring 15x  Destructive Illusions to the NPC located at Star’s End to receive 1x Mass of Pure Magic.
| Quest | Goal | Reward |
|---|---|---|
| [Repeat] Evidence of Corruption | Collect 10 tentacles from the Remnants of Corruption | Caphras Stone |
| [Repeat] Stenchful Frontline | Defeat 10 Apostles of Corruption. | Destructive Illusion |
| No Loot Scroll | 2 hours Item Collection Increase Scroll (60 min) |
1 hour Item Collection Increase Scroll: Advanced (60 min) |
|
| Item Drop Rate +100% Item Drop Amount +50% |
Item Drop Rate +100% ItemDrop Amount +100% |
||
| Trash amount | 3,500 | 10,500 | 7,000 |
The answer to that question comes to personal preference, I will just present you with the data. Comparing 2 hours of Blue and 1 hour Yellow Loot Scroll, you will have ~33% more trash amount by grinding 2 hours with Blue.
Use the Yellow Loot Scroll, if you are fine with giving up a third, but grinding 1 hour less.
If you are running low on Loot Scrolls or have more free time, use the Blue Loot Scroll.

It is a known fact that in Black Desert decimal places of trash number get rounded down. (That is the reason Blue Loot Scroll does not affect drop amount at Mirumok Ruins!)
Except Elites, Star’s End monsters drop either x1, x2 or x3 trash.
| Agris and Blue LS | Agris and Yellow LS | ||
| Increase | +200% | +250% | |
| Trash amount | x1, x2, x3 | x3, x6, x9 | x3.5, x7, x10.5 |
As you can see, Agris and Yellow LS will get rounded down to x3, x7, x10 instead of x3.5, x7, x10.5. Obviously, it is better to use Agris and Blue LS due to odd numbers appearing more often in the loot table.
Obviously  Vell's Heart is what you want, except if you are not at that point of your gear progression viable option would be Alchemy Stone of Destruction. I would not advise buy anything more expensive than the Sturdy Alchemy Stone of Destruction.
| Vell's Heart |
Sturdy Alchemy Stone of Destruction |
|---|---|
| All AP +8 All Accuracy +10 Ignores All Resistance +5% Attack Speed +5% Casting Speed +5% |
All AP +6 All Accuracy +8 |

You can get the Church Buff in Calpheon by talking to the NPC Leona and exchanging 5x Gold Bar 1G (~500k Silver) for the following buffs which are rolled randomly and stay on you for 2 hours:
 Simple Cron Meal is what you wanna go for, because of its Monster Damage. If you feel like you lack Accuracy and Duel for the spot frequently use
  Exquisite Cron Meal.
| Simple Cron Meal |
Exquisite Cron Meal |
|---|---|
| Extra AP against Monsters +30 Combat EXP +20% Skill EXP +10% Attack Speed +2 Casting Speed +2 Movement Speed +3 Max HP +150 Chance to Gain Knowledge +10% Chance to Gain Higher-Grade Knowledge +5% Weight Limit +100LT Down Attack Damage +5% Damage from Monsters -6% Heatstroke/Hypothermia Resistance +10% |
All AP +8 All Accuracy +15 Attack Speed +2 Casting Speed +2 Movement Speed +2 Critical Hit +2 All Evasion +15 Max HP +150 Max Stamina +200 Back Attack Damage +5% Critical Hit Damage +5% All Resistance +4% Ignores All Resistance +4% |
While Draughts and normal Elixirs don’t stack, you can stack a Perfume with either of them:
 Spirit Perfume Elixir is the best in slot Elixir. You will never run out of the secondary resource and your Critical Hit Rate will hit the maximum amount. There is no reason not to use it. Although, if you still feel yourself squishy and have some Event versions of
  Khalk's Elixir laying around it is a viable option as well.
| Spirit Perfume Elixir |
Khalk's Elixir |
|---|---|
| MAX HP +300 Critical Hit Rate +5 MP/WP/SP +3 per every good hit |
All Resistance +10% Damage Reduction +15 Max HP +100 Movement Speed +5% |
 Frenzy Draught is generally the best choice for any class, it offers everything you need for Star’s End, except tankiness. For the lack of later, consider substituting it with
  Beast's Draught, which also is a cheaper option.
| Frenzy Draught |
Beast's Draught |
|---|---|
| Extra AP Against Monsters +30 All Accuracy +12 Max Stamina +200 HP Recovery +3 per hit All DP -15 Critical Hit Damage +10% Weight Limit +100 LT |
Extra AP against Monsters +15 Combat EXP +20% Skill EXP +10% Recover HP +1 on Attack Damage from Monsters -10% Weight Limit +100 LT |
To make the maximum use of Star’s End specific knockdown mechanic we can run Elixirs instead of Draughts, since the latter doesn’t offer Down Attack damage modifier. In general it is better to use Elixirs, but not always convenient. Note that Elixirs and Draughts do not stack with each other.
 Elixir of Sharp Detection – Critical Hit Damage +15%
 Elixir of Endless Frenzy – All DP -8 / All AP +13
 Elixir of Brutal Carnage – Down Attack Damage +15%
 Fierce Demihuman Hunting Elixir – Extra Damage Against Demihumans +15
The only buff I will recommend is Master’s Stuffed Black Leopard Head:
 Master's Stuffed Black Leopard Head – All AP +9 for 1 hour
Since there is no Repair NPC at the node, you will need a Naphart Campsite, which is debatably a P2W item. By placing it on the ground and interacting with it you will have an option to purchase a Body Enhancement buff for 60/90/180 minutes priced at 1,000,000/1,500,000/4,500,000 Silver respectively.
Make sure that you have a valid Villa Invitation (7 Days) in your inventory, or the Pearl Shop Item – Secret Book of Old Moon active:
In summary that’s how your buffs will look like:
Vell's HeartSimple Cron MealSpirit Perfume ElixirFrenzy Draught
Master's Stuffed Black Leopard HeadCheck the grinding videos below for your specific class, and try to mimic the pulling and skill rotations:
Happy Grinding!

Defeating monsters or gathering
Grinding Black Stone (Weapon) or Black Stone (Armor)
Looting field bosses
Hunting Khalks or whales
Harvesting magical seeds or Mysterious Seeds
Excavating the node Star's End
Manufacturing Remnants of the Rift
Complete [Weekly] Delivering Essence of Tunta quest
 Black Spirit's Claw(1)
 Remnants of the Rift(1)

 Black Stone Powder(200)
 Tyrant's Blood(3)
 Oil of Fortitude(2)
Processing (L) - Simple Alchemy with the following materials
Clear Blackstar Crystal x1
Magic Crystal of Infinity - Critical Hit x1
Forest Fury x3
※ This crystal has a chance of shattering upon death.
※ Press RMB to start transfusion.
※ Crystals can be transfused via the Black Spirit.
 Magic Crystal of Infinity - Critical Hit(1)
 Forest Fury(3)

Defeat monsters in certain zones
※ This crystal has a chance of shattering upon death.
※ Press RMB to start transfusion.
※ Crystals can be transfused via the Black Spirit.
 Yellow Grade Black Magic Crystals
Defeating monsters or gathering
Grinding Black Stone (Weapon) or Black Stone (Armor)
Looting field bosses
Hunting Khalks or whales
Harvesting magical seeds or Mysterious Seeds
Excavating the node Star's End
Manufacturing Remnants of the Rift
Complete [Weekly] Delivering Essence of Tunta quest
Black Spirit's Claw(1) Remnants of the Rift(1)
Quests, defeating monsters, or Gathering

Defeating monsters in Balenos, Valencia, Kamasylvia, or Drieghan
- How to Obtain: Mining, lumbering, fluid collecting (sap), fluid collecting (blood), underwater gathering, butchering, or tanning
– Press RMB to start enhancement.
 Ancient Spirit Dust(5)
 Black Stone(1)
Defeating monsters in Balenos, Valencia, Kamasylvia, or Drieghan
- How to Obtain: Mining, lumbering, fluid collecting (sap), fluid collecting (blood), underwater gathering, butchering, or tanning
– Press RMB to start enhancement.
Ancient Spirit Dust(5) Black Stone(1)
It can be Excavated at Glish Ruins, Fountain of Origin.


※ How to Obtain Design: Karlstein to craft Karlstein outfit boxes:
1. Accept the quest "A Hero in Karlstein I" from Rubin the Herald of Calpheon City and complete the questline in order to obtain the item.
2. Accept the quest "[Daily] To Become Karlstein" from Clara Siciliano the Bookseller of Calpheon City and complete the quest in order to obtain more of this item.

※ Category: Fairy
※ Main Usage: Important ingredient to exchange into fairies, helpful companions to any adventurer
- Exchange Info
Kamasylve Temple
- Exchange 2: Sealed Fairy Wings x1
Kamasylve Temple
- Exchange 10: Fairy's Blessing x1

It can be produced by using a Cooking Utensil in your residence if you are at least Cooking Beginner 1.
– You can use this to grow your Fairy; it gives more EXP than other materials that can be used to grow your Fairy.
 Cooking Honey(2)
 Full-bodied Exotic Herbal Wine(4)
 Sugar(10)
 Fruits(2)

Effect: Valks Enhancement Chance +1
※ Valks enhancement chance, which you get from Valks' Cry or Fairy's Blessing, is separate from the enhancement chance you get from failed enhancements.
※ The total amount of Valks enhancement chance you can accumulate is+10.
※ You have to complete the quest "[Awakening] Traces of Edana" or reach Lv. 30 to use this item.
"I hope the memories of our time together can give you strength."
※ Category: Enhancement
※ Main Usage: Increases Enhancement Chance

Obtain this item by defeating monsters in all areas.

 Wind Spirit Stone Fragment(10)
 Earth Spirit Stone Fragment(10)
Defeat monsters in certain zones
※ This crystal has a chance of shattering upon death.
※ Press RMB to start transfusion.
※ Crystals can be transfused via the Black Spirit.
Yellow Grade Black Magic CrystalsDefeating monsters in Balenos, Valencia, Kamasylvia, or Drieghan
- How to Obtain: Mining, lumbering, fluid collecting (sap), fluid collecting (blood), underwater gathering, butchering, or tanning
– Press RMB to start enhancement.
Ancient Spirit Dust(5) Black Stone(1)Quests, defeating monsters, or Gathering
It can be Excavated at Glish Ruins, Fountain of Origin.
Black Stone Powder(200) Tyrant's Blood(3) Oil of Fortitude(2)
Defeat monsters in certain zones
※ This crystal has a chance of shattering upon death.
※ Press RMB to start transfusion.
※ Crystals can be transfused via the Black Spirit.

Processing (L) - Simple Alchemy with the following materials
JIN, BON, or WON Magic Crystal x1
Combined Magic Crystal - Hoom x1
Garmoth's Scale x3
- The 2 crystal and 4 crystal set effects are applied separately, and only once each.
※ This crystal has a chance of shattering upon death.
※ Press RMB to start transfusion.
※ Crystals can be transfused via the Black Spirit.
 Garmoth's Scale(3)
 Combined Magic Crystal - Hoom(1)
 BON Magic Crystal - Viper(1)
Processing (L) - Simple Alchemy with the following materials
Clear Blackstar Crystal x1
Magic Crystal of Infinity - Critical Hit x1
Forest Fury x3
※ This crystal has a chance of shattering upon death.
※ Press RMB to start transfusion.
※ Crystals can be transfused via the Black Spirit.
Magic Crystal of Infinity - Critical Hit(1) Forest Fury(3)Processing (L) - Simple Alchemy with the following materials
JIN, BON, or WON Magic Crystal x1
Combined Magic Crystal - Hoom x1
Garmoth's Scale x3
- The 2 crystal and 4 crystal set effects are applied separately, and only once each.
※ This crystal has a chance of shattering upon death.
※ Press RMB to start transfusion.
※ Crystals can be transfused via the Black Spirit.
Garmoth's Scale(3) Combined Magic Crystal - Hoom(1) BON Magic Crystal - Viper(1)
Processing (L) - Simple Alchemy with the following materials
Kagtunak x1
Black Magic Crystal - Armor x1
※ This crystal has a low chance of shattering upon death.
※ Press RMB to start transfusion.
※ Crystals can be transfused into equippable gear via the Black Spirit.
 Black Magic Crystal - Armor(1)
 Kagtunak(1)
Processing (L) - Simple Alchemy with the following materials (according to a set probability)
Black Magic Crystal - Viper x1
Forest Fury x1
Magical Shard x10
※ This crystal has a chance of shattering upon death.
※ Press RMB to start transfusion.
※ Crystals can be transfused via the Black Spirit.
※ Obtain Forest Fury by defeating monsters in Kamasylvia.
※ Obtain Magical Shard by heating yellow-grade Black Magic Crystals.
 Black Magic Crystal - Viper(1)
 Magical Shard(10) Forest Fury(1)
Processing (L) - Simple Alchemy with the following materials
JIN, BON, or WON Magic Crystal x1
Combined Magic Crystal - Hoom x1
Garmoth's Scale x3
- The 2 crystal and 4 crystal set effects are applied separately, and only once each.
※ This crystal has a chance of shattering upon death.
※ Press RMB to start transfusion.
※ Crystals can be transfused via the Black Spirit.
Garmoth's Scale(3) Combined Magic Crystal - Hoom(1) BON Magic Crystal - Viper(1)
Processing (L) - Heating with the following materials
Red Essence x1
Ancient Magic Crystal of Nature - Adamantine x1
※ This crystal has a chance of shattering upon death.
※ Press RMB to start transfusion.
※ Crystals can be transfused via the Black Spirit.
※ Exchange Battlefield Token obtained from the Red Battlefield via Ornella in Heidel for Red Essences.
 Red Essence(1)
 Ancient Magic Crystal of Nature - Adamantine(1)
 Yona's Fragment(15)
 Melted Titanium Shard(10)
 Trace of Chaos(10) Black Stone Powder(20)
It can be enhanced with the same item, but due to the Crystal of Symmetry, the item will not be destroyed if enhancement fails. However, the enhancement level will drop and the max durability will decrease by 10.
- Ingredient for Max Durability Repair: Yona's Fragment
How to obtain Capotia Accessories
Ring: Reach Lv. 58
Earring: Reach Lv. 59
Belt: Reach Lv. 60
Necklace: Reach Lv. 61
After reaching Lv. 61, you can craft a Capotia Earring by processing Yona's Fragment x300, Nouver's Latent Aura x3, Oil of Corruption x5 with Manufacture.
Yona's Fragment(300) Latent Boss Aura(3)
 Oil of Corruption(5) Yona's Fragment(20)
 Fine Thick Fur(5)
 Trace of the Earth(10) Black Stone Powder(20)
- Growth Attempt: You need to be Alchemy Apprentice 1 or up.
- Fuel: oil, blood, reagent
- Polishing Material: pure metal crystal, ingot
- Use Grinding in the Processing window (L)to get Alchemy Stone Shard.

Defeating monsters in Balenos, Valencia, Kamasylvia, or Drieghan
- How to Obtain: Mining, lumbering, fluid collecting (sap), fluid collecting (blood), underwater gathering, butchering, or tanning
– Press RMB to start enhancement.
Ancient Spirit Dust(5) Black Stone(1)Defeating monsters in Balenos, Valencia, Kamasylvia, or Drieghan
- How to Obtain: Mining, lumbering, fluid collecting (sap), fluid collecting (blood), underwater gathering, butchering, or tanning
– Press RMB to start enhancement.
Ancient Spirit Dust(5) Black Stone(1)Defeating monsters or gathering
Grinding Black Stone (Weapon) or Black Stone (Armor)
Looting field bosses
Hunting Khalks or whales
Harvesting magical seeds or Mysterious Seeds
Excavating the node Star's End
Manufacturing Remnants of the Rift
Complete [Weekly] Delivering Essence of Tunta quest
Black Spirit's Claw(1) Remnants of the Rift(1)
Defeating monsters or gathering
Grinding Black Stone (Weapon) or Black Stone (Armor)
Looting field bosses
Hunting Khalks or whales
Harvesting magical seeds or Mysterious Seeds
Excavating the node Star's End
Manufacturing Remnants of the Rift
Complete [Weekly] Delivering Essence of Tunta quest
Black Spirit's Claw(1) Remnants of the Rift(1)Defeating monsters in Balenos, Valencia, Kamasylvia, or Drieghan
- How to Obtain: Mining, lumbering, fluid collecting (sap), fluid collecting (blood), underwater gathering, butchering, or tanning
– Press RMB to start enhancement.
Ancient Spirit Dust(5) Black Stone(1)
– Growth Attempt: Unknown.
– Fuel: Vell's Fine Powder and Mystical Spirit Powder
– Polishing Material: Unknown.
 Vell's Concentrated Magic(1)
 Alchemy Stone Shard(1500)
- Growth Attempt: You need to be Alchemy Apprentice 1 or up.
- Fuel: oil, blood, reagent
- Polishing Material: pure metal crystal, ingot
- Use Grinding in the Processing window (L)to get Alchemy Stone Shard.
– Growth Attempt: Unknown.
– Fuel: Vell's Fine Powder and Mystical Spirit Powder
– Polishing Material: Unknown.
Vell's Concentrated Magic(1) Alchemy Stone Shard(1500)- Growth Attempt: You need to be Alchemy Apprentice 1 or up.
- Fuel: oil, blood, reagent
- Polishing Material: pure metal crystal, ingot
- Use Grinding in the Processing window (L)to get Alchemy Stone Shard.

Use Simple Cooking in the Processing window (L) to combine Knight Combat Rations x1, Mediah Meal x3, Valencia Meal x3, Ancient Cron Spice x1.
Use Simple Cooking in the Processing window (L) to combine Serendia Meal x3, Special Drieghanese Meal x1, Mediah Meal x3, Ancient Cron Spice x1.
※ Higher-grade versions of the same food item can be used as a substitute at a 1:3 ratio.
* While this item is in effect the effects of other food items will not be applied, except Health EXP gain.
* Only the effects of the last Cron Meal used will be applied (e.g. Seafood Cron Meal, Simple Cron Meal, Exquisite Cron Meal).
 Knight Combat Rations(1)
 Mediah Meal(3)
 Valencia Meal(3)
 Ancient Cron Spice(1)
Use Simple Cooking in the processing window (L) to combine Special Arehaza Meal x1, Serendia Meal x3, Kamasylvia Meal x3 and Ancient Cron Spice x1.
* Higher-grade versions of the same food item can be used as a substitute at a 1:3 ratio.
* While this item is in effect the effects of other food items will not be applied, except Health EXP gain.
* Only the effects of the last Cron Meal used will be applied.
 Special Arehaza Meal(1)
 Serendia Meal(3)
 Kamasylvia Meal(3) Ancient Cron Spice(1)
Use Simple Cooking in the Processing window (L) to combine Knight Combat Rations x1, Mediah Meal x3, Valencia Meal x3, Ancient Cron Spice x1.
Use Simple Cooking in the Processing window (L) to combine Serendia Meal x3, Special Drieghanese Meal x1, Mediah Meal x3, Ancient Cron Spice x1.
※ Higher-grade versions of the same food item can be used as a substitute at a 1:3 ratio.
* While this item is in effect the effects of other food items will not be applied, except Health EXP gain.
* Only the effects of the last Cron Meal used will be applied (e.g. Seafood Cron Meal, Simple Cron Meal, Exquisite Cron Meal).
Knight Combat Rations(1) Mediah Meal(3) Valencia Meal(3) Ancient Cron Spice(1)Use Simple Cooking in the processing window (L) to combine Special Arehaza Meal x1, Serendia Meal x3, Kamasylvia Meal x3 and Ancient Cron Spice x1.
* Higher-grade versions of the same food item can be used as a substitute at a 1:3 ratio.
* While this item is in effect the effects of other food items will not be applied, except Health EXP gain.
* Only the effects of the last Cron Meal used will be applied.
Special Arehaza Meal(1) Serendia Meal(3) Kamasylvia Meal(3) Ancient Cron Spice(1)
> It can be produced by using Alchemy Tool in your residence if Skilled 1 or up in Alchemy.
* Only the effects of the last elixir used will be applied (e.g. Perfume of Courage, Perfume of Swiftness, Khalk's Elixir, Elixir of Deep Sea, Spirit Perfume Elixir, Perfume of Charm).
 Dead Tree Essence(1)
 Fruit of Nature(1)
 Loopy Tree Sap(10)
 Powder of Darkness(10)
 Violet Flower(2)
It can be produced by using Alchemy Tool in your residence if Skilled 1 or up in Alchemy.
* Only the effects of the last elixir used will be applied (e.g. Perfume of Courage, Perfume of Swiftness, Khalk's Elixir, Elixir of Deep Sea, Spirit Perfume Elixir, Perfume of Charm).
 Fugitive Khalk's Skin(1)
 White Cedar Sap(10) Trace of Chaos(5)
 Purified Water(4) Oil of Corruption(2)
> It can be produced by using Alchemy Tool in your residence if Skilled 1 or up in Alchemy.
* Only the effects of the last elixir used will be applied (e.g. Perfume of Courage, Perfume of Swiftness, Khalk's Elixir, Elixir of Deep Sea, Spirit Perfume Elixir, Perfume of Charm).
Dead Tree Essence(1) Fruit of Nature(1) Loopy Tree Sap(10) Powder of Darkness(10) Violet Flower(2)It can be produced by using Alchemy Tool in your residence if Skilled 1 or up in Alchemy.
* Only the effects of the last elixir used will be applied (e.g. Perfume of Courage, Perfume of Swiftness, Khalk's Elixir, Elixir of Deep Sea, Spirit Perfume Elixir, Perfume of Charm).
Fugitive Khalk's Skin(1) White Cedar Sap(10) Trace of Chaos(5) Purified Water(4) Oil of Corruption(2)
Processing (L) - Simple Alchemy with the following materials
Abyssal Essence x1
Elixir of Demihuman Hunt x3
Elixir of Frenzy x3
Tears of the Falling Moon x1
※ Higher-grade versions of the same elixir can be used as a substitute at a 1:3 ratio.
※ Type: Draught
※ While the draught's effects are active, only the effects of perfumes, Whale Tendon Elixirs, and Tough Whale Tendon Elixirs will be stacked.
※ Only the effects of the last draught used will be applied.
 Abyssal Essence(1)
 Elixir of Demihuman Hunt(3)
 Elixir of Frenzy(3)
 Tears of the Falling Moon(1)
Use Simple Alchemy in the Processing window (L) to combine Grim Reaper's Elixir x3, EXP Elixir x3, Elixir of Will x3, and Tears of the Falling Moon x1.
* Higher-grade versions of the same elixir can be used as a substitute at a 1:3 ratio.
* While this item is in effect the effects of elixirs will not be applied, excluding those of Perfume of Courage, Perfume of Swiftness, Elixir of Deep Sea, Khalk's Elixir, Spirit Perfume Elixir, Whale Tendon Elixir or Tough Whale Tendon Elixir.
* Only the effects of the last draught used will be applied.
 Grim Reaper's Elixir(3)
 EXP Elixir(3)
 Elixir of Will(3) Tears of the Falling Moon(1)
Processing (L) - Simple Alchemy with the following materials
Abyssal Essence x1
Elixir of Demihuman Hunt x3
Elixir of Frenzy x3
Tears of the Falling Moon x1
※ Higher-grade versions of the same elixir can be used as a substitute at a 1:3 ratio.
※ Type: Draught
※ While the draught's effects are active, only the effects of perfumes, Whale Tendon Elixirs, and Tough Whale Tendon Elixirs will be stacked.
※ Only the effects of the last draught used will be applied.
Abyssal Essence(1) Elixir of Demihuman Hunt(3) Elixir of Frenzy(3) Tears of the Falling Moon(1)Use Simple Alchemy in the Processing window (L) to combine Grim Reaper's Elixir x3, EXP Elixir x3, Elixir of Will x3, and Tears of the Falling Moon x1.
* Higher-grade versions of the same elixir can be used as a substitute at a 1:3 ratio.
* While this item is in effect the effects of elixirs will not be applied, excluding those of Perfume of Courage, Perfume of Swiftness, Elixir of Deep Sea, Khalk's Elixir, Spirit Perfume Elixir, Whale Tendon Elixir or Tough Whale Tendon Elixir.
* Only the effects of the last draught used will be applied.
Grim Reaper's Elixir(3) EXP Elixir(3) Elixir of Will(3) Tears of the Falling Moon(1)
Craft >Elixir of Detection
 Oil of Storms(1)
 Pure Powder Reagent(6)
 White Truffle Mushroom(3)
 Trace of Savagery(3)
 Old Tree Bark(2)
 Elixir of Detection ( Skilled 1 )
There is a slight chance of obtaining Elixir of Endless Frenzy when producing Elixir of Frenzy if your Alchemy level is Artisan 1 or above.
Elixir of Frenzy ( Skilled 1 )
There is a slight chance of obtaining Elixir of Brutal Carnage when producing Elixir of Carnage if alchemy level is Artisan Lv. 1 or up.
 Elixir of Carnage ( Skilled 1 )
There is a slight chance of obtaining Elixir of Fierce Demihuman Hunt when producing Elixir of Demihuman Hunt if your Alchemy level is Professional 1 or above.
Elixir of Demihuman Hunt ( Apprentice 1 )
 Artisan's Stuffed Black Leopard Head(1)
 Fire Horn(1)
 Usable Hide(60)
– Growth Attempt: Unknown.
– Fuel: Vell's Fine Powder and Mystical Spirit Powder
– Polishing Material: Unknown.
Vell's Concentrated Magic(1) Alchemy Stone Shard(1500)Use Simple Cooking in the Processing window (L) to combine Knight Combat Rations x1, Mediah Meal x3, Valencia Meal x3, Ancient Cron Spice x1.
Use Simple Cooking in the Processing window (L) to combine Serendia Meal x3, Special Drieghanese Meal x1, Mediah Meal x3, Ancient Cron Spice x1.
※ Higher-grade versions of the same food item can be used as a substitute at a 1:3 ratio.
* While this item is in effect the effects of other food items will not be applied, except Health EXP gain.
* Only the effects of the last Cron Meal used will be applied (e.g. Seafood Cron Meal, Simple Cron Meal, Exquisite Cron Meal).
Knight Combat Rations(1) Mediah Meal(3) Valencia Meal(3) Ancient Cron Spice(1)> It can be produced by using Alchemy Tool in your residence if Skilled 1 or up in Alchemy.
* Only the effects of the last elixir used will be applied (e.g. Perfume of Courage, Perfume of Swiftness, Khalk's Elixir, Elixir of Deep Sea, Spirit Perfume Elixir, Perfume of Charm).
Dead Tree Essence(1) Fruit of Nature(1) Loopy Tree Sap(10) Powder of Darkness(10) Violet Flower(2)Processing (L) - Simple Alchemy with the following materials
Abyssal Essence x1
Elixir of Demihuman Hunt x3
Elixir of Frenzy x3
Tears of the Falling Moon x1
※ Higher-grade versions of the same elixir can be used as a substitute at a 1:3 ratio.
※ Type: Draught
※ While the draught's effects are active, only the effects of perfumes, Whale Tendon Elixirs, and Tough Whale Tendon Elixirs will be stacked.
※ Only the effects of the last draught used will be applied.
Abyssal Essence(1) Elixir of Demihuman Hunt(3) Elixir of Frenzy(3) Tears of the Falling Moon(1)Craft >Elixir of Detection
Oil of Storms(1) Pure Powder Reagent(6) White Truffle Mushroom(3) Trace of Savagery(3) Old Tree Bark(2) Elixir of Detection ( Skilled 1 )There is a slight chance of obtaining Elixir of Endless Frenzy when producing Elixir of Frenzy if your Alchemy level is Artisan 1 or above.
Elixir of Frenzy ( Skilled 1 )There is a slight chance of obtaining Elixir of Brutal Carnage when producing Elixir of Carnage if alchemy level is Artisan Lv. 1 or up.
Elixir of Carnage ( Skilled 1 )There is a slight chance of obtaining Elixir of Fierce Demihuman Hunt when producing Elixir of Demihuman Hunt if your Alchemy level is Professional 1 or above.
Elixir of Demihuman Hunt ( Apprentice 1 ) Artisan's Stuffed Black Leopard Head(1) Fire Horn(1) Usable Hide(60)|
|
GigRise
I play and stream Black Desert, main Archer since it's release. Grinding and spreadsheets are my passion. Former officer of the strongest Tier 1 medium guild - Lunacy and now I am Guild Master of FunHub on EU.
|

Leave a Reply