About GW2 |
||
|---|---|---|
|
|
||
| Release Date Aug 22, 2012 |
||
|
|
Developer ArenaNet |
|
|
|
Publisher NCSoft |
|
|
|
Country of Origin United States |
|
Welcome to my Beginner’s Guide for Guild Wars 2, the MMORPG from ArenaNet & NCSoft. With a ground-breaking release in 2012, the game is still offering amazing content, great gameplay & a friendly / large community.
In the following guide, I’m going to assume that you are a newcomer to the Guild Wars series, therefore I will breakdown the basic aspects of the game. Let’s start:
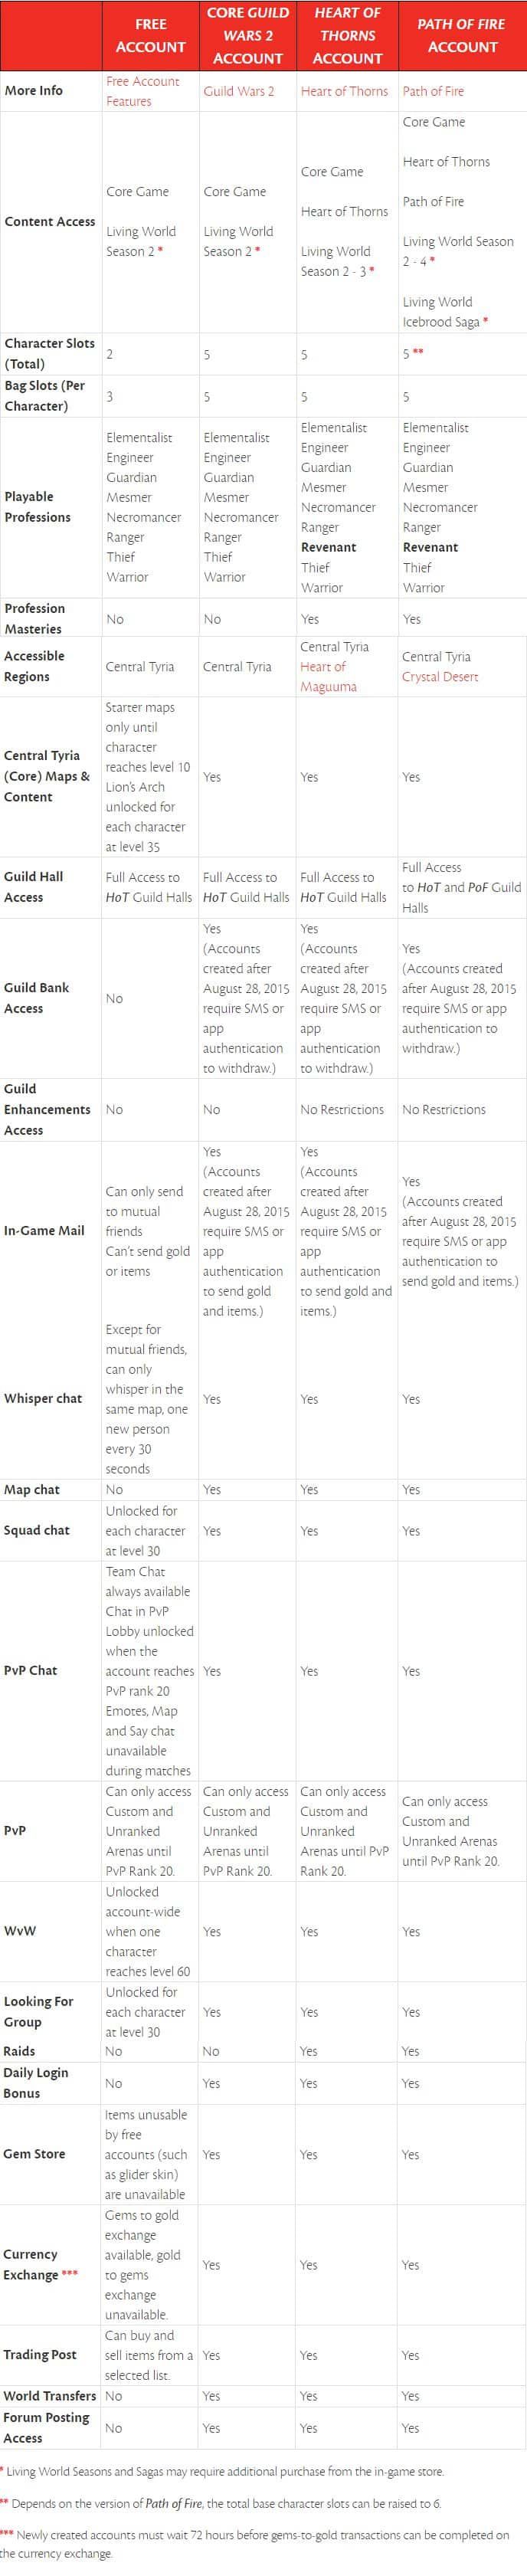
First things first. There are different types of accounts in the game, depending what you have purchased. This divide into:
As of August 30 2019, purchasing Path of Fire also grants you Heart of Thorns for no additonal fee!
Let’s take a look at the characteristics of each type of account, as given to us by ArenaNet in their official forum.
 >
>
Choosing a server in Guild Wars 2 is essential and should be given thought. It affects one of the three aspects of the game: World vs World (WvW for short). It’s strongly recommended to get in a server with high population.
Note: server ONLY affects WvW. In PvE and PvP it’s only region-restricted, meaning people in Europe can play with everyone from Europe but not with someone from North America.
Since server populations change all the time, if you want to check each server’s current population follow this link to the official gw2wiki.

The Five races of Tyria. From left to right: Charr, Human, Norn, Asura, Sylvari
In Guild Wars 2, you can create up to 5 Characters if you have bought any version of the game, or up to 2 if you are free to play. Additional character slots can be bought later in game. There are 5 races to choose from:
Character race determines a set number of skills (6 race-specific skills to be exact). You can find those skills here. (note: racial skills are not usable in PvP) In addition, choice of race determines your personal story and starting point.
Then you may choose your character’s class (or as they call it in GW2, profession). There are 8 professions with a 9th added with the Heart of Thorns expansion:
You can check more info about all GW2 classes in our separate guide.
The game breaks down in three aspects. Player vs Environment (PvE), Player vs Player (PvP) and World vs World (Wvw). Let’s see what each one of them is about:

Your main aspect of the game. Everybody is friends here, no fights between players. You work together doing events, world bosses, dungeons, raiding, storyline etc, etc.

The PvP lobby
You guessed right. PvP in Guild Wars 2 is awesome for 2 main reasons: 1) You can play straight up from level 1. Gear is scaled in PvP so you can jump straight in, although I wouldn’t recommend it. 2) it’s basically 5vs5 Domination (for FPS gamers). 5 players versus 5 players, 3 points to hold, winner at 500 points.

This is where shit gets real and you play for the honor of your world (server). Each week you compete against 2 other worlds for who will hold most Camps, Keeps, Towers and Castles. Fights could rise between 50vs50 players so, if your system can’t handle it, I would recommend limiting the character models.
When you enter the game with your character, you must complete the tutorial (can’t be skipped) which is basically a very short story mission. After that you are free to move around the world as you like.
Tyria has a huge map which is broken down in areas (or zones). Each area has it’s own level range therefore any materials harvested or dropped are of a specific level.

The game has also two expansions so far. Heart of Thorns and Path of Fire. Both of these add major gameplay as well as a lot of new zones and I would recommend buying both of them to get the best experience of the game.
In order to “complete” a zone you will have to unlock all waypoints, visit every vista and point of interest, complete all skill points and tasks. Succesfully completing a zone will reward you with a chest that grants you experience among other goodies.

Waypoints is maybe the most important aspect of map completion as they will allow you to move instantly between zones, allowing you to get to world bosses and events much faster than walking. They need a small price to pay in gold, and they can become expensive if used very frequently. The further away a waypoint is the more gold you will need to pay. Travelling through waypoints within a city costs nothing.

Points of Interest (PoI for short) are the little squares you see on a map. They are placed in areas where there are important places to visit (much like sightseeing). In order to unlock them you must get as close to the square as possible. If it doesn’t unlock maybe the PoI is in another height or depth so don’t freak out.

Tasks are seen as Hearts in the map. They are like mini-quests that make you gather stuff or kill certain mobs, basically helping the local NPCs. Completing Tasks is important as they grant XP, Karma and unlock the corresponding Task Merchant who sometimes can sell stuff needed for Legendary items or Collections. Renown Hearts in the expansions are reset daily hence can be completed more than once.

Vistas are seen as red triangles in the map. When you get close they are lights with a map floating inside them. Visiting a vista and interacting will trigger a cutscence showing you a panoramic view of the surrounding area (as I said, sightseeing).

Another important aspect of Map Completion is doing hero points. They usually make you fight a Veteran mob or drink something (later on the expansions Hero Points may make you fight Champions) or just commune with a place of power. Upon completion, they grant you 1 hero point (10 in the expansion areas) which you use to train your character and unlock skills (see below).
This is what the interface looks like in game:

As you can see on the lower right corner we have the minimap, which you are gonna look at a lot. Note that you can change the position of the minimap.

At the center bottom of the HUD there is the skill bar. Skills are divided in two sections: the weapon skills and skills you take up from Traits and Training. Between is the Health Bar and the Endurance bars. Endurance is what is consumed in order to Dodge. On the far right is the icon of the mount currently equipped. Above the skills on the right are the boons (buffs) and conditions (debuffs).

On the upper right corner of the HUD we have the active storyline with a compass pointing you to the right direction.

Below the compass are the incomplete achievements that you highlighted in the Achievement Section (see below).

Bottom left corner lies the chat.

On the bottom of the screen is the Experience Bar.
![]()
Last but not least, on the upper left corner we have the shortcuts. In order from left to right:
![]()

While in combat, you won’t be able to change your skills or use waypoints. You will notice when you are not in combat cause your health will refill rapidly and you will be able to change skills.
Each enemy has a Health bar shown on top if you have targeted it. Enemies die when their health reach Zero.
Now the most important aspect of combat are boons (buffs) and conditions (debuffs):
Boons are buffs that grant you greater strength and help you in defeating your enemies (or help your enemies defeat you). They can be applied on both you and on enemies, so when enemies have boons they become stronger. The boons are as follows:
![]() Aegis: Blocks next incoming attack
Aegis: Blocks next incoming attack
![]() Alacrity: Skills recharge faster
Alacrity: Skills recharge faster
![]() Fury: Increases critical chance by 20%
Fury: Increases critical chance by 20%
![]() Might: Increases outgoing damage
Might: Increases outgoing damage
![]() Protection: Decreases incoming damage by 33%
Protection: Decreases incoming damage by 33%
![]() Quickness: Skills and actions are faster
Quickness: Skills and actions are faster
![]() Regeneration: Gain health every second
Regeneration: Gain health every second
![]() Resistance: Conditions currently on you are ineffective
Resistance: Conditions currently on you are ineffective
![]() Retaliation: Reflect incoming damage back to its source
Retaliation: Reflect incoming damage back to its source
![]() Stability: Cannot be knocked down, pushed back, pulled, launched, stunned, dazed, feared, taunted, sunk or floated.
Stability: Cannot be knocked down, pushed back, pulled, launched, stunned, dazed, feared, taunted, sunk or floated.
![]() Swiftness: Increases movement speed by 33%
Swiftness: Increases movement speed by 33%
![]() Vigor: Increases Endurance regeneration by 50%
Vigor: Increases Endurance regeneration by 50%
Conditions are the counterpart of boons. They can be applied by players on enemies to damage them, or they can be applied by enemies on players for the same purpose. The damage you do with conditions can be increased by having more Condition Damage and their duration with Expertise. Conditions are as follows:
![]() Burning: Deals damage every second
Burning: Deals damage every second
![]() Bleeding: Deals damage every second
Bleeding: Deals damage every second
![]() Confusion: Damage is received on skill activation
Confusion: Damage is received on skill activation
![]() Poison: Deals damage every second, decreases healing effects by 33%
Poison: Deals damage every second, decreases healing effects by 33%
![]() Torment: Deals damage every second, deals additional damage to moving foes.
Torment: Deals damage every second, deals additional damage to moving foes.
![]() Blind: Next outgoing attack misses
Blind: Next outgoing attack misses
![]() Chill: Movement Speed decreased by 66%, cooldown increased by 66%
Chill: Movement Speed decreased by 66%, cooldown increased by 66%
![]() Cripple: Movement Speed decreased by 50%
Cripple: Movement Speed decreased by 50%
![]() Fear: Involuntary retreat, unable to act
Fear: Involuntary retreat, unable to act
![]() Immobilize: Unable to move
Immobilize: Unable to move
![]() Slow: Skills and actions are slower
Slow: Skills and actions are slower
![]() Taunt: Involuntarily attack foes
Taunt: Involuntarily attack foes
![]() Weakness: Endurance regeneration decreased by 50%, 50% of hits are glancing blows (50% damage).
Weakness: Endurance regeneration decreased by 50%, 50% of hits are glancing blows (50% damage).
![]() Vulnerability: Damage and condition damage taken is increased.
Vulnerability: Damage and condition damage taken is increased.
Conditions ignore armor and other effects that reduce damage, like Protection. That’s what separates them from direct damage. They are dealt in 1 second intervals.
You may notice some numbers on some boons and conditions. Those numbers represent how many stacks a boon has. While might and stability stack intensity, the rest stack duration. The more you apply, the more they stack.
Always pay attention on your boons and conditions, as they are very important for your survivability and outgoing damage.
The yellow bar above your health is your Endurance. This bar affects your dodges. To perform a dodge you will have to consume one of the two bars of Endurance. To dodge you must have at least one endurance bar full.
Dodging will get you throw most attacks. Some skills will also allow you to dodge attacks without consuming your Endurance. Dodging is a key element to surviving.
One of the most important aspects of the combat is the defiance bar. The Defiance bar is seen usually in Champion and Legendary enemis, but some Elite and Veterans have a defiance bar as well. You can see the bar right beneath the enemies’ health bar. Breaking the defiance bar is of major importance for killing bosses in events, dungeons, fractals etc.
![]()
![]()
While the defiance bar is up, it’s color will be teal like the image above. That means that the enemy is immune to crowd control skills, soft (like blind and cripple) or hard (like knockbacks, pulls). While soft crowd control skills deal damage over time to the Defiance Bar, hard crowd control skills deal instant damage.
Soft crowd control are as follows:
![]() Fear
Fear
![]() Taunt
Taunt
![]() Immobilize
Immobilize
![]() Slow
Slow
![]() Chill
Chill
![]() Blind
Blind
![]() Weakness
Weakness
![]() Cripple
Cripple
Hard crowd control are as follows:
![]() Daze
Daze
![]() Float
Float
![]() Knockback
Knockback
![]() Knockdown
Knockdown
![]() Launch
Launch
![]() Pull
Pull
![]() Stun
Stun
Petrified
Transform
Freeze
Ward
Generally hard crowd control skills are used to break the Defiance Bar faster. If the Defiance Bar is not affected for a while it usually starts to Regenerate.
![]()
![]()
This is what the defiance bar looks like when it’s broken. The brown bar will slowly start to regenerate and when it reaches maximum it will become teal again and will be able to be damaged again.
The important thing that happens when the Defiance Bar is broken is that the enemies action is interrupted and some crowd control is usually applied:
![]() Stun
Stun
![]() Knockdown
Knockdown
![]() Exposed (takes 50% additional damage for 5 seconds)
Exposed (takes 50% additional damage for 5 seconds)
Some mobs have special conditions that happen when their defiance bar is broken. It’s very important to break the Defiance Bars of enemies, not only because of the increased damage they take, but some can even wipe the entire party if their Defiance Bar is not broken in time.
![]()
![]()
When the Defiance Bar looks like this, it means that it’s “locked” and enemy is currently immune to every crowd control.

When your health reaches Zero, you will enter Last Stand (or “downed”) mode, where you will be able to throw some projectiles or try to recover your health. Each profession has also some special ability when in downed mode.
If an enemy you have damaged is killed, then you will instantly Rally, and will be back on your feet. You will also be able to Rally if you are revived by your fellow players or manage to recover enough health with skill No. 4. If the health bar reaches zero, you die and revive will be much harder and time consuming.

Attributes are basically your stats. The more they increase, the more their effectiveness increases. Attributes are devided in categories:
Let’s take a look at what each one does:
![]() Power: Increases outgoing direct damage
Power: Increases outgoing direct damage
![]() Precision: Increases critical change
Precision: Increases critical change
![]() Toughness: Increases Armor
Toughness: Increases Armor
![]() Vitality: Increases Health
Vitality: Increases Health
![]() Concentration: Increases Boon Duration
Concentration: Increases Boon Duration
![]() Condition Damage: Increases damage done by conditions
Condition Damage: Increases damage done by conditions
![]() Expertise: Increases Condition Duration
Expertise: Increases Condition Duration
![]() Ferocity: Increases Critical Damage
Ferocity: Increases Critical Damage
![]() Healing Power: Increases all outgoing healing your character does
Healing Power: Increases all outgoing healing your character does
![]() Armor: Decreases incoming direct damage. Increased by Toughness and Defense.
Armor: Decreases incoming direct damage. Increased by Toughness and Defense.
![]() Boon Duration: Increases the duration of Boons. Increased by Concentration.
Boon Duration: Increases the duration of Boons. Increased by Concentration.
![]() Critical Chance: Increases critical hit chance. Increased by Precision.
Critical Chance: Increases critical hit chance. Increased by Precision.
![]() Critical Damage: Increases critical hit damage. Increased by Ferocity.
Critical Damage: Increases critical hit damage. Increased by Ferocity.
![]() Condition Duration: Increases duration of applied conditions. Increased by Expertise.
Condition Duration: Increases duration of applied conditions. Increased by Expertise.
![]() Health: The character’s maximum health. Affected by profession and Vitality.
Health: The character’s maximum health. Affected by profession and Vitality.
There are also attributes specific to professions. They do not increase by armor or weapons or boons. They can only be increased by traits. Each profession (except Revenant) has one specific Profession Attribute:
![]() Attunement Recharge Rate: Reduces the recharge of the four elemental attunements.
Attunement Recharge Rate: Reduces the recharge of the four elemental attunements.
![]() Tool Belt Recharge Rate: Reduces the recharge on all toolbet skills.
Tool Belt Recharge Rate: Reduces the recharge on all toolbet skills.
![]() Virtue Recharge Rate: Reduces the recharge on Virtues.
Virtue Recharge Rate: Reduces the recharge on Virtues.
![]() Shatter Skill Recharge Rate: Reduces the recharge on all Shatter skills.
Shatter Skill Recharge Rate: Reduces the recharge on all Shatter skills.
![]() Life Force Pool: Increases the size of the necromancer’s life force pool.
Life Force Pool: Increases the size of the necromancer’s life force pool.
![]() Pet Attribute Bonus: Improves pet attributes.
Pet Attribute Bonus: Improves pet attributes.
![]() Steal Recharge Rate: Reduces the recharge of the steal ability.
Steal Recharge Rate: Reduces the recharge of the steal ability.
![]() Burst Recharge: Reduces the recharge of Warrior’s burst skills.
Burst Recharge: Reduces the recharge of Warrior’s burst skills.
In the hero panel (pressing H in the default control settings) you will be able to manage your characters as well as see achievements and masteries etc. Here is a breakdown of the hero panel:

Here you can see and change your equipment as well as see your Attributes (stats). It’s the most convenient panel you can use when you want to compare armor and weapons, as you get a filtered list of all the equippable items in your inventory on the left side.

In this section you can see which skills you have unlocked through training and equip them, as well as choose your specializations, which are passives that your character has unlocked through the training section.

Training is required to unlock skills that you equip in the build section. In order to train, you spend Hero Points that you gain through map completion, and which you can identify by the Training icon in every area. Don’t strain too hard on what to train, since there will be enough HP to train everything.

In the Story Journal you can see the complete (or not) parts of the storyline.

Here you can see the crafts that your character has leveled up. Note that each character can have up to two active crafting disciplines. Additional discipline licences can be bought from the Gem Store, but I wouldn’t recommend it unless you have gold (or money) for waste (since you can have 5 characters with the default version of the game. More than enough to have all disciplines active between characters).
In order to craft you have to go to the corresponding crafting station, and the process depends on the discipline. Note that you can use the materials stored in your Collectibles inventory once in a crafting station, without having to withdraw anything from the bank.

In the achievement panel you can see your completed (or not) achievements. You can also see the log-in rewards that you have and the ones that will come (resets after the last chest). Also in the lowest Summary section you can see your account bonuses:
One important aspect of achievements are the daily ones. There are 4 daily achievements for each aspect of the game (PvE, PvP and WvW). Completing ANY 3 daily achievements will reward you with 2 gold and 10 Achievement Points. Completing 3 dailies will not take much of your time and can reward you in many ways.
First of all 2 gold a day for basically nothing is not bad. It’s 60 extra gold per month folks! More importantly you gain 10 AP every day. Achievement points are important because they award you with great prizes over time. For example every 5.000 AP you gain 400 Gems among other huge amounts of gold and bonuses.
Even if you are not an achievement hunter I would advise to at least do the daily achievements every single day. You won’t regret it.

Masteries are unlocked when you buy the Heart of Thorns expansion and reach level 80 on a character. They are account-wide, so whenever you reach level 80 with any character, masteries will carry over.
Central Tyria: XP gained in every area except Heart of Thorns areas (includes Living World Season 3 areas) and Path of Fire ares (includes Living World Season 4 areas) will advance the Central Tyria masteries. These masteries focus on legendary crafting and bonuses in Cities and Fractals
Heart of Thorns: XP gained in areas unlocked with the Heart of Thorns expansion (including areas from Living World Season 3) will advance the heart of thorns masteries. These masteries focus on Gliding and boons and passives that help you in those specific maps.
Path of Fire: XP gained in areas unlocked with the Path of Fire expansion (including areas from Living World Season 4) will advance the Path of Fire masteries. These masteries focus on Mounts and passives that help you navigate these specific areas.
In order to unlock a Mastery you have to farm the necessary experience as well as use the necessary Mastery Points. Mastery Points are found in the storylines as well as achievements and lying in the world.

Level cap in Guild Wars 2 is 80. After you reach level 80, every level gained grants you one spirit shard (a token for buying stuff from the Mystic Forge). If you have purchased the first expansion, Heart of Thorns, after level 80, any XP you earn goes into Masteries (see above).
Your main goal as you start the game is to reach the level cap. You can do it however you like. Almost everything gives you XP in the game, from Events to Map Completion and Crafting. Playing through the storyline also gives you a good amount of XP plus you get the privilege of seeing the amazing story that Guild Wars 2 gives.

My personal recommendation is doing a little bit of everything. Map completion will be mandatory for the endgame since you will need to go to almost all areas of the game for events, scavenger hunts for Legendary weapons and armor etc. At this point don’t worry about weapons and armor, just use the best you get from loot and rewards.
This is your first major step in the game. Up until you hit level 80, you are gonna be learning to find your way around. At this point I would recommend NOT doing Dungeons until you hit level 80. The first Dungeon unlocks at level 35, but people in LFG (looking for group) are generally hostile towards non-80 level players, and tend to kick them from the group.
However, people in the /map channel are way friendlier and helpful, so it shouldn’t be hard to get a group of lower level players and clear a dungeon.
So doing a little bit of story, a little bit of events you may come across and map completion should get you to 80 in a good amount of time. After level 80 is where the endgame begins and the race for fully gearing up your character begins.
In Guild Wars 2 you can gather 3 types of materials from the world:
Metal (uses Mining Pick)

Mining a Mithril Ore node
Wood (uses Logging Axe)

Logging an Ancient Wood node
Herbs and Plants (uses Harvesting Sickle)

Gathering Leeks
Every area has it’s own level, therefore they have their own material type. So going from area to area you may gather different materials. Highest type of materials doesn’t always mean more expensive though, as prices in TP change constantly, so be sure to gather as much as you can.
Each type of gathering tool has it’s own use count, meaning that when it drops to zero you have to change it. Gathering tools are sold at almost all merchants around the world. If you find it tiring to change gathering tools every once and a while you can buy Unlimited Use ones from the Gem Store. In time you may find it a convenient buy.
 Dungeons / Fractals / Raids
Guild Wars 2 like any MMO that respects itself has it’s own set of Dungeons and Raids. They are mostly what you know from other MMOs but let’s take a closer look.

Dungeons can be found by finding the Gate icon on the map. There are 8 dungeons in Guild Wars 2:
As you can notice in the image above, dungeons have 2 modes. Explorable and story. Story mode is for a bit lower levels and is basically the quest of the Dungeon. Explorable mode on the other side is what you do when you go dungeoning. In most dungeons there are paths that you take, which you choose through voting at a certain point in the dungeon.
Completing all paths in all dungeons will reward you with achievements. In order to find people for dungeons, you may write on the chat with /map if you are at the dungeon zone or just use LFG (pressing Y on the default controls). In order to enter a dungeon you must be a group of 5 people (unless you are THAT good to make it with less people).
Each dungeon has it’s own currency which can be used to buy dungeon-specific weapons and therefore unlock their skins. An article dedicated to all currencies will soon be published so make sure to check in often!
Although you unlock dungeons quite early my recommendation would be to completely ignore them until you reach level 80 and equip yourself with exotic gear at least. That is because people dungeoning through the LFG will almost always ask for people of level 80.
Now in case you have friends or a guild that can support you in the dungeon without being toxic give it a go! You will level up in no time.

Fractals are level 80 dungeons for groups of 5 that have their own unique mechanics and strategies as well as debuffs. One thing that makes fractals unique is Agony. Agony is a debuff that chunks away your life every second unless you have Agony Resistance equipped.
Agony Resistance can be equipped only on Ascended Gear (final level) so in order to go up the ranks in fractals you will have to craft endgame gear. The higher the level of the fractal, the more Agony Resistance is required to survive, with a maximum of 150 Agony Resistance to reduce damage taken per tick to a minimum of 1%.

Raids are unlocked with the Heart of Thorns or Path of Fire expansion. They require 10-man squads, specific professions and builds and are currently the hardest aspect of the game to learn and master.
Their loot though, is immense. Needless to say in order to raid you need full endgame gear, training and most likely a guild.

Time to socialize. I mean what’s the point of playing an MMO alone? Go out there and find a guild. The bigger the guild, the better the rewards of being in one. For example Guild Missions.
Guild Missions will reward you with Guild Commedations that can be used to buy even Ascended Gear. People in GW2 PvE tend to be very friendly, so go out there, find a guild and they will most likely help you understand the mechanics of the game better.

In Guild Wars 2, gear is broken down in 3 main aspects: Armor, Weapons and Trinkets. Let’s have a breakdown of each one of them:
Armor is divided in 3 weight: Light, Medium and Heavy. Here is a list of the professions that utilize each weight
Obviously each armor weight has different value in defense.
Armor breaks down in 6 pieces:
Whenever you get downed or die in the game your armor will take damage too. When that happens you will see an orange shield icon under your Health Bar. That’s when you will need to find an armor repair anvil to repair your armor. It looks something like this:

For some years now it’s free to repair your armor so no worries about costs there!
Each profession can have up to 2 weapon sets and swap between them during combat, with a 9 second cooldown in swapping. Weapons are divided in 3 main types: Main Hand, Off-Hand and Aquatic weapons.
Main Hand is the basic weapon, taking up 3 of the 5 skills if it’s One-Handed or all 5 if it’s Two-Handed. Having a Two-Handed weapon negates the Off-Hand.
Off-Hand is the weapon that takes the last 2 skill spots if you are using a One-Handed as Main Hand.
Aquatic are the weapons used underwater.
Trinkets are armor-like jewels that you equip giving you more stats. They are divided in 4 types:
Some trinkets have the “Unique” trait. Being “Unique” means that you can’t equip the same trinket twice. For example if you have 2 same Rings that are unique you can’t equip both of them.
Now let’s break down the rarity-quality of the gear, from worse to best:
Please note that Ascended and Legendary gear has no difference in stats. Legendary has the bonus of having unique skins as well as having the top-tier stats with Ascended items.

In Guild Wars 2, by Prefixes we mean the set of specific stats that a piece of gear gives to the player. For example Berserker gear gives +Power, +Precision, +Ferocity. Assassin gear also gives the same stats but with more focus on +Precision. Getting the right prefix for your character is the endgame goal in order to maximize your DPS or Support capabilities. We will talk about prefixes in another article dedicated to Endgame Gear.
One of the things people wanted in Guild Wars 2 originally were mounts. It was a much missed element in the game. Fortunately arenanet has added mounts. Unfortunately you will need the second expansion, Path of Fire, in order to unlock them. So far, 8 different mounts have been introduced in the game, all with different factions and uses.

The raptor has the ability to jump great distances and can be used in order to traverse areas quickly and if I may add, in style.

This cute bunny that has the voice of a goat, can actually be used in order to jump very high, being useful in climbing mounts and similar areas.

Personally my favourite mount, the skimmer hovers above ground, with its speed greatly increased if you hover over water.

The jackal is a sand hound equipped with glowing runes, that has the ability to teleport short distances and also go through sand portals to teleport even further.

Ah finally the classic grif… NOPE. This birdie is not the classic griffon cause it doesn’t actually fly wherever you want. Instead you can look at it as an advanced glider, being able to fly on the same level it started, meaning it can’t go higher. Still it’s a griffon though.

The newest addition to the game, added with the Long Live The Lich episode of Living World Season 4, it can use it’s ability to amount great speed and it can also drift. Yeah it’s a drifting beetle, what else do you need to know?

The Warclaw was released as the first WvW mount. Its skills include finishing downed foes and damaging gates. The Warclaws full potential is unlocked only in World vs World, but it can still be used in PvE.
Skyscale was released with Living World Season 4 Episode 6, War Eternal. It can gain altitude for a bit as well as hover in the air and attach on walls. Obtaining it will require access to all Living World Season 4 maps and it will be quite a grind. Good luck!

The game offers 9 different disciplines for crafting:
In order to acquire Ascended endgame gear, you will have to max out each discipline that your character utilizes. Note that each character can have up to 2 active disciplines, with the ability to buy more from the Gem Store.

Your bank is one place you are gonna be spending a lot of time. You start off with 30 slot bank space but you can buy more with gems from the Gem Store.

In your bank, also lies the material storage. In this you will be able to drop every crafting material you find, up to a stack of 250 (or more if you buy the coresponding upgrade from the gem store).

Also in the bank section you will find the Wardrobe, which shows you every skin that you have unlocked. Skins are unlocked by either binding an item to your character or by salvaging it.

Welcome to Guild Wars 2 Auction House. Here you will be able to buy and sell anything that isn’t Character or Account bound. You may also buy Legendary items from the TP! You are also gonna be spending a lot of time here, for buying materials to gear.
In the TP, you may place an order for an item, or buy it straight up from the lowest seller. Similarily you can place a sell order or sell to the highest paying customer straight away

In the Gem Store you use the currency of Gems. Gems can be aqcuired in 3 ways:

In the Gem Store you can buy from account upgrades like more bank space or more character slots, to outfits and cosmetic items. You can also find boosters for more XP or Magic Find. Be sure to check the gem store often as many times ArenaNet puts on sales!
Here’s some tips that might help new players in saving some gold and make their life easier in the game.

As you can see in the screenshot above, there’s a “Deposit All Materials” button in your inventory. Pressing it will automatically send all materials that can be deposited in the Material Storage of the bank there. You may think “how is this a tip?”. I’ve been playing Guild Wars 2 for 5 years now, and found out about that after 3 years of playing, so yeah, don’t be me.

Do you have problems in World Bosses and WvW, where hoards of players are at a place all together and your PC can’t handle that much? Try lowering these two settings. You will see less character models, but you will see their names, making your fps not completely drop and the game run smoother.

Entering PvP lobby is free. That means you can use its merchants, banks and trading post easily since they are very close one to another hence it will save you time from running around.

Frequently using waypoints might cost you a good amount of gold. If you want to travel to Lion’s Arch, the main city that you will probably spend most of your time, you can always go to one of the WvW realms and use the portal like the one on the above screenshot in order to travel to LA for free!

www.gw2efficiency.com is an amazing website that tell you all about your account. I can’t write everything down here, but it’s a very useful tool used for almost everything. I suggest that you link your account and start figuring out the website, as it will help you greatly in your journey.
Guild Wars 2 manages to keep interesting stock in the Black Lion Trading, while keeping the game far from Pay 2 Win, and closer to Pay 4 Convenience.
With a large selection of cosmetic items for appearance addicts, there is also a great variety of account upgrades, or helpful items.
Below, I am going to list the ones I find to be the best value / money when it comes to convenience, and getting the most out of the game.

If you were planning to buy the single best item from the store, this is the one! I advise you to think carefully which character will get the Inventory Expansion though, it makes sense to redeem it in your main character, or bank alt.

This is one of the best items you can get for your gems, since it’s a huge convenience, especially when coupled with a shared inventory slot (so that all your characters can use the item). It provides the same rates with Basic Salvage Kits (10% chance of rarer materials & 20% chance of recovering upgrades).
You can find it for 560 gems when it’s on sale, and it will show up with the Silver-Fed Salvage-o-Matic on the store as well, which goes for 350 gems (down from 500), and gives the same rates with Mystic & Master Salvage Kits (25% chance of rarer materials & 80% chance of recovering upgrades). Copper-fed Salvage-o-matic is worth only if you buy it with real money. Converging gold to gems will be much more expensive than using the basic salvage kits.
Have any questions regarding any aspect of the game? Feel free to adress them in the comment section below and we will get back to you as soon as possible. Welcome to Guild Wars 2, have fun!
|
|
Geowulf
Metalhead with OCD. Avid trophy / achievement hunter. Sony fanboy. Bass player and good-story lover. Most likely to be found on Guild Wars 2 unable to decide what to do next.
|

I am very new to the game and your beginners guide is very, very helpful. Great job and thank you for taking ur tIme in making it.
You are most welcome! Thank you for the feedback 🙂
I love this game and your post is very useful. It is the only video game my entire family can enjoy together. Massive world exploring, optional story if you want, but are not required to play. Lots of events, and I love the ‘fight for your life’ aspect when you run out of health. Unique character races, mounts are awesome (if a bit hard to get the hang of at first). No monthly fee to play, but i buy things with real cash to get some of the great items. It takes a while to get all the materials to craft it, but that is part of the challenge that keeps me playing.
Thanks for the feedback Jerry! Indeed Guild Wars 2 has one of the best models for new players and is very appealing to both casual and hardcore players! Cheers! 🙂
This is by far the best guide that I have found. Confusion is the name of the game as a new player of both GW2 and MMOs in general. This really helped clear things up, thanks!
Are you still planning on doing a guide on end game gear and such? I’ve completed the base game, started on the story for HoTand want to know how to go about structuring myself so i don’t get overwhelmed trying to manage building some ascended/legendary gear. should i just plow through the story of HoT and PoF and just enjoy myself as best i can, then when i’ve got more masteries, then begin to deal with End game gear, or should i be focused on it at the same time D: I’ve just come back to Gw2 after a 6 month hiatus, and my brain needs rebooting
Any advice would be greatly appreciated, i need some direction before i lose my enthusiasm to play!
Greetings! I apologize for the late answer.
I’m currently away on business hence why I haven’t made an endgame guide yet, but rest assured I intend to.
The way I went about it was to first level the discipline of my main character to 500 (eg. if you play Warrior, level up Armorsmith to 500). This way you will be able to start crafting Ascended gear. This will enable you to move further into Fractals by equipping your Ascended gear with Agony Resistance. Higher fractals = more frequent ascended drops and loot. Just by fully gearing my Warrior I managed to fully gear 4 more characters just by playing fractals alone.
For expansion content you don’t need Ascended gear, Exotic will do just fine while you go for your full upgrade.
So TL;DR play the content of the expansions while simultaneously crafting your Ascended gear step by step.
Sidenote: Legendary has the same stats as ascended gear sided with exclusive looks and the ability to change the stats of the gear. Feel free to go for any legendary if you want but you will find it will take off resources and time off your Ascended crafting. Hope it helps!
do you need both the copper and silver fed salvage-o-matics? or can you buy just the silver and use it for both basic mystic and master?
The difference between the two is the chance for more rare materials and the cost per use. My personal opinion is to use the copper one, as it has a small cost-per-use.
You can check even more information about useful gem store items, in our relevant guide! https://altarofgaming.com/guild-wars-2-gem-store-items-worth-or-not/
AWesome!! So grateful for this, now level 10 as a noob , you answered so many questions!! THANKS a milllion times! Rachel from Canada
Tons of usefulness brought to my eyes! You will make my adventure now easier! 😉
Very useful and written to the point. Thanks 😉
as a long standing vet in Gw2, I highly recommend this website for any player, be they new or veteran. very well thought out and detail oriented. as a side note, i go into the same detail on my youtube channel through a let’s play of a norn thief.
impressive article!!
Exactly what I believe about new players.
A casual guild is always the reasons you said, like fun etc – If a gamer wants to try hard he is going to follow the lecturing way of course!
Thank you for the explanation, I really look forward to your next guides!
Cheers’
I’m playing Guild Wars 2 for years and this is a very useful guide for a beginner but, also for a veteran like me to get a reminder not to spend my Gems on unnecessary items!
It’s a very understandable article exactly on the point, having everything a newcomer will need to start the right way and not to feel lost in such a huge & endless game like this one.
Thank you Geowulf for your great work and for your time, keep up the great work!
I have one question though, what is your opinion about what kind of Guild should a newcomer join so he won’t feel any stress about their schedule?
P.S. Keep it old school guys, Power Builds in PvP gonna give you muscle fingers. You will remember me 😉
Cheers’
Thank you! 🙂
Now to answer your question about the guild. Being in a guild with schedule and specific conditions might be a bit overwhelming for a newcomer. Then again, if you have similar experiences from other MMOs you could give it a try. But speaking from my own experience I’d search for a casual guild – nothing too serious, nothing too lazy.
Let’s also not forget that you can join up to 5 guilds simultaneously, so you can have a bit of everything. It’s also important to note, that guilds who require you to follow a schedule, are usually prone to lecturing – definitely a bad experience for a new player. Generally, some guilds are what we call “elitists”. Again, I would avoid and join a casual guild. Out of all the guilds I’ve joined I had the most fun with the casual ones. That’s the point anyway 🙂 I hope I covered your question, and thanks again for your kind words!